Page 10 ?)+('-71;%7/:(K*-&'%);&L(2:-/&-(7/::(#MNNNMN!!MOPQP4 Item 64416
BC?9DR ST9>CDFSH GCFHD9HCHU9B9DIT
S2-+/'%;6(F;&'+*7'%);&
(>-/<('1-(9HDF>9(FGTS>DCHD(BC?9DR(FH?S>GCDFSH(&-7'%);(/'('1-(.-6%;;%;6()5('1%&(
8/;*/:(%;7:*<%;6(/::('-]'(*;<-+(&*.1-/<%;6&('1-+-%;(.-5)+-(&-'(*2()+(*&-()5('1%&(2+)<*7'4
F;&2-7'(')):(.-5)+-(*&-L(:))\%;6(5)+(</8/6-<L(:))&-L(/;<(8%&&%;6(2/+'&4((
F5(/;A(2+).:-8&(/+-(5)*;<L(<)(;)'(*&-(')):(*;'%:(+-2/%+-<4
D)):(B-'(I2
DS(T>9$9HD(B9>FSIB(FH[I>R(?>SG(CUUFY9HDCJ(ST9>CDFSH0(
D*+;()55('1-(')):L(<-'/71('1-(/%+(&*22:AL(&/5-:A(<%&71/+6-(/;A(+-&%<*/:(/%+(2+-&&*+-(
%;('1-(')):L(/;<(+-:-/&-('1-('1+)'':-(/;<3)+('*+;('1-(&,%'71(')(%'&()55(2)&%'%);(.-5)+-(
2-+5)+8%;6(/;A(%;&2-7'%);L(8/%;'-;/;7-L()+(7:-/;%;6(2+)7-<*+-&4
DS(T>9$9HD(B9>FSIB(FH[I>R0(
Y)(;)'(/<@*&'()+('/82-+(,%'1(/;A(7);'+):()+(7)82);-;'(%;(/(,/A(;)'(&2-7%5%7/::A(-]2:/%;-<(,%'1%;(
'1%&(8/;*/:4((F82+)2-+(/<@*&'8-;'(7/;(+-&*:'(%;(')):(5/%:*+-()+()'1-+(&-+%)*&(1/`/+<&4
V)+\2%-7-(/;<(V)+\(C+-/(B-'(I2
1� Designate a work area that is clean and well-lit�
The work area must not allow access by children
or pets to prevent distraction and injury�
2� Route the air hose along a safe route to reach
the work area without creating a tripping hazard
or exposing the hose to possible damage�
The hose must be long enough to reach
the work area with enough extra length to
allow free movement while working�
3� Secure loose workpieces using a vise or clamps
(not included) to prevent movement while working�
4� There must not be hazardous objects
(such as utility lines or foreign objects) nearby
that will present a hazard while working�
5� Disconnect the air supply when replacing the
sand paper or backing pad� Replace the PSA
sandpaper disc with the grit of choice�
6� The6″diameterPressure-SensitiveAdhesive(PSA)
sandpaper discs attach to the Backing Pad, just
press the sanding disc onto the Backing Pad� The
PSA sanding discs are standard and sold separately�
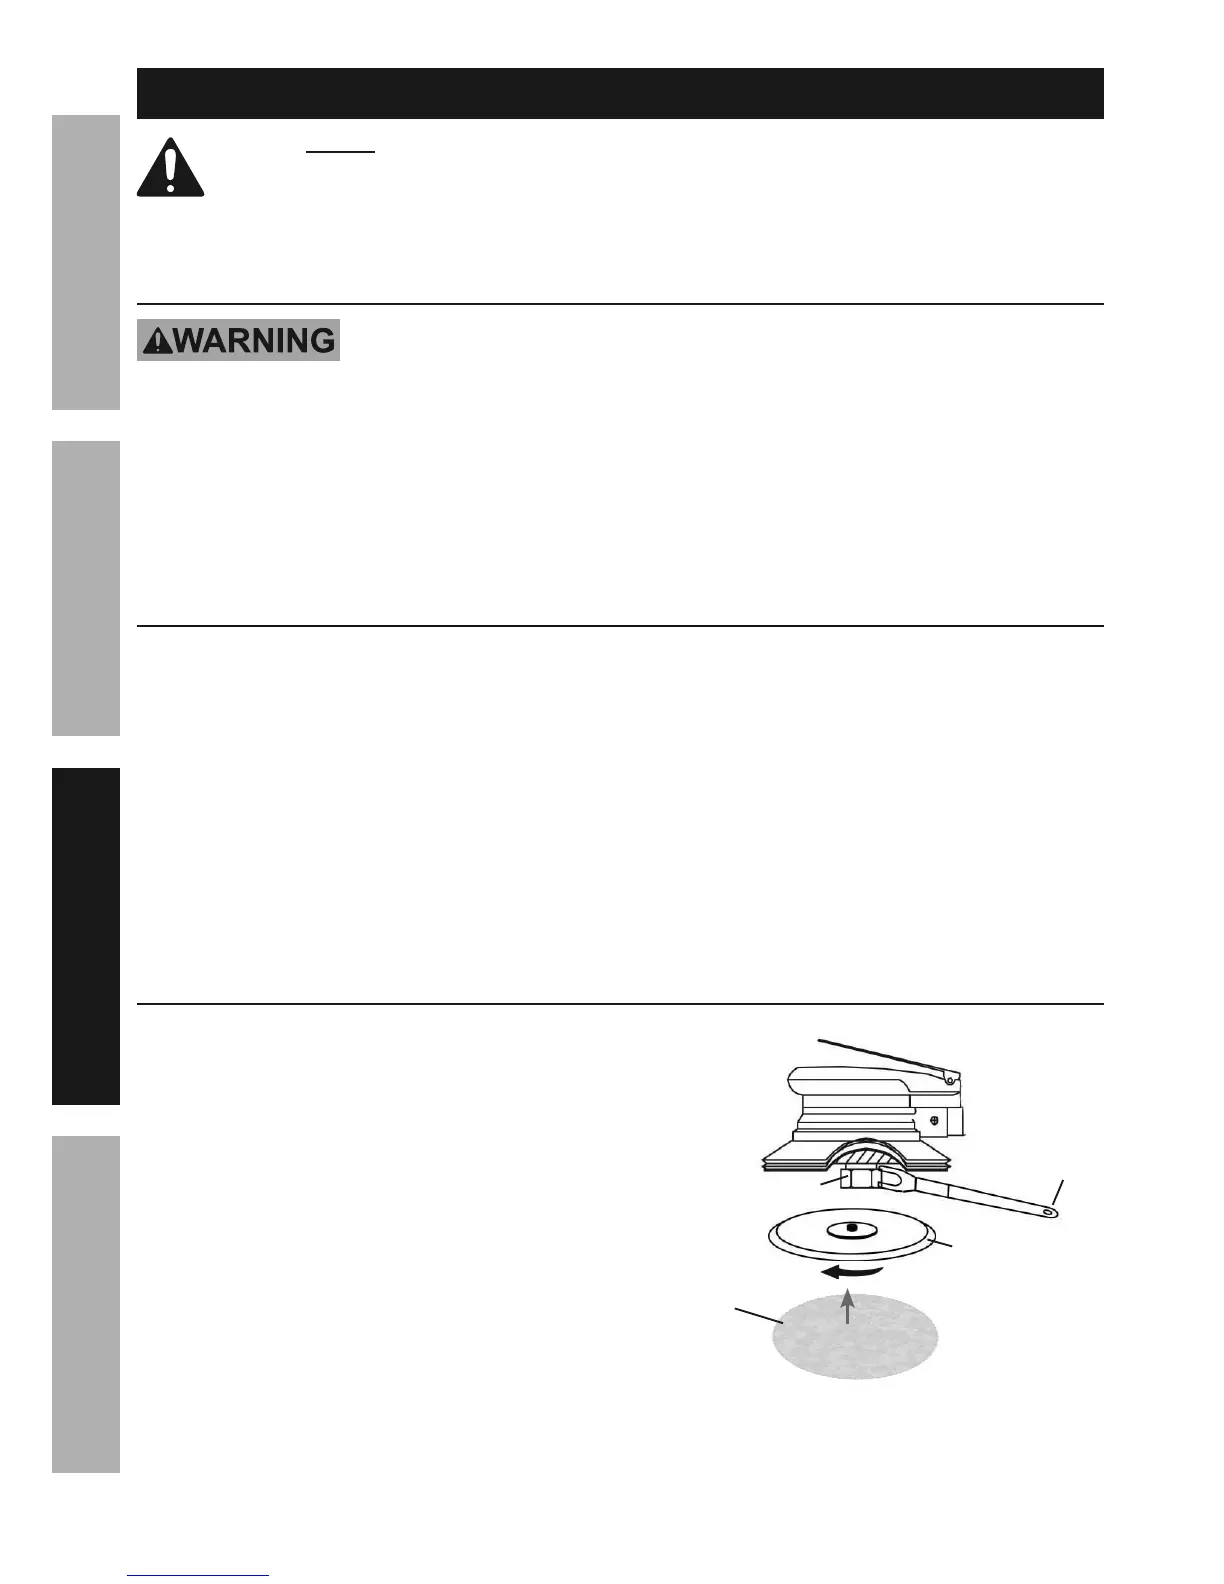
F;&'/::%;6(X/7\%;6(T/<(/;<(B/;<%;6(Y%&7
1� Remove air supply from the Palm Sander�
2� Connectthe6″BackingPadbythreadingit
clockwise onto the Shaft of the Palm Sander until
tight� Use the Wrench to hold the Shaft in place�
3� Connect the Pressure-Sensitive Sanding Disc
to the face of the backing pad by pressing
it firmly in place� Use only 6″ diameter
T+-&&*+-MB-;&%'%^-(B/;<%;6(fTBCg(<%&7&4
Backing Pad
Sanding Disc
Shaft
Wrench
?%6*+-(U
 Loading...