2. Insert the gray square
end of the test strip
into test strip port on
the meter.
3. The meter will turn on and a test strip with
a flashing blood drop will appear on your
meter display letting you know the meter is
ready to test.
4. Remove the endcap
from the M
ICROLET
®
2
lancing device.
5. Loosen the round
protective cap on a lancet
by rotating it ¼ turn, but
do not remove it.
1. Always wash your hands well with soap
and water before and after handling the
meter, lancing device, or test strips.
Getting Ready to Test
See your CONTOUR
®
NEXT EZ
User Guide and MICROLET
®
2 insert
for complete instructions.
1. Hold the lancing
device with your thumb
on the grip indent and
the endcap as shown.
Gently snap off the
endcap.
Removing the used lancet
Need Help? 1-800-348-8100
(available 24 hours a day, 7 days a week)
www.bayercontour.com
2. Place the round
protective lancet cap
on a flat surface with
the Bayer logo facing
down.
3. With the used lancet
still in the lancing
device, push the lancet
needle completely into the middle of the
exposed side of the cap.
4. Eject the lancet into a container following
the instructions in your lancing device insert.
5. Replace the endcap.
6. Insert the lancet
firmly until it comes to
a complete stop and
re-sets the device.
Basic Testing
®
CAUTION: The CONTOUR
®
NEXT EZ meter
and MICROLET
®
2 lancing device are
intended for use by a single patient.
4. Your result is displayed
after a 5 second
countdown.
5. To turn your meter off,
remove the test strip.
Dispose of the test strip
as medical waste.
7. Twist off the lancet cap.
Getting the Blood Drop
1. Press the endcap
firmly against the
fingertip and press the
blue release button with
your thumb.
2. Stroke your hand and finger towards the
puncture site to form a drop of blood.
1. Use only C
ONTOUR
®
NEXT
test strips with the
C
ONTOUR
®
NEXT EZ meter.
2. Touch the tip of the test
strip to the drop of blood.
The blood is pulled into
the test strip.
3. Hold the strip in the
blood drop until the
meter beeps.
9. Adjust the endcap dial
to your preferred puncture
depth setting.
8. Replace the endcap
prior to getting your
blood drop.
Testing Your Blood
Fingertip
Testing
QUICK REFERENCE GUIDE
Blood Glucose
Monitoring System
Use only the
C
ONTOUR
®
NEXT Test Strip
Gray Square End:
Insert this end into the
test strip port.
Sample Tip:
Blood sample pulled in here.
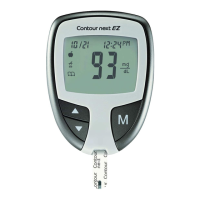
Your CONTOUR
®
NEXT EZ Meter
Display
Memory
Button
(On/Off,
Memory
Recall, Enter)
Up/Down
Scroll
Buttons
Test Strip
Port
83791935_CntrNex tEZ_QRG_EN _FpBp_v1
02/21/12 07:07 AM1-6
DATE:
CLIENT:
DESCRIPTION:
SCHAWK JOB#:
SKU#:
DIMENSIONS:
PRINTER SPEC:
RELEASE: V-1
LANGUAGE(S):
ENGLISH
INTERNAL: R-X
18211 NE 68th Street, E120
Redmond, WA 98052
T: 425-881-5454
BAN#: 83791935 Rev. 02/12
Contour NEXT EZ QRG - US
Alt#1 - 02/21/12 copy changes
February 21, 2012
Bayer HealthCare
Contour NEXT EZ QRG - US
English
908188
7252, 7253, 9628, 9629
4.0” (H) x 16.5” (W)
PQRG0495 REV A
FONTS:
HelveticaNeueRed, Helvetica, Zapf Dingbats
COLORS:
Cyan Magenta Yellow Black
NOTE: THIS COLOR PROOF INDICATES COLOR BREAK ONLY AND MAY NOT ACCURATELY REFLECT ACTUAL PRODUCTION COLOR.
Regional Master Template No: M-QRG-0209 R0002
Clinical Trial / Global Master Template No: XXXX
FC: 12mm BC: 7.5mm
Footer: N/A
1/3rd of Cross clear
space has been applied
7mm min.