EasyManua.ls Logo

Bayou Classic 200-480 - User Manual

Bayou Classic 200-480
16 pages
Print Icon
To Next Page IconTo Next Page
Loading...
MODEL #
200-480
200-490
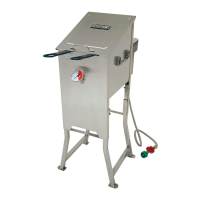
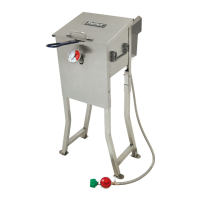
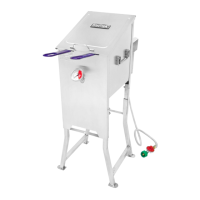
LP GAS TURKEY FRYER KIT
OWNERS MANUAL
SAFETY ALERTS, ASSEMBLY & OPERATING INSTRUCTIONS
GENERAL MAINTENANCE & STORAGE
KEEP THIS MANUAL FOR FUTURE REFERENCE
NOT FOR COMMERCIAL USE
Barbour International, Inc. • 101 Cypress Way, Brandon, MS 39042
1-800-736-8028 (English Only) • Monday - Friday 7:30am - 4:30pm CST
www.thebayou.com
This Instruction Manual contains important information necessary for the proper assembly and
safe use of the appliance. You must carefully read and follow all warnings and instructions before
assembling and using the appliance. Follow all warnings and instructions when using the appliance.
This manual is for Barbour International Bayou Classic
®
products only. If you are using another
manufacturer’s product, refer to the manual supplied with that product. Only use approved
Bayou Classic
®
replacement parts and accessories with this appliance.

Questions and Answers

Overview

This document is an owner's manual for the Bayou Classic LP Gas Turkey Fryer Kit, models 200-480 and 200-490. It provides safety alerts, assembly and operating instructions, general maintenance, and storage guidelines for the appliance.

Function Description

The Bayou Classic LP Gas Turkey Fryer Kit is a portable gas appliance designed for outdoor cooking, specifically for deep frying whole turkeys or chickens, as well as general cooking. It features a high heat output, greater than traditional kitchen stoves, and is intended for use with a cooking vessel (pot) and a self-contained Liquid Propane (LP) gas supply system (tank). The appliance is designed to work exclusively with the hose and regulator assembly provided with the product.

Important Technical Specifications

LP Cylinder:

  • Capacity: 9.1 Kg/20 lbs
  • Dimensions: 31.75 cm/12.5-in diameter x 45.72 cm/18-in tall
  • Valve Type: Type-1 gas cylinder valve outlet with Over-Filling Protection Device (OPD) indicated by a trilobular handwheel.
  • Features: Protective collar, safety relief valve, protective cap.
  • Storage: Must be stored outdoors, out of reach of children, and not in a building, garage, or any enclosed area.

Hose Valve Regulator (HVR):

  • Model: M5HPR-TMR
  • Hose Length: 90 cm/36-in high pressure hose
  • Pressure: 0-5 PSI adjustable regulator
  • Features: Gas Flow Timer, adjustable control knob, male connector (#59 orifice), Type-1 connector, wire hook, low battery light (red), gas flow light (green), start (reset) button, power button.
  • Battery: Requires two "AAA" alkaline batteries (not included) for the Gas Flow Timer.
  • Replacement: HVR assembly must be replaced every two years, regardless of physical appearance.

Thermometer:

  • Model: #5025
  • Stem Length: 30.5 cm/12-in
  • Dial Diameter: 6.35 cm/2.5-in
  • Features: Adjustable stem clip.
  • Usage: Must be used when cooking with oil or grease. Any replacement thermometer must reach at least 75% of the cooking vessel depth.

Cooking Vessel (Pot):

  • Maximum Diameter: 35.6 cm/14-in
  • Maximum Volume: 42 L/44 Qt
  • Maximum Turkey Size:
    • For 28-30.3 L/30-32 Qt vessel: 8.16 Kg/18 lbs
    • For 39.7-41.6 L/42-44 Qt vessel: 11.34 Kg/25 lbs
  • Fill Line: Marked on the inside of the vessel; do not fill beyond this line. Minimum 8 cm/3-in between water level and top of vessel when food is submerged.

Safety Distances:

  • Appliance to structure/combustible material/other gas cylinder: Minimum 3 m/10 ft
  • Appliance to flammable liquid: Minimum 7.5 m/25 ft
  • LP cylinder to appliance: Minimum 50.8 cm/20-in

Operating Temperatures:

  • Maximum oil/grease temperature: 200°C/400°F. If exceeded or if oil smokes, turn off burner/gas supply immediately.
  • Relighting temperature: Wait until temperature decreases to less than 175°C/350°F before relighting.
  • Cooling temperature: Do not touch appliance until it has cooled to 45°C/115°F or less.

Usage Features

Assembly:

  • Requires an adjustable wrench and Phillips head screwdriver.
  • Components include a stockpot with lid, poultry rack with lift hook, 12-inch thermometer, seasoning injector, burner support bar, 3 legs, 5 PSI hose valve regulator with timer, burner with locking nut, round frame, air shutter, heat shield, 3 long bolts, 4 short bolts, 7 locking nuts, and a spring.
  • Assembly involves mounting the burner support bar, attaching the burner and heat shield, and then attaching the legs to the round frame.
  • The hose connects to the burner by screwing the male hose connector with orifice into the burner, ensuring the air shutter can turn freely.
  • The Gas Flow Timer requires two "AAA" alkaline batteries.

Placement:

  • For outdoor use only, not in buildings, garages, or enclosed areas.
  • Not for use on apartment/condominium balconies or decks, boats, or recreational vehicles.
  • Must be placed on a level, stable noncombustible surface (brick, concrete, or dirt).
  • Keep cooking area clear of combustible materials, spare LP tanks, household chemicals, paint, gasoline, and other flammable vapors/liquids.
  • Place the cooker DOWNWIND from the LP cylinder.
  • Ensure no overhead unprotected combustible construction or tree limbs.

Lighting Instructions:

  • Before lighting, ensure LP Cylinder Valve and Adjustable Control Knob are fully closed.
  • Set the Gas Flow Timer by pressing the black POWER button (both lights blink once), then the red START button (green light remains on). The timer is set for a 15-minute operational cycle.
  • Slowly open the LP Cylinder Valve one full turn.
  • Position a fireplace match or long lighter directly over the burner, then open the Control Knob. The burner should light within 5 seconds.
  • Alternative lighting with a paper book match is also described.
  • Optimal flame is blue with little or no yellow. Adjust air shutter to achieve this.
  • If ignition fails after 5 seconds or 2-3 attempts, turn off gas supply, wait 5 minutes, and repeat. Do not reset the Gas Flow Timer if oil temperature is above 200°C/400°F.

Gas Flow Timer:

  • Designed to shut off gas flow after a pre-set time (15 minutes) unless manually reset.
  • Operational Cycle: 1-10 minutes (green light on), 10-13 minutes (green light blinks slowly), 13-15 minutes (green light blinks rapidly), 15 minutes (cycle ends, gas flow ceases).
  • Resetting: Push the red START button to begin a new 15-minute cycle.
  • Testing: Test the timer before attaching to the LP Cylinder, and whenever changing batteries or if left in the device.

Thermometer Usage:

  • Confirm thermometer is at least 75% of vessel height.
  • Set clip at least 50mm/2-in below dial.
  • Insert stem at least 25mm/1-in into the cooking liquid.
  • Do not insert into food.
  • Test thermometer in boiling water (should read 212°F/100°C +/- 5°F/2.78°C) before each use.

Safety Precautions:

  • Sober adult operation only.
  • Never operate unattended.
  • Keep children and pets away from the cooking area.
  • Completely thaw and towel dry food before immersing in hot oil/grease.
  • Lower food and accessories S-L-O-W-L-Y into cooking liquid to prevent splashing/overflow.
  • Always wear protective clothing, insulated mitts/gloves, and close-toed shoes.
  • Have a Type BC or ABC fire extinguisher readily accessible.
  • In case of rain/snow, cover vessel, turn off gas, and do not move.

Maintenance Features

General Care:

  • Before first use, light cooker and let it run for 5-7 minutes to burn off manufacturing oil/residue.
  • Clean cooker after each use and before storing. Spray frame with water hose, use soft cloth if needed. Allow to fully dry.
  • Do not use steel wool pads or harsh abrasive cleansers on cooking vessels.
  • Keep appliance area clear of combustible materials, gasoline, and flammable vapors/liquids.
  • Do not obstruct combustion and ventilation air flow.
  • Keep cylinder enclosure ventilation openings clear of debris.

Burner Maintenance:

  • Check burner/venturi tubes for obstructions (insects, nests) before every use.
  • Remove obstructions using a narrow bottle brush or stiff wire, or flush with water hose/compressed air.
  • If necessary, disassemble the burner by removing the serrated nut and unscrewing the mounting bolt.
  • A clogged tube can lead to fire beneath the appliance.

HVR Maintenance:

  • Clean and inspect HVR before each use for abrasion, wear, cuts, or leaks. Replace if damaged.
  • Replace HVR assembly every two years.
  • Disconnect HVR from LP Cylinder before installing/removing batteries.
  • Always confirm LP Cylinder Valve and Regulator Knob are OFF before connecting/disconnecting HVR.

Storage:

  • Remove batteries from the Gas Flow Timer after each use.
  • Turn off gas supply and disconnect hose/regulator from LP cylinder before moving or storing.
  • Use the wire hook to hang the regulator on the appliance frame when not connected to the LP Cylinder.
  • Store appliance in a dry place.
  • If storing indoors, detach LP cylinder and store it outside.
  • For long-term storage, cover burner and HVR with a plastic bag.
  • Do not store in corrosive environments (damp areas, saltwater/marine environments).

Troubleshooting:

  • Burner will not light: Check for burner obstruction, damaged parts, low LP fuel.
  • Small/sooty flame: Gas Flow Limiting Device activated, insufficient gas flow, poor oxygen/gas mixture.
  • Flame reduces, LP cylinder frosts: Extended cooking on HIGH.
  • Flame gone out: Low LP fuel, too windy.
  • Hissing/gurgling sounds: Damaged/leaking hose/regulator, moisture in burner.
  • Solutions provided for each issue, including inspecting parts, refilling/exchanging tanks, resetting the Gas Flow Limiting Device, adjusting air shutter, and performing a Gas Leak Test.

Gas Leak Test:

  • Perform after assembly, LP cylinder refill, component replacement, moving the cooker, or if unused for over 60 days.
  • Use a 50% water and 50% liquid dishwashing soap mixture.
  • Apply mixture to LP cylinder valve, regulator connections, timer housing, hose connections, and full length of hose.
  • Inspect for growing bubbles. If bubbles persist, terminate use immediately and do not use cooker.
  • Do not use a flashlight to check for bubbles; adequate lighting is required.

Bayou Classic 200-480 Specifications

General IconGeneral
BrandBayou Classic
Model200-480
CategoryFryer
LanguageEnglish

Related product manuals