The BeaverLAB Intelligent Microscope MX (DDL-MX) is a sophisticated optical instrument designed for detailed observation and analysis, featuring an integrated display and various connectivity options. This manual provides comprehensive instructions for its use, maintenance, and troubleshooting.
Function Description:
The BeaverLAB Intelligent Microscope MX allows users to observe specimens at different magnifications (100x, 600x, 1200x) and capture images or videos of their observations. It features both top and bottom lighting for illuminating specimens and a movable platform for precise positioning. The integrated 9-inch display provides a clear view of the magnified specimen, and the device can also connect to mobile phones or Windows computers for data export, software operation, and a larger viewing experience. Dimensional calibration tools are integrated into the software for measuring internal dimensions of observed objects.
Important Technical Specifications:
- Product Name: Intelligent Microscope MX
- Product Model: DDL-MX
- Product Brand: BeaverLAB
- Product Size: 214x224x324mm
- Input Voltage: DC5V = 1A
- Battery Capacity: 3500mAh
- Display Size: 9 inches
- Magnification: 100x / 600x / 1200x (switchable by rotation)
- Connectivity: USB for mouse operation, Charging/Data Transmission Port (DC5V) for mobile phone data export and Windows computer connection.
- Supported Computer OS: Windows (for BeaverLAB computer software)
- Operating Temperature: -10°C to 45°C
- Executive Standard: CE FCC
- Texture Of Material: ABS+PC
Usage Features:
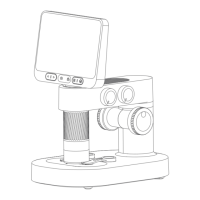
Microscope Composition:
The microscope consists of a Screen, Host Head, Objective Lens, Lifting Table, Upright Column, and Base.
Knob Function Description:
- Objective Lens Lighting Adjusting Knob: Turns on clockwise to increase brightness, turns down counterclockwise to decrease brightness or turn off.
- Platform Bottom Light Adjustment Knob: Turns on clockwise, increases brightness clockwise, decreases brightness counterclockwise, turns off counterclockwise.
- Focusing Knob (Fine Adjustment): Zooms out clockwise, zooms in counterclockwise.
- Objective Lens Switching Knob: Rotates to switch between 100x, 600x, and 1200x magnifications.
- Platform Lifting Adjustment Knob: Decreases counterclockwise, increases clockwise.
- Platform Move Back And Forth Button: Rotates counterclockwise to move the platform backward, rotates clockwise to move it forward.
- Platform Left And Right Movement Knob: Rotates counterclockwise to move the platform to the left, rotates clockwise to move it to the right.
Operating Steps:
- Place Stably: Position the microscope on a stable surface.
- Open the Screen: Lift the integrated screen.
- Power On: Long press the on/off button to start the machine. A short press puts it to sleep.
- Move the Platform: Adjust the platform to a suitable height.
- Prepare Specimen: Remove the lens cover and place the observation item on the platform, ensuring the specimen faces the eyepiece. The specimen fixing clip (magnetic suction type) helps secure the specimen.
- Select Magnification: Rotate the Objective Lens Switching Knob to select the desired magnification (100x, 600x, or 1200x).
- Raise Platform: Use the Platform Lifting Adjustment Knob to raise the platform to a suitable height.
- Adjust Lighting: Adjust the intensity of both bottom and top lighting using their respective adjustment knobs.
- Focus: Use the Focusing Knob to bring the display screen to a clear focus. The "Pithy Formula" suggests: large multiples should be close, and small multiples should be far away. Coarse adjustment depends on lifting, and fine adjustment depends on the knob.
- Move Observation Position: Adjust the moving knobs under the platform to move the observation position.
Interface User Guide (Software Interface Function Introduction):
The 9-inch display features a touch interface with various functions:
- Gallery: Observe, browse, and edit photographed pictures and videos.
- Take A Picture: Capture images of the currently observed objects.
- Record Video: Record videos of the currently observed objects.
- Dimensional Calibration: Measure internal dimensions of the calibration system.
- Connect to the Computer (through settings switching): Enables connection to a computer.
- On / Off Key: Powers on/off or puts the device to sleep.
- Set Up: Access settings for Language (Chinese/English), Time/Date, Sleep duration (never/3 min/5 min/10 min/15 min), Timed Shutdown (never/5 min/10 min/30 min/1 hour), Memory Card Switching (in/out), Camera Switching (in/out), and Color Selection (blue, green, red, yellow, purple).
- Shut Down: Turns off the device.
- Grid: Locates the center point of the image.
- Straight Line: Measures the length of the observation object.
- Circular: Measures the S (area) of the selected range C (perimeter), D (diameter).
- Casual Painting: Tagging function.
- Angle: Measures the angle of the observation object.
- Rectangle with rounded corners: Measures S (area) c (perimeter) of the selected range.
- Ellipse: Measures s (area) and d (diameter) of the selected range.
- Delete: Deletes all dimensions on the interface.
- Undo / Return: Undoes the previous action.
External Equipment Connectivity:
Connect To Mobile Phone:
- Plug the data cable into the DC5V charging port of the MX microscope and the adapter into the mobile phone end, then connect the data cable with the adapter.
- On the MX microscope, navigate to "Setting → Memory card switching → Cut out". The screen will darken.
- On the mobile phone, open "File manager" to access the USB storage device and view/copy pictures from the microscope's memory.
Computer Device Connection:
- Visit www.dangdangli.com to download and install the BeaverLAB computer software (Windows only).
- Plug the data cable into the DC5V charging port of the MX microscope and connect the other end to a USB interface on the computer.
- On the MX microscope, navigate to "Setting → Camera Switching → Cut Out". The screen will darken.
- In the computer software, click "connect device button → select device (recognized camera device) → open".
- The computer software will connect to the camera, allowing direct observation.
- Prepared Slides x10
- Adapter
- Data Line
- Magnetic specimen holder x2
Maintenance Features:
Charging Instructions:
- The red light indicates charging, and the green light indicates charging is complete.
- Can be charged using a daily mobile phone charger, computer, or power bank.
- Do not charge for more than 12 hours to avoid affecting battery life.
- Slight heating of the microscope shell and battery during charging is normal.
Storage Environment:
- Store in a cool and dry place, away from direct sunlight.
- Avoid storing in places where there is a risk of falling, which could cause lens deviation or damage to other components.
Use Environment:
- Use at temperatures between -10°C and 45°C.
- Prevent the microscope from getting wet with water, beverages, or corrosive liquids.
- Keep away from heat sources, open flames, flammable and explosive gases/liquids.
- Avoid dust entering the microscope lens and inside.
- Avoid impact and violent vibration.
- At low temperatures, battery capacity may decay.
Matters Needing Attention:
- The specimen fixing clip uses magnetic suction; ensure it's installed close to the base.
- Regularly clean the adsorption positions at the bottom and base of the specimen fixing clip to prevent adsorption of other metal substances.
- Wipe the observation panel regularly to avoid oil stains or other residues affecting observation.
- Adjust light intensity carefully, as it affects the outline and details of the specimen.
Troubleshooting Of Microscope:
- Lifting not smooth / Unable to lift:
- Reason: Normal heating during charging (large current, high calorific value).
- Processing Method: Normal state.
- Reason: Internal lifting gear damaged.
- Processing Method: Send for repair.
- Light cannot be adjusted:
- Reason: Dimmer circuit board damaged / Lamp board damaged / Connecting wire open circuit.
- Processing Method: Send for repair.
- Device cannot be charged:
- Reason: Charging interface not firmly plugged in / No power connection / Equipment failure.
- Processing Method: Unplug and replug the interface, connect power, or send for repair.
- Device cannot be used normally:
- Reason: Internal damage due to water spray, collision, etc.
- Processing Method: Send for repair (man-made damage not covered by warranty).
- Device cannot be connected to computer software:
- Reason: Interface not plugged tightly, data line damaged, or connecting line without data transmission function.
- Processing Method: Reseat interface, replace data cable, or use a data cable with data transmission function.
- Lens display image blur:
- Reason: Sharp ambient temperature changes causing lens fog.
- Processing Method: Wait for temperature to stabilize and fog to disappear.
- Foreign bodies in specimen, observation not clear:
- Reason: Surface of specimen or panel is dirty.
- Processing Method: Wipe surfaces.
- Shell broken/cracked due to falling/impact:
- Reason: Damage caused by external use.
- Processing Method: Man-made damage not covered by warranty.
- Product cannot be turned off or key fails:
- Reason: Crash.
- Processing Method: Reset and restart.
- Warranty Period:
- Within 7 days of signing: Free return or replacement for performance failures (after testing by BeaverLAB service center).
- Within 8-15 days of signing: Free replacement or maintenance for performance failures (after testing by BeaverLAB service center).
- Within 6 months of signing: Free maintenance for performance faults (after testing by BeaverLAB service center).
- Warranty Content: The host is guaranteed for 6 months.
- Non-Warranty Regulations: Unauthorized maintenance, misuse, collision, negligence, abuse, liquid inlet, accident, modification, incorrect use, tearing/altering labels, expired warranty, force majeure, non-compliance with performance fault table, or human factors causing faults.
- Recommendation: Keep the packing box for at least 30 days for safe transportation.
- Brand Company: Beaver Technology (Shenzhen) Co., Ltd.
- Service Mailbox: support@beaverlabtech.com
- Official Website: www.beaverlabtech.com / www.dangdangli.com