BAC002 Series WiFi Thermostat User Guide
For Fan Coil Unit
Welcome
Thank you for your purchase.
Your new thermostat will provide uniform and comfortable
temperature control throughout every room in your property. We
bring together technology,
materials to provide you with a safe, reliable product combined with
sleek, contemporary design.
programming manual for comprehensive
thermostat. Please also
ensure a suitably qualified person installs your thermostat and
In the box you will find
Thermostat
Screws
User Guide
W
all plate
1pc
2pc
1pc
1pc
QC Passed
1pc
ABOUT YOUR THERMOSTATS
BAC-002 series Modern Round Touch Screen Room Thermostats
temp. as reaching the aim of comfort and saving energy.
MODEL DEFINITION
A : Two pipe; Control Fan Coil Unit and Two Wired Motorized Valve
M
: Two pipe; Control Fan Coil Unit and 0-10V Motorized Valve
E : Four pipe; Control Fan Coil Unit and Two Wired Heat Valve and
Two Wired Cool Valve.
K : Keycard
W2 : Window
E : External Sensor
T : Clock
P : Programmable
For example: BAC-002ALW
FEATURES
2. White, black or mix-color housing creates your colorful life.
On Appearance
DIMENSION
TECHNICAL DATA
Power Supply: 95 ~ 240 VAC, 50 ~ 60HZ
Sensor: NTC3950, 10K
Accuracy: ±0.5℃
Set Temp. Range: 5 -35
Dispaly Temp. Range: 5 ~ 99
Ambient Temp.: 0 ~ 45 ℃
Ambient Humidity: 5 ~ 95 % RH (Non Condensing)
Storage Temp.: -5 ~ 45 ℃
Timing Error: < 1%
Shell Material: PC +ABS ( Fireproof)
Wire Terminals: Wire 2 x 1.5 mm2 or 1 x 2.5 mm2
℃
℃
BEFORE WIRING AND INSTALLING...
3. Installer must be a trained, experienced service technician.
CAUTION
Electrical Shock or Equipment Damage Hazard. Can shock
individuals or short equipment circuitry.
WIRING
L
N
L
N
L
N
M
Valve
A (RED)
Modbus
B (WHITE)
AC95-240V 50~60Hz
Fan
hgiH
Med
woL
Open
esolC
Close
M
M
A (RED)
Modbus
B (WHITE)
Fan
Open
Close
Open
Low
Med
High
Two Pipe, On/off
AC95-240V 50~60Hz
Four Pipe , On/off
Valve
Cooling
Valve
Fan
Close
Open
Low
Med
High
AC95-240V 50~60Hz
Two Pipe
Modbus
0-10V
Valve
+-AB
INSTALLATION
Step 1. Keep the electricity off. See Fig 1.
Step 3. Connect power supply, load into the appropriate terminals.
(see “Wiring your thermostat” for details and Fig 3).
the box. See Fig 4.
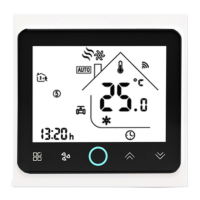
HOME SCREEN QUICK REFERENCE
During Power On
1. Power On/off:
Press to turn the thermostat on/off.
2. Manual & Programmable
Press and hold , will flash.
Press to select manual and press
to select weekly programmable.
In the mode of manual, press to set temperature. will
Press to change the system mode HEATING, COOLING and
VENTILATION. In the mode of VENTILATION, the valve is off but the
fan runs.
OPERATION
4. Locking Your Thermostat
Press and hold the for 5 seconds to lock/unlock your thermostat.
5
Press to select the fan speed AUTO, HIGH, MED, LOW.
6
1
2
3
4
5
6
7
8
9
A
B
C Deadband Temp.
IP20
-9 to 9 C
。
-1
0
05
35
00
20
26
Cooling Economy
10 to 30 C
。
1
Display Mode
01
Energy saving Mode
00: Non-energy saving Mode 01: Energy saving
Mode,set Temp. keep economy Temp.
Setting and options
Function DefaultCode
Temp.
Temp.
10 to 30 C
。
1 to 5 C
。
12/24 hours 00:12h 01:24h 01
01
00
Heat/cool
00:Cool only 01:Heat/Cool
1. 86mm hidden box and european 60mm round box is suitable.
3. White backlight protect your eyes
See Fig 5
See Fig 6
00:Display both set temp. and room temp.
01: Display set temp. only
Temperature
Min. Set Temp.
Max. Set Temp.
5 to 15 C
5 to 35 C
。
。
Fan control
00:When room temp. reaches the set point,the
fan will turn off
01:When room temp. reaches the set point,the
fan will turn to low speed
7. Restore Manufacturer Defaults
2. 0.5°C Accuracy keeps temperature within the level you set.
3.
4. 5+2 six periods programmable maximize comfort and economy.
5. Create thermostat group to centrally control.
6.
Integrated with
Amazon Echo, Google Home, Tmall Genie, IFTTT.
7. Support Device Sharing to your family or friends.
/
Clock memory when power is off.
9. No limit to add thermostats in App.
10. Support Smart Scene.
Press the
Restore Manufacturer Defaults
,you can reset thermostat.
Steps: Open your app - go into your room - click menu on the top
right corner - move to the end - Press
Restore Manufacturer Defaults.
During Power Off
When power is off, press and hold
Then press to change the different items.
9
not be adjusted.
Time display
WEEKDAY (MONDAY – FRIDAY)
(1 2 3 4 5 shows on screen)
WEEKEND (SATURDAY)
(6 shows on screen)
TIME TEMPERATURE TIME TEMPERATURE
WEEKEND (SUNDAY)
(7 shows on screen)
TIME
Period 5
Period 6
Period 3
Period 4
Period 2
Period 1
06:00
08:00
11:30
13:30
17:00
22:00
06:00
08:00
11:30
13:30
17:00
22:00
06:00
08:00
11:30
13:30
17:00
22:00
20 C
。
15 C
。
15 C
。
15 C
。
22 C
。
15 C
。
20 C
。
20 C
。
20 C
。
20 C
。
20 C
。
15 C
。
20 C
。
20 C
。
20 C
。
20 C
。
20 C
。
15 C
。
Press to do the adjustment of weekly programmable.
Then press to change the different items. Press or to set
day – three Comfort periods - 1, 3 & 5 (the temperature required when
room is occupied) and three Economy periods – 2, 4 & 6 (the temperature
schedules can only be carried out when in program mode;Touch (mode)
to change between manual mode
screen.Touch the icon
period Press the icon and use the and arrows to set the temp.
for the 1st period. Repeat this process for periods 2 – 6. Press the icon
Press once more to confirm and exit.
weekday (1 = Monday, 2 = Tuesday etc.) by using the
the
the
Front
Back
Side
Unit: mm
13.2 30.2
50.1
50.1
60.0±3.0
86.0
86.0
Power
On/Off
FanMode
Valve
On/off
Period
Auto Fan
Fan speed
Week
Clock
Timing
On/Off
Lock
Net work
Set Temp.
Cooling
Up
Manual
Down
Energysaving
Program Mode
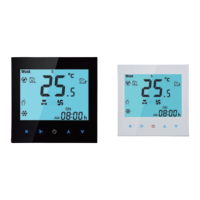
002FW: full white
002WB:white and black 002FB: full black
002BW: black and white
Thermostat Colors