Installing your thermostat
8. Setting functions and options
During power off, press and hold M and at the
same time for 5 sec. to system functions. Then press
M to change the different items. All the settings will
confirm automatically when power is on. Press
to confirm, to cancel.
WARNING: Please arrange the professional technician
to install this product according to installation drawing and
instruction.
RISK OF ELECTRICAL SHOCK. Disconnect power supply
before making electrical connection. Contact with components
carrying hazardous voltage can cause electrical shock and may
result in severe personal injury or death.instruction.
Press to time setting of the second period.
Press to temperature setting of the second period.
Press to time setting of the third period.
Press to temperature setting of the third period.
Press to time setting of the fourth period.
Press to temperature setting of the fourth period.
Press to time setting of the fifth period.
Press to temperature setting of the fifth period.
Press to time setting of the sixth period.
Press to temperature setting of the sixth period.
Press to Sat. & Sun setting.
The above is the 5+2 weekly programmable.
Factory default setting of period time and temperature
Sat & Sun
AC95~230V
IP20
N
L
1
2
3
4
M
Close Open
5
6
NTC
GA
L1
N1
LOAD
IP20
N
L
RS485+
(Red)
RS485-
(White)
1
2
3
4
NTC
5
6
GB
Remark:
GA is for water heating;
GB is for electric heating;
NTC and RS485 is optional.
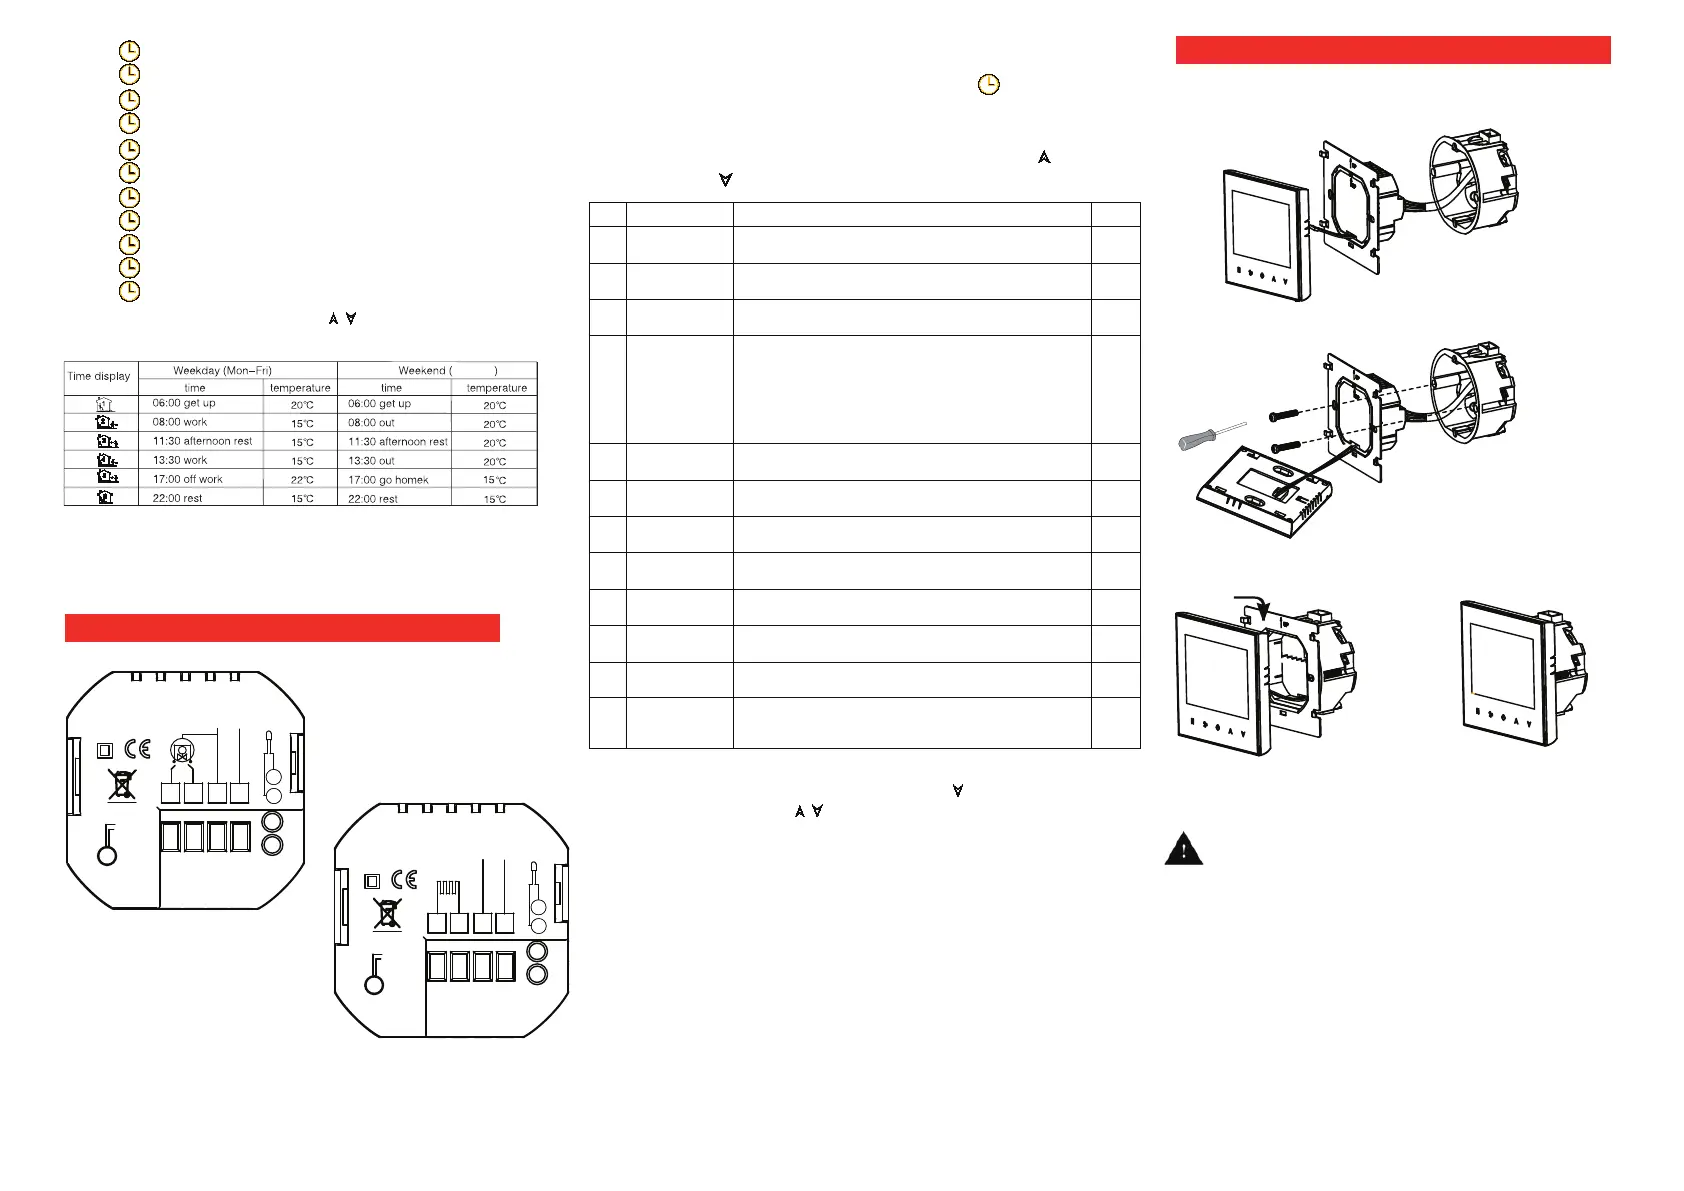
Wiring your thermostat
Remark: all values please press for the adjustment.
Remark: 1. When the sensor type is AL, room temp. and floor temp.
could be changed by pressing and holding for 3 second.
2. Press and hold for 5 sec. to lock/unlock the button.
3. Connect the LCD board into the wall plate.
4. Finished.
(Fig 4)
(Fig 3)
RS485+
(Red)
RS485-
(White)
AC95~230V
This product is suitable for standard 86mm wall
box or european 60mm round box.
1. Connect the wire of power and other equipment into
the terminals.
(Fig 1)
(Fig 2)
2. Fix the wall plate into the wall box by a screwdriver.
Note: Programmable will be invalid for RS485 or Mod-
bus type.
Code Function Setting and options Default
1
-9 to +9℃
-2
2
0 ~ 5℃.
1
3 Botton locking
00: All bottons are locked except power button.
:
01
4 Sensor types
In
:
Internal Sensor
(
to control or limit the temperature
)
Ex
:
External Sensor
(
to control or limit the temperature
)
AL
:
Internal/ External Sensor
(
Internal sensor to control temperature,
external sensor to limit temperature
)
Remark: Please make sure the right sensor. If choose the wrong or bad
one, LCD will display Err.
In
5
Min. Set Temp.
5-15
℃
5
6
Max. Set Temp.
15-45℃
35
7 12/24 hours
00: 12h
01
8
:
display both set temp. and room temp.
01
:
00
9
Low temperature
protection setting.
0-20℃.
0
A
High temperature
10-70
℃
.
45
B Backlight Time 3~99 s 5
C
Return to factory
setting
00: Normal Status
01:Return to factory setting
00
 Loading...