120 Country Club Dr. Suite 22-L Incline Village, NV 89451 www.behmor .com
Est time: 30 minutes… UNPLUG THE ROASTER !!!!!
The replacement of the front panel is not a difficult procedure it merely is time consuming. You will be
removing the left and right side panels along with top panel. In the process you will remove in total 26 screws.
Before starting the procedure familiarize yourself with the written portion and photos.
Recommendation: As you remove a panel, place the screws for that panel inside its open cavity of that panel to
prevent losing or mixing with others. 21 screws will be the same size (some stainless steel others black), and 5
smaller.
Tools (Photo A): one short Philips head*screwdriver, one long Philips head screw driver (Highly
recommended magnetic tipped), pliers (needle nose are great) and wire cutters for snipping a wire tie- TAKE
CARE TO NOT CUT ACTUAL WIRING. * Short Philips Head should have a flattened (NOT POINTED-
pointed will strip screw head) tip.
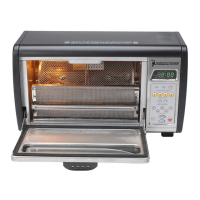
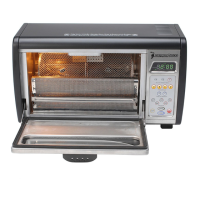
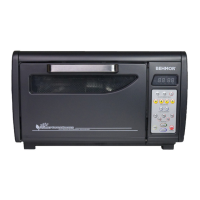
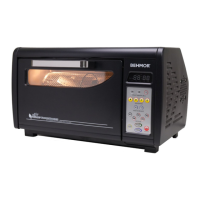
The roaster (see photo B) has three main panels each with varying number of screws holding them in place.
Remove them in the following order
A) Right side panel- 6 screws. Three screws under the panel lip, three on the angle and back. Once removed
slide from back to front.** Side Panel fan is attached so remove slowly, then disconnect DC power
wire from PCB
B) Left side panel- 7 screws. Same as right side with an additional screw inside by the chamber door. To
locate open the chamber door and look just inside the door opening, left side. The screw just inside the
door is smaller than the rest. Be sure to not mix. Once removed slide the panel from back to front
C) Top Panel- 8 screws. Four screws are located under the lip of the door opening. These screws are
smaller than others use Small Philips head as noted above- Do Not mix. Four screws located along the
top back. Wait to remove the top (see below)
To remove the top panel you must first straighten a “T” shaped clip (see Photo C- black arrow) so it slides
through a guide (same photo- yellow arrow). To straighten the “T”, take a set of pliers, look inside the top right
side of the roaster, just above the control panel. You will note the “T” has been twisted/moved to be at an angle.
Take the pliers and move the end portion of the “T” so that it is flat and horizontal. This will enable the flange
to slide through the guide
Once done, rotate the top panel (photo D), so the left side swings out, then gently slide the right side free from
the guide. When doing this note how it came out so during reassembly you repeat in reverse. You now should
have a roaster as shown in Photo E.
Our next step is to remove the panel itself. This will be done by removing 5 screws (Photo F- yellow arrows)
and disconnecting a ribbon/flat cable and the power cable (Photo G- yellow arrows).
You will need the long Philips head screw driver ( highly recommend magnetized tip-This could prevent losing
screws).
Before removing the front panel, take a moment and look at the front of the roaster specifically the gap between
door and panel. You’ll refer back to this mental note later.
Start with the three screws that go along the side of the roaster.
 Loading...