2
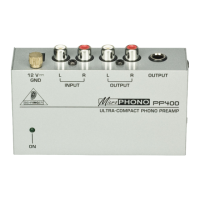
(1) 12 V connector: To connect the power supply unit to the
PP400, use the 12 V connector. Connecting the power supply
unit to the mains automatically switches the PP400 on. To
disconnect the unit from the mains, pull out the main cord plug.
(2) ON LED: As soon as the unit is connected to the mains, the ON
LED is illuminated.
(3) INPUT (L and R) connectors: To send a turntable signal to the
PP400, you need an RCA audio cable (stereo). Use this cable
to connect:
• the left output on the turntable to the L (left) INPUT
on the PP400
• the right output on the turntable to the R (right) INPUT
on the PP400
The PP400 can output a line-level signal via one of the following
connectors:
• RCA ((4) OUTPUT L and R)
• ¼" TRS ((5) OUTPUT)
◊ Do not simultaneously use both PP400 OUTPUTs.
(4) OUTPUT (L and R) connectors: To use these RCA connectors, you
need an RCA audio cable (stereo). Use this audio cable to connect:
• the L (left) OUTPUT on the PP400 to the left input on the
amplier, recordingunit, or mixer. (On a mixer, use a CD
or TAPE input.)
• the R (right) OUTPUT on the PP400 to the right input on
the amplier, recordingunit, or mixer
(5) OUTPUT connector: To use this ¼", TRS (stereo) connector, you
need an audio cable. Use the audio cable to connect the PP400
OUTPUT to an input on the mixer, amplier, or recording unit.
Oneend of this audio cable must include a ¼", TRS connector.
If the input on the mixer, amplier, or recording unit is: