26 POWERPLAY 16 P16 -M/P16 -I/P16-D 27 Quick Start Guide
(EN) Step 3: Getting
started
(ES) Paso 3: Puesta en
marcha
(FR) Etape 3 : Mise en
oeuvre
(DE) Schritt 3: Erste
Schritte
(PT) Passo 3: Primeiros
Passos
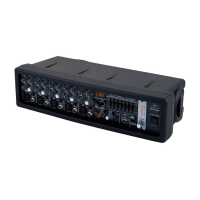
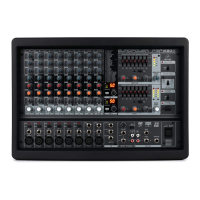
POWERPLAY 16 P16-M/P16-I/P16-D Getting started
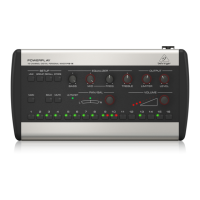
(EN) If using headphones, plug your
headphones into the PHONES jack using a
¼" TRS plug.
(ES) Si va a utilizar auriculares, conéctelos a la toma
PHONES usando una clavija TRS de 6,3 mm.
(FR) Si vous utilisez un casque, connectez le casque
au Jack stéréo 6,35 mm PHONES.
(DE) Schließen Sie bei Bedarf Ihre Kopfhörer mit
einem 6,3 mm Klinkenstecker an die PHONES-
Buchsean.
(PT) Se estiver utilizando fones de ouvido, ligue os
fones ao jack PHONES usando um plugue TRS de
¼de polegadas (6.35 mm).
(EN) If using external powered monitors,
run audio cables with ¼" TS plugs from
the LINE OUT outputs to the monitors.
(ES) Si va a utilizar monitores autoamplicados,
conecte unos cables audio con clavijas TS de
6,3mm desde las salidas LINE OUT a la entrada de
losmonitores.
(FR) Si vous utilisez des enceintes actives externes,
utilisez des câbles audio en Jacks mono 6,35 mm
entre les sorties LINE OUT et les enceintes.
(DE) Führen Sie ggf. Audiokabel mit 6,3 mm
Klinkenstecker von den LINE OUT-Ausgängen zu
Ihren externen Aktivmonitoren.
(PT) Se estiver usando monitores externos, passe
cabos de áudio com plugues TS de ¼ de polegadas
(6.35 mm) das saídas LINE OUT até os monitores.
(EN) Power up the P16-M by pressing the
ON/OFF button in to the “ON” position.
(ES) Encienda el P16-M pulsando el botón
ON/OFF hasta que quede en la posición “ON”.
(FR) Placez le P16-M sous tension en plaçant la
touche ON/OFF en position “ON”.
(DE) Schalten Sie den P16-M mit der ON/OFF-Taste ein
(Schalter auf “ON”).
(PT) Ligue o P16-M pressionando o botão ON/OFF,
colocando-o na posição de ligar “ON”.
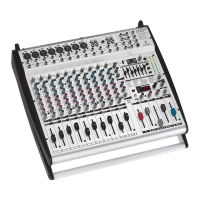
P16-M Basic Mix Setup
Conguración básica de mezcla del P16-M
P16-M — Mise en œuvre d’un mixage
élémentaire
P16-M Prinzipielle Einrichtung der Mischung
Conguração de mixagem básica P16-M
(EN) Turn the OUTPUT LEVEL knob all
theway down to the full counter-
clockwiseposition.
(ES) Coloque el mando OUTPUT LEVEL en la posición
mínima (tope izquierdo).
(FR) Tournez le bouton OUTPUT LEVEL au minimum.
(DE) Drehen Sie den OUTPUT LEVEL–Regler ganz nach
links bis zum Anschlag.
(PT) Gire o botão OUTPUT LEVEL todo para baixo na
posição anti-horário.
(EN) Turn the OUTPUT LIMITER knob all
the way up to the full clockwise position.
(ES) Gire el mando OUTPUT LIMITER hasta
su tope derecho (ajuste máximo).
(FR) Tournez le bouton OUTPUT LIMITER aumaximum.
(DE) Drehen Sie den OUTPUT LIMITER–Regler nach
rechts bis zum Anschlag auf.
(PT) Gire o botão OUTPUT LIMITER completamente no
sentido horário.
(EN) Conrm that the ULTRANET LED is lit.
(ES) Compruebe que el piloto ULTRANET
esté encendido.
(FR) Vériez que la Led ULTRANET soit allumée.
(DE) Achten Sie darauf, dass die ULTRANET
LEDleuchtet.
(PT) Conrme que o LED indicador da rede ULTRANET
está aceso.
(EN) Activate your audio channels by
pressing each CHANNEL SELECT button
until the LED lights up red. (Green LED
ickering=audio signal activity; red LED
constant=mono channel or stereo-linked pair
selected; red LED blinking=channel is part of a
selected group, but channel is currently
notselected.)
(ES) Active sus canales audio pulsando cada uno
de sus botones CHANNEL SELECT hasta que sus
pilotos se iluminen en rojo. (parpadeo de piloto
verde=actividad de señal audio; pilotorojo
jo=canal mono o par enlazado en stereo
seleccionado; parpadeo de piloto rojo=el canal
forma parte de un grupo seleccionado, pero el canal
en sí no está seleccionado en ese momento).
(FR) Activez les voies audio en appuyant sur
chaque touche CHANNEL SELECT, jusqu’à ce que la
Led s’allume en rouge. (Led verte clignotante=
présence de signal audio ; Led rouge constante=
voie mono ou paire de voies couplées sélectionnée;
Ledclignotante rouge = la voie fait partie
d’un groupe sélectionné, mais la voie n’est
passélectionnée).
(DE) Aktivieren Sie Ihre Audiokanäle, indem Sie
jede CHANNEL SELECT–Taste drücken, bis die LED
rot leuchtet. (grüne LED ackert = Audiosignal-
Aktivität; rote LED leuchtet = Monokanal oder
gekoppeltes Stereopaar gewählt; rote LED blinkt =
Kanal ist Teil einer gewählten Gruppe, aber Kanal ist
aktuell nicht gewählt.)
(PT) Ative os canais de áudio apertando cada botão
CHANNEL SELECT até que o LED se ilumine com uma
cor vermelha. (LED verde tremulando=atividade
de sinal de áudio; LED vermelho constante=canal
mono ou par estéreo vinculado selecionado;
LEDvermelho piscando=o canal faz par com
um grupo selecionado, mas o canal não está
selecionado nomomento.)
(EN) While playing audio, slowly turn
theOUTPUT LEVEL knob clockwise
untilyou have a comfortable basic
monitoringlevel.
(ES) Mientras reproduce la señal audio,
girelentamente hacia la derecha el mando
OUTPUTLEVEL hasta que consiga un nivel de
monitorización básico que le resulte adecuado.
(FR) Pendant que le signal audio est lu,
montezprogressivement le bouton OUTPUT LEVEL
jusqu’à ce que le niveau d’écoute vous convienne.
(DE) Drehen Sie während der Wiedergabe von
Audiosignalen den OUTPUT LEVEL–Regler langsam
nach rechts, bis ein angenehmer Abhörpegel
erreicht ist.
(PT) Enquanto estiver tocando o áudio,
girelentamente o botão OUTPUT LEVEL no
sentido horário até que você tenha um nível de
monitoramento básico confortável.
(EN) Slowly turn the OUTPUT LIMITER
knob counter-clockwise to get the
limiter working and nd an acceptable
balance between dynamics and control of
volumepeaks.
(ES) Gire lentamente el mando OUTPUT LIMITER
hacia la izquierda para hacer que actúe el limitador
y ajustar un balance aceptable entre dinamismo y
control de los picos de volumen.
(FR) Tournez le bouton OUTPUT LIMITER lentement
vers la gauche pour déclencher le limiteur et
trouver un équilibre acceptable entre dynamique et
contrôle des crêtes de volume.
(DE) Drehen Sie den OUTPUT LIMITER–Regler
langsam nach links, um den Limiter zu aktivieren
und eine akzeptable Balance zwischen Dynamik
und der Begrenzung von Pegelspitzen zu nden.
(PT) Gire o botão OUTPUT LIMITER aos poucos no
sentido anti-horário para fazer com que o limitador
funcione e encontre um equilíbrio aceitável entre a
dinâmica e o controle dos picos de volume.
(EN) Create stereo channels by pressing
the LINK button and then any pressing
any CHANNEL SELECT button.
Therelated adjacent channel will get stereo-linked.
Press the LINK button again to release the
LINKmenu.
(ES) Cree canales stereo pulsando el botón LINK y
después cualquier botón CHANNEL SELECT. El canal
adyacente al que haya pulsado será enlazado en
stereo con este. Pulse de nuevo el botón LINK para
salir del menú LINK.
(FR) Créez des voies stéréo en appuyant sur la
touche LINK puis sur n’importe quelle touche
CHANNEL SELECT. La voie adjacente devient couplée
pour former une paire stéréo. Appuyez à nouveau
sur la touche LINK pour quitter le menu LINK.
(DE) Um Stereokanäle zu erzeugen, drücken Sie
die LINK–Taste und dann eine beliebige CHANNEL
SELECT-Taste. Der zugehörige Nachbarkanal wird zu
einem Stereopaar gekoppelt. Um das LINK–Menü
zu verlassen, drücken Sie nochmals die LINK-Taste.
(PT) Crie canais estéreos apertando o botão LINK
e então pressionando qualquer botão CHANNEL
SELECT. O canal adjacente relativo terá vínculo
estéreo. Aperte o botão LINK novamente para soltar
o menu LINK.
(EN) To adjust any individual or stereo
channel in the mix, press the channel’s
CHANNEL SELECT button until the
buttonlights red.
(ES) Para ajustar cualquier canal individual o canal
stereo en la mezcla, pulse el botón CHANNEL SELECT
de dicho canal hasta que se ilumine en rojo.
(FR) Pour régler une voie mono ou stéréo dans le
mixage, appuyez sur la touche CHANNEL SELECT
correspondante jusqu’à ce que la touche s’allume
en rouge.
(DE) Um einen einzelnen oder Stereokanal in der
Mischung einzustellen, drücken Sie die CHANNEL
SELECT–Taste des Kanals, bis diese rot leuchtet.
(PT) Pra fazer o ajuste de qualquer canal individual
ou estéreo na sua mixagem, pressione o botão de
canal CHANNEL SELECT até que este se acenda.
(EN) Turn the PAN/BAL knob clockwise or
counter-clockwise to adjust the
channel’s position in the stereo eld.
(ES) Gire el mando PAN/BAL a derecha o izquierda
para ajustar la posición del canal dentro del
campostereo.
(FR) Montez ou baissez le bouton de PAN/BAL pour
régler la position de la voie dans le champ stéréo.
(DE) Drehen Sie den PAN/BAL–Regler nach
rechts/links, um die Position dieses Kanals im
Stereofeldeinzustellen.
(PT) Gire o botão PAN/BAL no sentido horário ou
anti-horário para ajustar a posição do canal no
campo estéreo.
(EN) Turn the VOLUME knob clockwise or
counter-clockwise to adjust the
channel’s relative level in the mix.
(ES) Gire el mando VOLUME a derecha o izquierda para
ajustar el nivel relativo del canal dentro delamezcla.
(FR) Montez ou baissez le bouton de VOLUME pour
régler le niveau de la voie dans le mixage.
(DE) Drehen Sie den VOLUME–Regler nach rechts/
links, um den relativen Pegel des Kanals in der
Mischung einzustellen.
(PT) Gire o botão VOLUME no sentido horário ou
anti-horário para ajustar o nível relativo do canal na
sua mixagem.
(EN) Adjust the channel’s bass and treble
frequencies using the BASS and
TREBLEknobs.
(ES) Ajuste las frecuencias graves y agudas del canal
usando los mandos BASS y TREBLE.
(FR) Ajuste as frequências graves e agudas dos
canais utilizando os botões BASS e TREBLE.
(DE) Stellen Sie die Bässe und Höhen des Kanals mit
den BASS- und TREBLE-Reglern ein.
(PT) Réglez la réponse dans les basses et
hautes fréquences de la voie avec les boutons
BASSetTREBLE.
(EN) Target a specic mid-range
frequency for adjustment using the
FREQknob, and then adjust that
frequency’s level using the MID knob.
(ES) Elija la frecuencia de rango medio concreta
que quiera ajustar por medio del mando FREQ,
ydespués ajuste el nivel de cha frecuencia usando
el mando MID.
(FR) Sélectionnez une fréquence médium avec
le bouton FREQ, et réglez le niveau avec le
boutonMID.
(DE) Wählen Sie mit dem FREQ–Regler einen
bestimmten Mittenfrequenzbereich aus und stellen
Sie dessen Pegel mit dem MID–Regler ein.
(PT) Aponte uma frequência média especíca para
ajuste utilizando o botão FREQ, e em seguida faça
o ajuste do nível desta freqüência utilizando o
botãoMID.
 Loading...