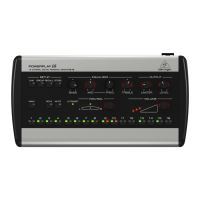
POWERPLAY 16 (P16-M) – BASIC MIX SETUP
1. Turn the OUTPUT LEVEL knob all the way down to the full counter-clockwise position.
2. Turn the OUTPUT LIMITER knob all the way up to the full clockwise position.
3. Confirm that the ULTRANET LED is lit.
4. Activate your audio channels by pressing each CHANNEL SELECT button until the LED lights up
red.*
5. While playing audio, slowly turn the OUTPUT LEVEL knob clockwise until you have a comfortable
basic monitoring level.
6. Slowly turn the OUTPUT LIMITER knob counter-clockwise to get the limiter working and find an
acceptable balance between dynamics and control of volume peaks.
7. Create stereo channels by pressing the LINK button and then any CHANNEL SELECT button. The
related adjacent channel will get stereo-linked. Press the LINK button again to release the LINK
menu.
8. To adjust any individual or stereo channel in the mix, press the channel’s CHANNEL SELECT
button until the button lights red.
9. Turn the PAN/BAL knob clockwise or counter-clockwise to adjust the channel’s position in the
stereo field.
10. Turn the VOLUME knob clockwise or counter-clockwise to adjust the channel’s relative level in
the mix.
11. Adjust the channel’s bass and treble frequencies using the BASS and TREBLE knobs.
12. Target a specific mid-range frequency for adjustment using the FREQ knob, and then adjust that
frequency’s level using the MID knob.
13. Adjust any other channels using the same procedure as necessary.
14. To group several channels together, press the GROUP button (button will blink), and then press
the desired CHANNEL SELECT buttons. The LEDs for the selected channels will blink. Press the
GROUP button again to exit. The selected channels may then be adjusted as a group in the mix
with a single level adjustment using the VOLUME knob.
15. Save your settings to a preset by holding the STORE button and then select the target preset by
pressing any of the 16 CHANNEL SELECT buttons. Press the same CHANNEL SELECT button again
to confirm the STORE process.
16. Load a preset by holding the RECALL button and then pressing the CHANNEL SELECT button
containing the desired preset.
*
Green LED flickering = audio signal activity
Red LED constant = mono channel or stereo-linked pair selected
Red LED blinking = channel is part of a selected group, but channel is not currently selected

 Loading...