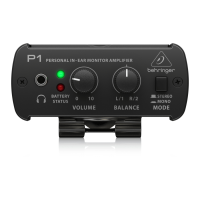
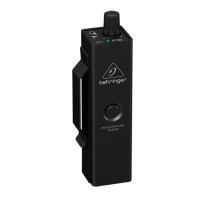
BEHRINGER P2
Quick Start Guide
(1)
(4)
(5)
(2)
(3)
(6) (7)
(4) La PINZA DE CINTURÓN le permite jar la unidad a un
cinturón para usarlo sin manos.
(5) El botón RELEASE le da acceso a las pilas de la unidad,
así como al interruptor stereo/mono. Mantenga pulsado
el botón y deslice la carcasa exterior hacia la clavija de
entrada para acceder al interior de la unidad.
(6) El interruptor MONO/STEREO debería estar ajustado a
la posición Mono cuando use esta unidad con el envío
auxiliar de un mezclador o cualquier otra fuente mono y
debería ajustarlo a Stereo cuando la conecte a una salida
de auriculares o a cualquier otra fuente stereo.
(7) Las RANURAS PARA LAS PILAS permiten que la unidad
funcione por medio de un par de pilas AAA. A la hora
de introducir unas pilas nuevas tenga en cuenta su
correcta polaridad.
(FR) Réglages
(1) L’embase combinée XLR/Jack 6,35 mm permet de
connecter un système de monitoring personnel du mixage.
Appuyez sur la languette pour déconnecter le câble.
(2) Le potentiomètre VOLUME permet de régler le niveau
de sortie et de mettre l’appareil hors tension lorsqu’il
est placé complètement à gauche. La LED s'allume
lorsque l’appareil est sous tension.
(3) La sortie CASQUE est compatible avec les connecteurs
MiniJack stéréo.
(4) Le CLIP DE CEINTURE permet d’accrocher l’appareil à
votre ceinture ou à la taille de votre pantalon a n de
libérer vos mains.
(5) Le BOUTON DE DÉVERROUILLAGE permet d’accéder
au compartiment des piles et au sélecteur stéréo/mono.
Maintenez ce bouton enfoncé et faites glisser la coque
pour ouvrir l’appareil.
(6) Le sélecteur MONO/STÉRÉO doit être réglé sur Mono
si l’appareil est utilisé avec le départ auxiliaire d’une
console de mixage ou toute autre source audio mono,
et réglé sur stéréo dans le cas d’une utilisation avec une
sortie casque ou toute autre source stéréo.
(7) Placez les 2 piles AAA dans le COMPARTIMENT À PILES.
Veillez à bien respecter la polarité lorsque vous mettez
les piles en place.
(DE) Bedienelemente
(1) Die INPUT-Buchse akzeptiert XLR- oder 6,3 mm-Stecker
zum Anschließen einer Personal Monitor-Mischung.
Drücken Sie auf den Entriegelungshebel, um das
Kabel abzuziehen.
(2) Der VOLUME-Drehregler steuert den Ausgangspegel.
Drehen Sie den Regler ganz nach links, um das Gerät
auszuschalten. Die benachbarte LED leuchtet bei
eingeschaltetem Gerät.
(3) An den HEADPHONE-Ausgang kann man einen
3,5 mm-Stereo-Ministecker anschließen.
(4) Der BELT CLIP wird am Gürtel oder Hosenbund
befestigt, um die Hände frei zu haben.
(5) Mit der RELEASE-Taste erhält man Zugri auf die
Batterien und den Stereo/Mono-Schalter. Halten Sie
die Taste gedrückt und schieben Sie das Außengehäuse
nach unten in Richtung Eingangsbuchse, um die inneren
Komponenten des Geräts freizulegen.
(6) MONO/STEREO-Schalter. Stellen Sie ihn auf Mono
ein, wenn Sie das Gerät mit dem Aux Send eines
Mixers oder einer anderen Monoquelle verbinden.
Stellen Sie ihn auf Stereo ein, wenn Sie das Gerät
mit einem Kopfhörerausgang oder einer anderen
Stereoquelle verbinden.
(7) BATTERIEFACH, um das Gerät mit zwei AAA-Batterien
zu betreiben. Achten Sie beim Einlegen der Batterien
auf die korrekte Polarität.
(PT) Controles
(1) O jack INPUT aceita tomadas macho XLR ou ¼" para
conexão de um mix de monitor pessoal. Aperte a
lingueta de liberação para desconectar o cabo.
(2) O botão VOLUME ajusta o nível de saída e desliga a unidade
quando girado no sentido anti-horário máximo. O LED
adjacente acenderá quando a alimentação estiver ligada.
(3) A saída HEADPHONE permite conexão de um mini jack
estéreo de ⁄".
(4) O BELT CLIP se a xa a cintos ou cintura de calças
possibilitando utilização sem uso das mãos.
(5) O botão RELEASE permite acesso ao interruptor de
estéreo/mono e baterias. Segure o botão para baixo e
deslize a cobertura exterior para baixo em direção ao
jack de entrada para expor o interior da unidade.
(6) O botão MONO/STEREO deve ser ajustado para Mono
quando usado com um aux send de mixer ou qualquer
outra fonte mono, e ajustado para Stereo quando
conectado a uma saída de fone de ouvido ou outra
fonte estéreo.
(7) BATTERY SLOTS permite que a unidade seja alimentada
por um par de pilhas AAA. Observe a polaridade correta
quando inserir novas pilhas.
(JP) コントロール
(1) 入力ジャックXLR または¼ インチオスプラグ
を使ってパーソナルモニターミックスを接続し
ます。ケーブルを抜く際には、リリースタブ を押
してください 。
(2) VOLUME(音量)ノブ出力レベルを調節します。
さらに、反時計回りいっぱいに回すとモニター
の電源がオフになります。電源がオンの間は、
隣接する
LEDが点灯します。
(3) ヘッドフォン出力⁄インチステレオミニジャ
ックを接 続します。
(4) ベルトクリップベルトまたはパンツのウェスト
に装着し、ハンズフリーで使用できます。
(5) リリース ボタン バッテリーおよびステレオ/モ
ノスイッチを操作する際 に使用します。ボタン
を押下しながら、外側のシェルを入力ジャック
側にスライドすると、ユニット内部にアクセス
できます。
(6) MONO/STEREO (モノ/ステレオ)スイッチミキ
サーの
AUXセンドなどのモノラル音源を接続
する時は”
MONO”に、またヘッドフォン出力な
どのステレオ音源を接続する時は”
STEREO”に
設定してください。
(7) バッテリースロット単四乾電池2個でユニッ
トに電源を供給します。新しい電池を装着する
際は、極性を間違えないようご確認ください。
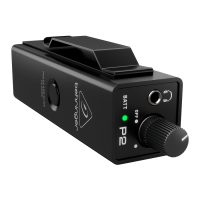
(EN) Controls
(1) INPUT jack accepts XLR or ¼ " male plugs for connection
of a personal monitor mix. Press the release tab to
disconnect the cable.
(2) VOLUME knob adjusts the output level and powers
the unit o when turned fully counterclockwise.
The adjacent LED will light when the power is on.
(3) HEADPHONE output allows connection of a ⁄" stereo
mini jack.
(4) BELT CLIP attaches to a belt or pant waistline for
hands-free use.
(5) RELEASE button allows access to the batteries and
stereo/mono switch. Hold the button down and slide
the outer shell down toward the input jack to expose
the unit’s interior.
(6) MONO/STEREO switch should be set to Mono when
used with a mixer’s aux send or any other mono source,
and set to stereo when connected to a headphone
output or other stereo source.
(7) BATTERY SLOTS allow the unit to be powered by a pair
of AAA batteries. Observe the correct polarity when
inserting new batteries.
(ES) Controles
(1) La toma INPUT acepta clavijas XLR o de 6,3 mm macho
para la conexión de una mezcla de monitorización personal.
Pulse la pestaña de seguridad para desconectar el cable.
(2) El mando VOLUME le permite ajustar el nivel de salida,
así como apagar la unidad cuando lo lleve a su tope
izquierdo. El piloto adyacente se iluminará cuando la
unidad esté encendida.
(3) La salida HEADPHONE le permite la conexión de unos
auriculares por medio de una clavija stereo mini de 3,5 mm.