behringer.com
12 U-CONTROL UMX490/UMX610 User Manual
Sequential scrolling in program libraries.b)
Most sound producers have the option to store presets in a separate bank
(frequently called a User Bank). If the sequence of songs to be played at a concert
is defined by your band, you can store all of the sounds used for the gig in the
User Bank in the sequence they occur in the concert and completely concentrate
on your playing. A cumbersome search for sounds in the sound producers is no
longer required thanks to the OCTAVE SHIFT push-buttons.
Press the ASSIGN push-button and 1) hold it down.
Press the 2)
PROG +/-
key.
Release the ASSIGN push-button.3)
Finally, press the 4) ENTER key. In order to discard your assignments,
please press the CANCEL key or press the ASSIGN push-button again.
The ASSIGN LED will go off in all 3 cases.
Pressing the right hand one of the two push-buttons now causes your external
device to switch one preset number upward to be switched upward in your
external device; pressing the left hand causes a step downward in your preset
library. By pressing both push-buttons you jump to Preset 0 in the current bank.
Please note that you must assign an individual MIDI channel to the OCTAVE SHIFT
push-buttons if you do not want to work in the GLOBAL CHANNEL (refer to
Chapter 4.2.2).
In case of the stepwise search function, the channel assignment always ◊
affects both the push-buttons. The assignment of a separate channel to
one of the 2 push-buttons is not supported.
Optional controller functionsc)
Please note that the OCTAVE SHIFT push-buttons generate switch controllers in
the event of a controller assignment. One of the two values 0 or 127 will always
be produced.
There are two exceptions: if you assign controller CC 07 (Channel ◊
Volume) to the OCTAVE SHIFT push-buttons, pressing one of the push-
buttons will always generate the value 0. In case of controller CC 10
(panning), pressing a push-button will always produce the value 64.
Please note that pressing both push-buttons simultaneously does not ◊
generate anything when assigning a controller.
Press the ASSIGN button and 1) keep it pressed.
Press the one of the two OCTAVE SHIFT buttons to which you want to 2)
assign a controller.
Release the ASSIGN button.3)
Assign the channel. Press one of the 16 channel keys 4)
CH 1
to
CH 16
. You can assign each of both the OCTAVE SHIFT buttons to
an individual MIDI channel.
Press the 5)
CC
key to be found under
BUTTON ASSIGN
.
Press the number keys on the keyboard to enter the controller number 6)
of your choice (as described in Chapter 4.2.7).
Confirm your selection with 7) ENTER. To discard your assignments either
press the CANCEL key or the ASSIGN button again. In all 3 cases the
ASSIGN LED goes out.
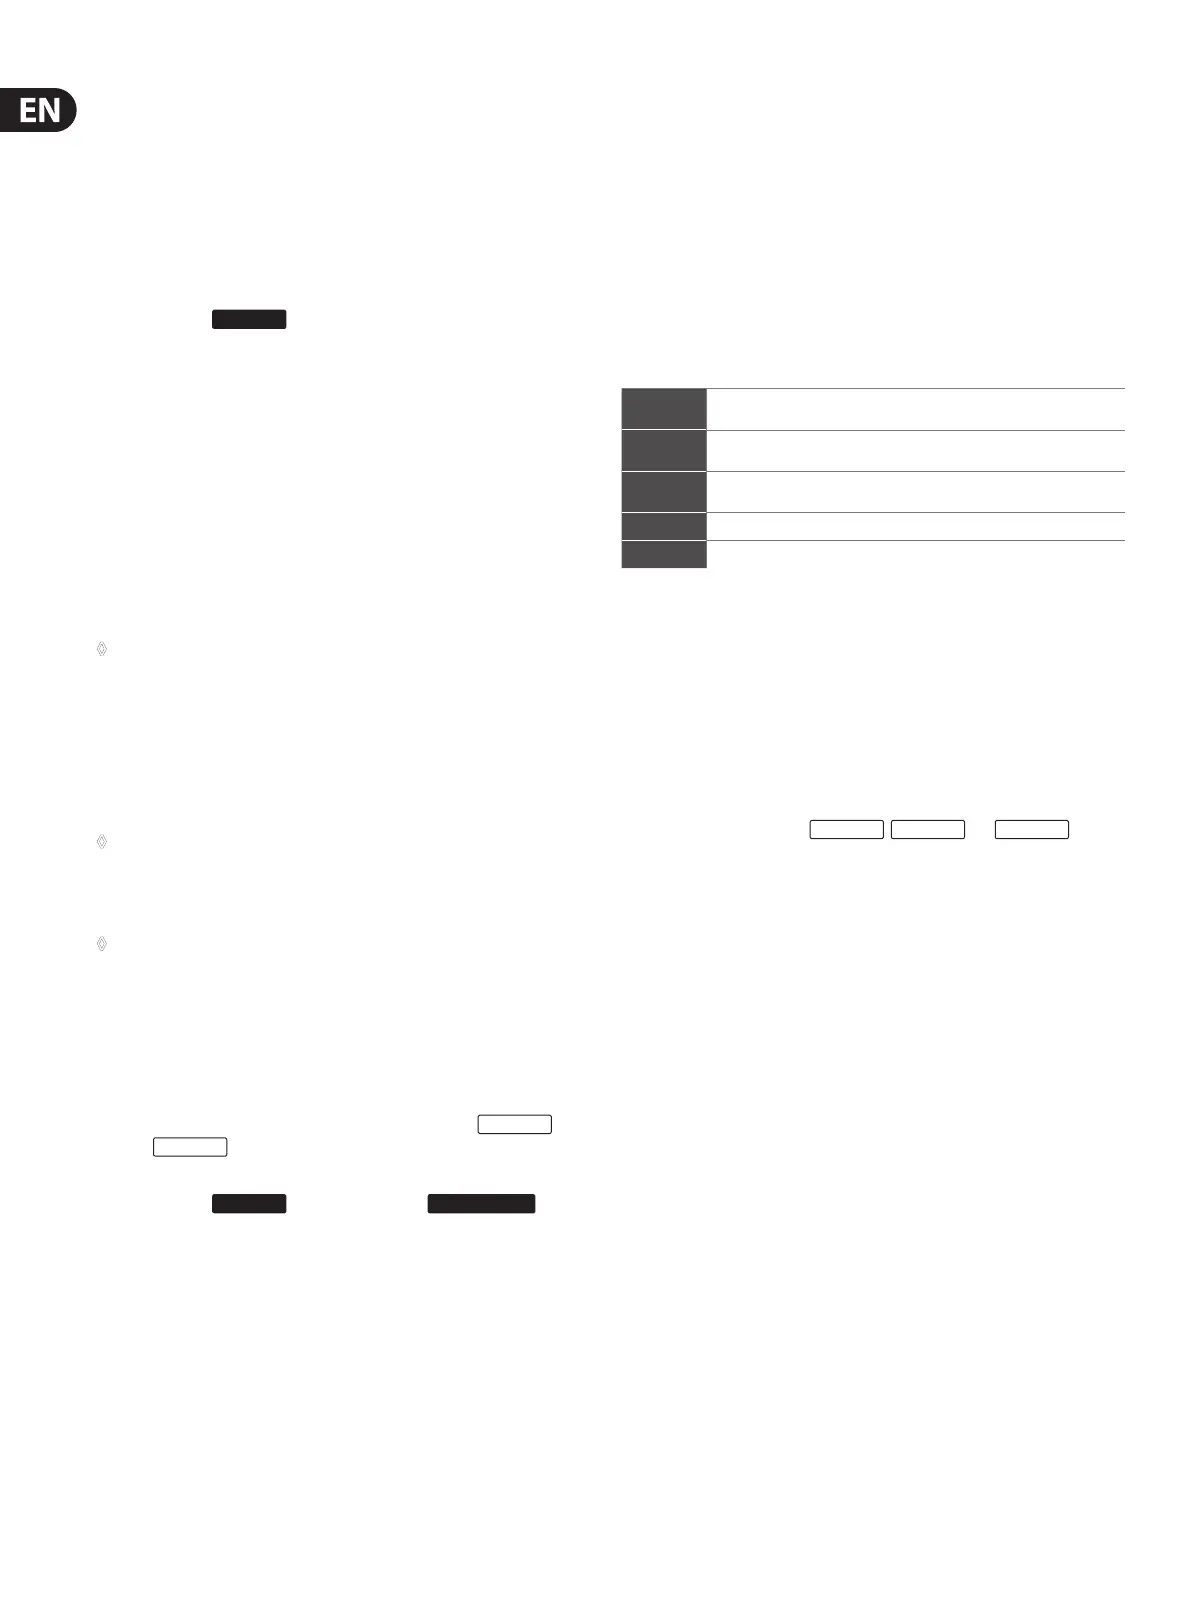
Velocity Sensitivity4.2.10
The sensitivity of the UMX can be regulated so that the velocity of the keys has an
effect on the volume level.
Press the ASSIGN button and keep it pressed.1)
Use the number keys to enter the keyboard velocity (see Table 4.1).2)
Release the ASSIGN button.3)
Confirm your selection with 4) ENTER. To discard your assignments either press
the CANCEL key or the ASSIGN button again. In all 3 cases the ASSIGN LED
goes out.
Key Effect on key velocity
0
OFF: velocity value is fixed to 110.
Change of key pressure has no effect on volume level.
1
SOFT: key pressure is very sensitive; low velocity changes create high
changes in volume level
2
MEDIUM: key pressure is “normal”; (very) hard hit notes are (very) loud,
(very) soft hit notes produce (very) low volume
3 HARD: key pressure is more unsusceptible compared to all other settings
4-9 invalid input
The FACTORY RESET command4.2.11
To reset all settings on your UMX, proceed as follows:
1) Press the ASSIGN push-button and hold it down.
2a) To cause a temporary FACTORY RESET, simultaneously press both
OCTAVE SHIFT push-buttons. All temporarily changed control elements are
returned to their factory settings. The USER MEMORY, however, is retained
and will not be reset.
2b) Simultaneously press the
8
,
9
and
0
keys
to perform a complete FACTORY RESET. In this case, the USER memory
is also overwritten, in addition to resetting all control elements of the
FACTORY MEMORY.
3) Release the ASSIGN push-button again. The LED of the ASSIGN push-button
stays on.
4) Finally, press the ENTER key. If you do not wish to perform the RESET
command, please press either the CANCEL key or press the ASSIGN
push-button again.
Table 4.1: Effect of RANGE definition on keyboard velocity