15
WING-DANTE Quick Start Guide
1. Introduction
Dante is a high-performance digital media protocol designed to
deliver audio over a standard Ethernet IP network. The WING-DANTE
card allows the WING console to share up to 64 x 64 channels of audio
with any network of Dante-enabled devices via single or redundant
Ethernet connection. Using existing wired network infrastructure
at 100 Mbit/s or 1 Gbit/s, the Dante protocol oers very stable, low-
latency transmission for a variety of professional applications unifying
multi-channel audio distribution across multiple locations or device
families.
2. Installation
Before you install the WING-DANTE card in the expansion slot of
the WING console, you must check behringer.com to verify whether
the console rmware supports that card. Minimum required WING
rmware for WING-DANTE is version 1.08. We recommend that you
periodically check your console’s product page for console rmware
updates.
Caution – before installing the WING-DANTE card into the console,
you must make sure that the console’s power switch is turned o.
Malfunctions or electrical shock may occur otherwise.
1. Make sure that the mixer’s power is turned o.
2. Loosen the 2 screws left and right that fasten the slot, then
remove the slot cover or currently-installed card and keep it in
a safe place.
3. Before removing the WING-DANTE card from its protective bag,
we recommend touching the grounded metal chassis of the
console to prevent electrostatic discharges aecting the sensitive
electronic components. It is generally a good idea to hold the
card either by the face plate or by the two small handles, but
never touching the components on the circuit board directly.
4. Align both edges of the card with the guide rails inside the
slot and carefully insert the card into the slot. It should slide in
without any considerable resistance. Push the card all the way
into the slot to ensure that the contacts of the card are correctly
inserted into the connector inside. The screw holes should be
naturally aligned.
5. Fasten the card using the included screws, or with those
that originally held the previous card in place. Damage or
malfunctions may occur if the card is not fastened.
6. If a card was initially removed, place it in the protective bag that
the WING-DANTE card was packed in, and repackage for safe
storage.
3. Requirements
For details on the PC hardware and software requirements,
please refer to the Minimum System Requirements posted on
audinate.com.
(Dante Virtual Soundcard drivers optionally available at audinate.com)
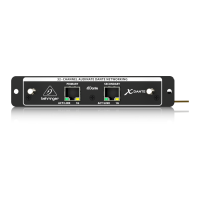
4. Connector Plate
• • 2x connectors compatible with Neutrik EtherCON
• • ACT/LINK LED (green) lights green when valid IP network
connection exists
• • 1 G LED (amber) lights when used in 1 GBit/s network
• • 2x small handles (St) for removing the expansion card from the
slot
• • 2x outer screws for xing the card in the slot (M3 x 6 size)
• • 3x countersunk screws xing the PCBA to the bracket,
do not remove these!