The ASURA 3S Wireless Game Controller is a versatile gaming peripheral designed to enhance the user's gaming experience across various platforms, including PC and TV. This user manual provides a comprehensive guide to its functions, features, and maintenance, ensuring users can fully leverage its capabilities.
Key Introduction and Layout
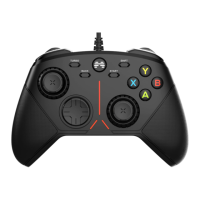
The controller features a well-organized layout with clearly labeled buttons and controls. On the front, users will find the LOGO Button, Shift, RB (Right Bumper), Start, ABXY buttons, Right Joystick, Sensivetity knob (for the right joystick), and an Indicator light. The left side of the front panel includes the Back button, Turbo button, LB (Left Bumper), Sensivetity knob (for the left joystick), Left Joystick, and D-Pad.
The back of the controller is equipped with a Type C Port for charging and wired connections, RT (Right Trigger), LT (Left Trigger), Trigger Lock for both triggers, M1 Custom Button, M2 Custom Button, and a Reset button. This ergonomic design ensures that all essential controls are easily accessible during gameplay.
Power On/Off and Indicator Lights
Power On: To power on the controller, simply press the BEITONG Logo button. The controller will activate, ready for connection.
Power Off: To power off the controller, press and hold the Back + B buttons simultaneously for approximately 3 seconds. This action will turn off the controller.
Forced Shutdown Situations:
- Disconnected State: If the controller fails to connect successfully within 120 seconds, it will automatically shut down.
- Connected State: If the controller remains idle for 10 minutes while connected, it will automatically shut down.
- Low Battery: The controller will automatically shut down when the battery is critically low.
The controller features four indicator lights that provide visual feedback on its status. These lights are crucial for understanding connection status, battery levels, and mode settings.
Connectivity
The ASURA 3S controller offers both wireless and wired connection options, providing flexibility for different gaming setups.
Wireless Connection:
- Insert the Wireless Receiver: Plug the wireless receiver into a USB interface on your PC or TV. The indicator lights on the receiver will flash slowly, indicating that it is pairing.
- Turn on the Controller: Press the BEITONG Logo button to turn on the controller. It will automatically attempt to connect with the device.
- Connection Confirmation: Once connected, the controller will vibrate, and the indicator light will turn on normally, signifying a successful connection.
- Switching Controller Modes: To switch between PC360 mode and BFM mode, press and hold the BEITONG Logo button for 3 seconds.
- PC360 Mode: The green light on the upper half of the indicator will be on for 3 seconds.
- BFM Mode: The green light on the lower half of the indicator will be on for 3 seconds.
- Automatic Pairing: For subsequent uses, the controller will automatically pair with the receiver when you press the BEITONG Logo (Home Button) to start up.
Wired Connection:
- Connect via USB Cable: Connect the controller directly to your device using a USB cable.
- Charging State: If the indicator light flashes slowly, it indicates that the controller is in a charging state.
- Connection Confirmation: The connection is completed when the controller vibrates, and the indicator light turns on normally.
Features for Controller
Sensitivity Knob Operation:
The ASURA 3S controller features sensitivity knobs for both joysticks, allowing real-time adjustment of joystick sensitivity.
- Adjusting Sensitivity: Rotate the knob three times to adjust a higher or lower gear. The three indicator lights will display the same color to confirm the adjustment.
- Indicator Lights and Sensitivity: The manual provides a visual representation of sensitivity levels, ranging from 1 (MIN) to 7 (MAX), with corresponding indicator light colors.
- Knob Operations Details:
- Left Knob: Adjusts the left stick. Indicator lights flow to the left (1, 3, 4).
- Right Knob: Adjusts the right stick. Indicator lights flow to the right (2, 3, 4).
- Sensitivity Enhance: Rotate the knob clockwise. Indicator lights flow from the bottom up.
- Sensitivity Weaken: Rotate the knob counterclockwise. Indicator lights flow from the top down.
- Left/Right Stick Reset to Default: Press and hold SHIFT, then press down the left/right stick. The indicator light will turn white for 3 seconds to confirm the reset.
- Simultaneous Reset to Default: Press and hold SHIFT for 3 seconds. The sensitivities of both sticks are reset to default when indicator lights 3 & 4 are off for 3 seconds.
Counterweight & Receiver Storage:
The controller's handles can be opened to insert counterweight blocks (6g and 12g) on both sides. This feature allows users to customize the controller's weight for a more comfortable grip and personalized feel. Additionally, the counterweight bin doubles as a storage compartment for the wireless receiver, ensuring it's always handy. Counterweights are sold separately, but suitable coins can also be used.
Trigger Stroke Adjustment:
The LT/RT keys' trigger stroke can be directly adjusted using the trigger lock on the back of the controller.
- Long Stroke (19°): Ideal for racing games.
- Medium Stroke (11°): Suitable for RPG games.
- Short Stroke (5°): Best for shooting and action games.
Software Configuration
The ASURA 3S controller is supported by the "ASURA 3S Assistant" software, which allows for advanced customization and firmware upgrades.
Controller Assistant Download:
- Download Software: Download the "ASURA 3S Assistant" from the official BEITONG website:
https://www.betop-cn.com/en/#/down.
- Install Software: Install the software on your computer.
- Connect Controller: Connect the controller to the computer using a USB cable.
- Run Software: Run the "ASURA 3S Assistant" to set up controller functions.
- Firmware Update: If prompted to update the firmware, click "Confirm."
Firmware Upgrade:
- Connect Controller: Connect the controller to the computer with a USB cable.
- Open Software: Open the "BEITONG Gamepad Assistant" configuration software.
- Automatic Check and Upgrade: The gamepad assistant will automatically check the gamepad firmware version and initiate an upgrade if necessary.
- Troubleshooting: If the firmware upgrade fails due to signal disconnection, poor contact, or other issues, unplug the USB cable and re-plug it to resume the upgrade.
The "ASURA 3S Assistant" software provides extensive customization options for the controller's buttons and lighting.
Key Functions Setting:
- Macro and Mapping: LB, RB, M1, and M2 keys can be customized to set macros and map to other keys.
- Mapping Other Keys: Other keys on the gamepad can only be customized for mapping.
- Key Value Mapping: Users can map one key's action to another. For example, pressing Key A can trigger the action of Key B. To do this, click the input box after the arrow of Key [A] to delete its current key value, then press Key B on the gamepad to map Key [A] to Key [B].
- Macro Programmable: LB, RB, M1, and M2 keys support macro programming. A single button can be programmed with a maximum of 32 actions. Users can record actions, durations, and intervals between actions in real-time combo operations and fine-tune them in milliseconds.
Lighting Adjustment:
The software allows for detailed customization of the controller's indicator lights.
- Configuration Name: Users can change the configuration name.
- Indicator Light Flicker Mode:
- Normal: All lights are on.
- Breath: All lights change in a breathing state.
- Drip: Light flows from the top down.
- Light Color: 9 colors can be selected.
- Color Flow Direction:
- Single Color: All lights are normally on in a single color.
- Clockwise: All lights switch in clockwise colors.
- Counterclockwise: All lights switch in counterclockwise colors.
- Brightness Adjustment: 5 levels are available.
- Frequency Adjustment: 5 levels are available for light switching.
Vibration Adjustment:
Users can adjust the intensity of the vibration feedback of the gamepad to suit their preferences.
Joystick Sensitivity Setting:
The sensitivity curve of the joysticks can be viewed in real-time, allowing users to fine-tune sensitivity by rotating the speed control knob of the stick.
Other Functions and Battery
TURBO Function:
The TURBO function allows for rapid, repeated input of a button press.
- Enable: Press and hold an [Action Key], then press the [TURBO Key]. The gamepad will vibrate once, indicating that running fire is enabled.
- Disable: Press and hold the [Action Key] that enabled running fire, then press the [TURBO Key].
Joystick D-Pad Switch:
The [SHIFT Key] allows users to switch between joystick and D-pad functions. Gently press the [SHIFT Key] to enable or disable this switching function.
Charging & Battery Life:
- Battery: The controller is equipped with a built-in 950mAh lithium battery.
- Battery Life: A fully charged controller provides up to 80 hours of battery life. In normal use, it offers approximately 40 hours.
- Charging Mode:
- Via Computer/TV: The controller can be charged by connecting it to a computer or TV with a USB cable. It will charge synchronously while playing games.
- Via Phone Charger: The controller can also be charged using a phone charger.
- Charging Indicator Light Prompt:
- Charging: The indicator light will be in a breathing state.
- Fully Charged: The indicator light will be normally on.
- Power On State: No specific indicator for power on.
- Power Off State: Color flows clockwise, frequency level 3.
- 0-25% Power: Indicator lights 1, 2, 3, 4 flow.
- 25%-50% Power: Indicator light 1 normally on, 2, 3, 4 flow.
- 50%-75% Power: Indicator lights 1, 2 normally on, 3, 4 flow.
- 75%-99% Power: Indicator lights 1, 2, 3 normally on, 4 breathing.
- Full Charge: Indicator lights 1, 2, 3, 4 normally on in white.
- Low Battery (below 20%): Indicator lights 1 and 2 will flicker in red quickly.
About BEITONG
BEITONG is a leading brand in smart gaming peripherals in China, with over 25 years of experience in game controller and software development. The company focuses on quality, function, and innovation, providing professional control solutions for various game types and aiming to create a stronger gaming experience for users.
Customer Service:
- Official Website:
www.betop-cn.com
- Service Email:
beitong-oversea@betop-cn.com
Users can also follow BEITONG's official WeChat account for more product and game information, and download the "joyu" official game community APP to communicate with other players.