Do you have a question about the BEITONG ASURA 2PRO and is the answer not in the manual?
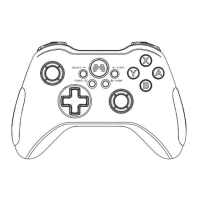
Diagram illustrating the front view of the game controller with all buttons labeled.
Diagram showing the vertical view of the controller, highlighting shoulder buttons and triggers.
Instructions to turn the controller on using the HOME button.
Methods to turn off the controller, including button combinations and auto-shutdown.
Explanation of the RGB breathing light and its states during connection, pairing, and charging.
Guide for connecting the controller to a computer via wireless or wired methods.
Instructions for connecting the controller to a television for gaming.
Steps to download, install, and use the BEITONG Gamepad Assistant software for controller setup.
Adjusting the controller's automatic sleep duration when idle.
Calibrating the joystick and trigger for optimal performance.
Procedure to enter joystick calibration mode by pressing specific buttons.
Instructions to rotate the left and right joysticks clockwise during calibration.
Method to exit joystick calibration mode and return to normal operation.
The BEITONG ASURA 2PRO Wireless Game Controller is a versatile gaming peripheral designed for an enhanced gaming experience across multiple platforms, including PC (Windows 7 and later) and Android TV. This user manual provides a comprehensive guide to its functions, usage, and maintenance features, ensuring users can fully leverage its capabilities.
The ASURA 2PRO controller boasts a standard gamepad layout, featuring two joysticks (Left Joystick - LS, Right Joystick - RS), a D-pad, ABXY buttons, shoulder buttons (LB, RB), and triggers (LT, RT). Additionally, it includes dedicated "Back," "Start," "Turbo," and "Shift" buttons, as well as two configurable "M1" and "M2" buttons on the back for advanced customization. A central "BEITONG (HOME Button)" serves as the primary power and connection indicator. The controller supports both 2.4G wireless and wired (USB Type-C) connections, offering flexibility in how it connects to various devices.
A key feature is the "RGB Breathing Light" located around the HOME Button, which provides visual feedback on the controller's status, such as connection, pairing, battery level, and charging. This light can be customized through the "BEITONG Gamepad Assistant" software, allowing users to personalize their gaming setup.
The controller also integrates vibration feedback, with adjustable intensity for both left and right motors, enhancing immersion during gameplay. The "Turbo" function allows for rapid, repeated input of any assigned button, with adjustable frequency, providing a tactical advantage in certain games.
To power on the controller, simply short press the BEITONG (HOME Button) after connecting the wireless receiver to your device. To power off, press and hold the "BACK" button and the "B" button simultaneously for approximately 3 seconds. The controller also features automatic shutdown: after 10 minutes of inactivity when connected, or after 120 seconds of inactivity when not connected. It will also power off automatically when the battery is low.
For wireless connection, insert the wireless receiver into a USB port on your computer, then press the BEITONG (HOME Button) to turn on the controller. A vibration and the illumination of the breathing light confirm a successful connection. For wired connection, use the USB Type-C cable to connect the controller to your computer. Press the BEITONG (HOME Button) to power on. Connection is confirmed by vibration and the breathing light.
Similar to computer connection, for wireless use with an Android TV, insert the wireless receiver into the TV's USB interface and press the BEITONG (HOME Button). An extension cable is recommended for a more stable connection. For wired connection, use the USB Type-C cable to connect the controller to the TV, then press the BEITONG (HOME Button).
The "BEITONG Gamepad Assistant" software is crucial for unlocking the controller's full customization potential. It can be downloaded from the official BEITONG website. To use the software, the controller must be connected to the computer via USB cable.
The software allows users to remap button values. By entering the "Button" tab in the assistant, any button's function can be modified. A "Restore Default" option is available to revert all changes. The LB/RB and M1/M2 back buttons support custom macro settings, enabling complex command sequences with a single press. To set a macro, users select "Edit Macro" in the software, press the desired button combination on the controller, and save the macro. Macro settings include trigger modes (Hold, Press, Loop) and enable/disable options.
Within the "Basic" tab of the software, users can adjust the vibration intensity of both the left and right motors. Each motor has five adjustable gears, allowing for fine-tuned haptic feedback.
The "Turbo" function's frequency can be adjusted in the "Button" tab of the software. Users can manually set the repeat frequency, with a default of 10 times/second and a maximum of 30 times/second. To activate Turbo, press and hold the Turbo button, then press any desired button. Repeating this action cancels the Turbo function for that button.
The "Joystick" tab in the software allows for individual sensitivity adjustments of the left and right joysticks. Users can choose from various sensitivity curves (Default, Delayed, Immediate, Performance, Smooth, Custom) and adjust the joystick dead zone.
The "Light" settings in the "Basic" tab enable customization of the RGB Breathing Light. Users can modify its color, brightness, frequency, and work type (e.g., breathing effect).
The "Function" tab in the software allows users to adjust the controller's custom sleep time. It also provides options for joystick and trigger calibration.
The "BEITONG Gamepad Assistant" software will prompt users if a firmware update is available. It is important to click "Confirm" to proceed with the update. In case of a failed firmware upgrade due to signal disconnection or poor contact, users are advised to unplug and re-plug the USB cable to resume the upgrade process.
If the joysticks exhibit issues like drift, unresponsiveness, or failure to return to the center, the calibration function can be used. Step 1: In the power-on state, press the "START" button and "BACK" button simultaneously, then press the "Right Joystick (RS)" to enter calibration mode. The Breathing Light will turn pink to indicate successful entry into calibration. Step 2: Turn both the left and right joysticks clockwise 2-3 turns. Step 3: After completing the turning, press the "START" button and "BACK" button simultaneously, then press the "Right Joystick (RS)" to exit calibration. The Breathing Light will return to its multi-color flashing state.
To clear all active pairing information from the controller, power it off, then press and hold the "RB" button, "BACK" button, "RS" button, and "HOME" button simultaneously. This can be useful for troubleshooting connection issues or preparing the controller for a new pairing.
| Battery Life | 20 hours |
|---|---|
| Analog Sticks | 2 |
| Connectivity | Bluetooth |
| Platform | PC, Android |
| Features | Turbo function |
| Battery | rechargeable lithium battery |