EasyManua.ls Logo

Belkin OmniView SOHO - User Manual

Belkin OmniView SOHO
2 pages
Print Icon
To Next Page IconTo Next Page
Loading...
This section provides complete instructions for the hardware setup of a single KVM Switch.
(F1DS102J or F1DS104J)
Installing the KVM Switch
The KVM Switch is a plug-and-play device for installation. For a quick start on installation and
operation, please follow the instructions below for the setup sequence:
NOTE: If you are using a PS/2 computer: Please make sure that all of your PS/2 computers are powered off before
connecting to the KVM Switch. Otherwise, the KVM Switch system might not be properly set up. However, USB
computers do not have this limitation.
Connect the Audio
NOTE: Speakers and microphones are not required for use of your KVM Switch.
Single-Switch Installation
Audio and Microphone Connections
Step 1.
Connect the shared keyboard, mouse, and
monitor to the console port on the rear of the
KVM Switch.
NOTE: The special KVM cable provides a PS/2 keyboard connector, a USB connector, and an HDB video connector for
the computer connection. When connecting to a USB computer, just plug the USB connector to it and leave the PS/2
connector dangling free. When connecting to a PS/2 computer, just add one USB-to-PS/2 adapter to the USB connector
and you’ll have a PS/2 connector for the mouse. Do NOT connect the USB connector and the PS/2 keyboard
connector to a computer at the same time.
Step 3.
The monitor and KVM must be powered up first. Then, power up the connected computers.
After your computer is powered up, the keyboard and mouse will be recognized and you can
begin using the KVM Switch.
Step 2.
Connect each of your computers to a
computer port on the rear of the KVM
Switch. You should use the special USB
PS/2 KVM cable (with the USB-to-PS/2
adapter) for connection to a USB computer
(PS/2 computer).
Step 1.
Using the audio cable attached to
your speakers, connect the male
3.5mm plug to the lime audio jack
in the “Console” section of the KVM
Switch.
Step 2.
Using the mic cable attached to
your microphone, connect the male
3.5mm plug to the pink mic jack in the
“Console” section of the KVM Switch.
Step 3.
Using the SOHO USB Cable Kit, connect one
end of the lime male 3.5mm plug to the speaker
jack of your sound card or computer, and
connect the other end to the audio jack of the
KVM Switch.
Step 4.
Using the KVM Cable, connect one end of the
pink male 3.5mm plug to the mic jack of your
sound card or computer, and connect the other
end to the pink mic jack of the KVM Switch.
Question and Answer IconNeed help?

Do you have a question about the Belkin OmniView SOHO and is the answer not in the manual?

Summary

Single-Switch Installation

Installing the KVM Switch

Provides instructions for the hardware setup and plug-and-play installation of a single KVM Switch.

Connect Console Peripherals

Connect shared keyboard, mouse, and monitor to the KVM console port on the rear.

Connect Computers to KVM

Connect each computer to the KVM switch using special USB/PS/2 cables for keyboard, mouse, and video.

Power Up Sequence

Sequence for powering up the monitor, KVM, and connected computers for proper recognition.

Audio and Microphone Connections

Connect Audio to KVM Console

Connect speakers to the KVM's lime audio jack and microphone to the pink mic jack on the console.

Connect Audio to Computer

Connect audio cables from your computer's sound card to the KVM's console audio jacks.

Overview

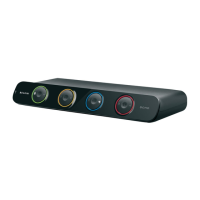
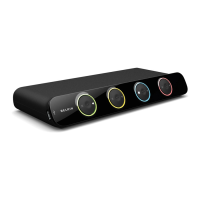
The Belkin OmniView SOHO KVM Switch with Audio is a plug-and-play device designed to allow a single console (keyboard, mouse, and monitor) to control multiple computers, with support for both PS/2 and USB connections, and integrated audio and microphone switching capabilities. This Quick Installation Guide provides comprehensive instructions for setting up either the F1DS102J or F1DS104J models.

Function Description

The primary function of the Belkin OmniView SOHO KVM Switch is to enable a user to operate multiple computers from a single set of peripherals: a keyboard, a mouse, and a monitor. This eliminates the need for multiple sets of these peripherals, saving desk space and simplifying the workspace. Beyond basic KVM functionality, the device also integrates audio and microphone switching, allowing the user to share speakers and a microphone across all connected computers. This is particularly useful in multimedia environments or for users who frequently switch between computers for different tasks, such as gaming, work, or content creation. The switch supports both PS/2 and USB console and host connections, offering flexibility for various computer setups.

Important Technical Specifications

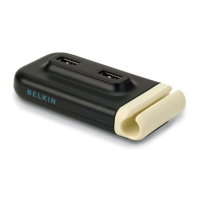
The KVM switch features a "Console" section on the rear for connecting the shared keyboard, mouse, and monitor. This section includes dedicated ports for the PS/2 keyboard, PS/2 mouse, and a USB console port, along with a VGA console port for the monitor. Additionally, it provides lime audio and pink mic jacks for connecting the shared speakers and microphone.

For connecting to the computers, the switch includes multiple "Computer Ports" on the rear. Depending on the model (F1DS102J or F1DS104J), it supports either two or four computers. Each computer port consists of an HDB video connector, a USB connector, and PS/2 keyboard and mouse connectors. The device utilizes special KVM cables that typically include a PS/2 keyboard connector, a USB connector, and an HDB video connector for the computer connection. For USB computers, only the USB connector needs to be plugged in, leaving the PS/2 connector dangling. For PS/2 computers, a USB-to-PS/2 adapter is required for the mouse connection, and it's crucial not to connect both the USB and PS/2 keyboard connectors to a computer simultaneously.

The audio and microphone connections for each computer are facilitated by separate lime audio and pink mic jacks on the KVM cable, which connect to the respective speaker and microphone jacks on the computer's sound card. The KVM switch also includes a DC Power Jack for its power supply.

Usage Features

The Belkin OmniView SOHO KVM Switch is designed for ease of use with its plug-and-play installation.

  1. Console Connection: The first step in setting up the KVM switch involves connecting the shared keyboard, mouse, and monitor to the "Console" port on the rear of the KVM Switch. This establishes the central control point for all connected computers.
  2. Computer Connection: Each computer is connected to a dedicated "Computer Port" on the KVM Switch using the provided special USB/PS/2 KVM cables. These cables are versatile, supporting both USB and PS/2 computers. For USB computers, only the USB connector from the KVM cable is plugged into the computer, while the PS/2 connector is left disconnected. For PS/2 computers, a USB-to-PS/2 adapter is used for the mouse, and it's important to avoid connecting both USB and PS/2 keyboard connectors to the same computer simultaneously.
  3. Audio Connection (Console Side): The shared speakers are connected to the lime audio jack in the "Console" section of the KVM Switch using the speaker's audio cable.
  4. Microphone Connection (Console Side): The shared microphone is connected to the pink mic jack in the "Console" section of the KVM Switch using the microphone's cable.
  5. Audio Connection (Computer Side): For each computer, the lime male 3.5mm plug from the KVM cable is connected to the speaker jack of the computer's sound card.
  6. Microphone Connection (Computer Side): Similarly, the pink male 3.5mm plug from the KVM cable is connected to the mic jack of the computer's sound card.
  7. Power-Up Sequence: To ensure proper setup, the monitor and the KVM Switch must be powered up first. After these devices are on, the connected computers can then be powered up. The KVM Switch will recognize the keyboard and mouse once the computers are fully booted, allowing the user to begin operation.

Usage Considerations:

  • PS/2 Computer Setup: When connecting PS/2 computers, it is critical to ensure that all PS/2 computers are powered off before connecting them to the KVM Switch. Failure to do so may result in improper setup of the KVM Switch system. USB computers do not have this specific power-off requirement.
  • Cable Management: The use of specialized KVM cables simplifies connections, but proper cable management is recommended to maintain an organized workspace.
  • Audio/Mic Functionality: While the KVM Switch supports audio and microphone connections, these are optional features and not required for the basic KVM functionality.
  • Switching: The manual implies that switching between computers is handled by the KVM Switch, likely through hotkeys or a physical button on the device, though specific switching methods are not detailed in this guide.

Maintenance Features

The Belkin OmniView SOHO KVM Switch is designed as a low-maintenance device.

  • Plug-and-Play: Its plug-and-play nature means no complex software installation or driver updates are typically required, simplifying initial setup and ongoing use.
  • Durability: The device appears to be housed in a robust casing, suggesting a durable design suitable for continuous operation in various environments.
  • Troubleshooting: The guide emphasizes the correct power-up sequence and PS/2 computer connection procedure as key to avoiding setup issues, which are common points of troubleshooting for KVM switches. Adhering to these steps helps prevent common problems.
  • Cleaning: As with most electronic devices, periodic cleaning of the exterior with a soft, dry cloth would be recommended to prevent dust buildup and maintain its appearance. No specific internal maintenance is suggested or required by the user.
  • Technical Support: Belkin provides extensive technical support contact information for various regions (US, UK, Australia, New Zealand, Singapore, Europe), indicating readily available assistance for any issues that may arise. This includes phone numbers and a website for support.

In summary, the Belkin OmniView SOHO KVM Switch with Audio is a versatile and user-friendly solution for managing multiple computers from a single console, enhanced by integrated audio and microphone switching, and designed for straightforward installation and reliable performance.

Belkin OmniView SOHO Specifications

General IconGeneral
BrandBelkin
ModelOmniView SOHO
CategorySwitch
LanguageEnglish

Related product manuals