5
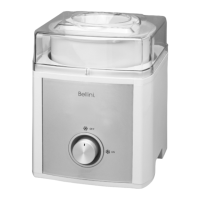
Getting to Know Your
2 Litre Ice Cream Maker
Congratulations on the purchase of your new 2
Litre Ice Cream Maker.
Before rst using your new Ice Cream Maker, it is
most important that you read and follow the
instructions in this use and care booklet, even
if you feel you are familiar with this type of
appliance.
Your attention is drawn particularly to the section
dealing with IMPORTANT SAFEGUARDS. Find a
safe and convenient place to keep this booklet
handy for future reference.
This appliance has been designed to operate
from a standard domestic power outlet. It is not
intended for industrial or commercial use.
Before First Use
Carefully unpack the Ice Cream Maker and
remove all packaging materials.
Wash the freezer canister, cover and paddle in
warm soapy water and dry thoroughly. Do not
clean it in a dishwasher.
Use a damp cloth to clean the exterior of the
motor base. Do not immerse the motor base in
water.
DO NOT clean any of the parts with abrasive
cleaners or hard implements.
How to Use Your 2 Litre
Ice Cream Maker
Step 1 – preparing the ice cream
mixture
Prepare recipe ingredients according to the
recipes in this booklet or from your own recipe. If
you use your own recipe, be sure it yields 2 liters
or less.
For best results, prepare the ice cream mixture
one day before making ice cream. This adds
volume and allows time for the mixture to cool
sufciently.
Step 2 – freezing the freezer canister
Note: It is important that the freezer
canister is frozen properly.
The freezer canister must be completely frozen
before you begin your recipe. Before freezing,
wash and dry the canister. To freeze the freezer
canister, wrap it in a plastic bag and place it in
the back of your freezer, where the temperature
is the coldest. Be sure to place the freezer canister
on a at surface in its upright position for even
freezing. The plastic bag will prevent freezer
sticking from occurring.
Shake the canister to determine whether it is
completely frozen. If you do not hear the liquid
within the canister moving, the cooling liquid is
therefore frozen.
Reminder: Your freezer should be set to -15°C or
below to ensure proper freezing of all foods. The
freezing time needed to reach the frozen state
depends on how cold your freezer is. Refer to
below table to freeze your freezer canister.
freezer approx.
temperature freezing time
-30°C/-22°F 8-9 Hours
-25°C/-13°F 12-13 Hours
-18°C/0°F 20-22 Hours
-15°C/5°F 24 hours or more
Note: The canister must be used
immediately after removing from the
freezer. It will begin to quickly defrost
once it has been removed from the
freezer.