19
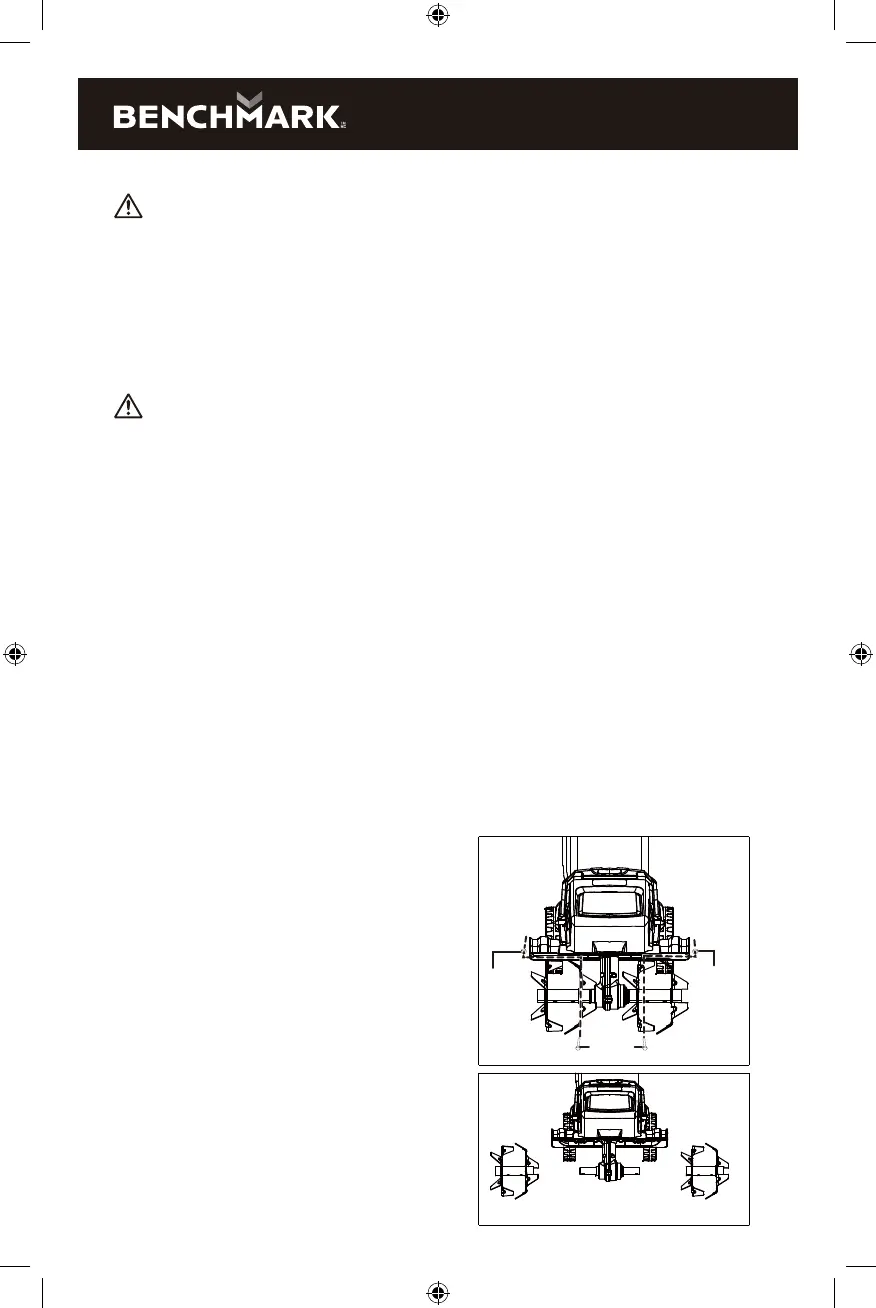
FIG. 10
FIG. 11
Unexpected tines movement may cause personal injury. Before servicing, repairing,
or inspecting the unit, turn the motor OFF and remove the batteries. Wait for the
tines to completely stop rotating before conducting inspection, cleaning, or
maintenance.
Before and after each use, check the product and accessories (or attachments) for
wear and damage. When necessary, only use identical replacement parts that are
approved by the manufacturer.
Contact with hot components (e.g. motor housing, gear box, etc.) on the machine
may cause burns. Allow the machine to cool o before handling.
IMPORTANT!
• Wear protective gloves when cleaning or maintaining the machine.
• Do not use cleaning fluids or solvents or spray the machine down with water
(especially water under pressure) when cleaning the machine.
NOTE: After each use, follow these steps to properly clean the unit:
1. Remove soil, dirt, and foliage stuck in the tines, drive shaft, tool surface, and
vents with a brush or dry cloth.
2. Spray or rub biodegradable oil onto the tines.
3. Clean soiled grips with a damp cloth. Always inspect the machine for damaged
and worn parts after each use. Check that safety features (i.e. labels, guards, etc.)
are in place. Check that nuts, bolts, and screws are tight.
Changing the tines
NOTE: The machine is fitted with four tilling tines that can easily be changed in
pairs. Both of the steel tines pairs can be fitted on the left or right, as required.
Always change both tines pairs at the same time to avoid imbalance and damage to
the machine. To replace the tines, follow the steps below:
WARNING:
WARNING:
1. While standing on a flat and stable
surface, switch o the unit and
remove the batteries.
2. Remove the hex bolts and the
self-locking nuts, then remove
the steel tines (Fig. 10).
3. Clean the drive shaft with
biodegradable oil (Fig. 11).
4. Place the new tines onto the drive
shaft so that the holes on the axles
line up with the holes on the drive
shaft (Fig. 11).
Self
locking
nut
Self
locking
nut
Hex bolts