Introduction
t#FGPSFJOTUBMMJOHUIFTZTUFNSFBEUIFJOTUSVDUJPO
herein.
t*UJTNBOEBUPSZOPUUPVTFUIF#0#.#0#.&
item for applications different from those indicated
in the instructions herein.
t4VQQMZUIFFOEVTFSXJUIJOTUSVDUJPOTGPSVTJOHUIJT
system.
t
The end user should receive special instruction manual.
t"MM#FOJODËJUFNTBSFDPWFSFECZBOJOTVSBODFQPMJDZ
for damages and injuries caused by manufacture
faults. It is however required that the machine
bear the CE marking and original Benincà parts be
used.
General information
To ensure a good operation of these automatic devices,
the gate to be automated should meet the following
requirements:
- good strength and stiffness.
- hinges should have a minimum backlash and allow
for smooth and regular manual operations.
- when closed, the gate leaves should correctly
overlap for their entire height.
How to install the automatic system
Calculate the height of the system from the ground
(it is advisable to define a position as much centred
as possible with respect to the main door and in
correspondence with a strong cross girder). Weld the
plate P, following measures in Fig. 1.
With the door closed, weld bracket S to a cross beam
of the main door or other element with equal strength,
according to measures shown in Fig. 1. Keep in mind
that, when carrying out this operation, the actuator
should not be totally in a stroke end position.
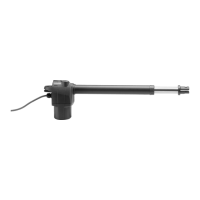
Remove the cover C by loosening the screw F. Then
fix the actuator to the plate P by means of the screw
T and the nut D (Fig. 2). Lock the actuator to plate S
by means of screw V and washer R.
The holes in the acturator (Fig. 1a-1b) help to keep to
the optimum installation measures.
How to adjust the mechanical stoppers
The actuator is provided with adjustable mechanical
stoppers in the opening and closing phases. The system
is adjusted by suitably positioning the “Open” and
“Close” mechanical locks, as shown hereunder (Fig.3):
1) Unlock the automatic system by using the special
release lever, as shown in the instructions for the
user (page 21-22).
2) Close the door/gate leaf.
3) Loosen screws V1 and move the “Close” lock until
it reaches the pivot P, then tighten screws V1.
4) Open the door/gate leaf.
5) Loosen screws V2 and move the “Open” lock until
it reaches the pivot P, then tighten screws V2.
6) Reset the automatic operating mode.
In the BOB 5M version, two limit micro-switches are
provided fixed to the mechanical stoppers.
The micro-switches trigger slightly in advance with
respect to the mechanical stop.
Connections
1) The special plate P (Fig. 4) allows for using a link for
sheath or cable gland PG11, or PG13,5. Once the
type of cable gland is applied to the plate, fix the
latter to the adaptor cover by means of screws V.
2) Insert the cable, or cables, under the terminal board,
as shown in Fig.5. This will leave enough space for
the capacitor.
3) BOB 5M: carry out the wiring by referring to the wire
diagram shown in Fig 6a (use both limit switches).
In order to use either the opening limit switch or the
mechanical stoppers, change wiring as shown in
Fig. 6b (opening limit switch only) or 6c (mechanical
stoppers only).
N.B: in wiring connections shown in Fig. 6a and
6b, the capacitor MUST NOT be connected to
the control unit, while for wire connection shown
in Fig. 6c, the capacitor can be connected to the
control unit.
4) BOB 5ME: carry out the wiring by referring to wire
diagram shown in Fig 6d.
5) It is mandatory to provide for ground by using the
special GND terminal.
WARNING
The insurance policy, which covers any damages or
injuries caused by manufacture faults, requires that
the installation comply with regulations in force and
Benincà original accessories be used.

 Loading...