10
DIP 7 “ENC” The optical sensor is enabled or disabled (Encoder).
Off: Disabled optical sensor. Detection of obstacles and braking not enabled.
On: Enabled optical sensor. Through the ENC trimmer, the sensitivity of obstacle
detection is adjusted in compliance with regulations in force.
DIP 8 “Radio” Programmable code transmitters are enabled or disabled.
Off: Receiver enabled for variable code transmitters (rolling-code) and
programmable transmitters (self-learning and dip/switches).
On: Radio receiver enabled only for variable code (rolling-code) transmitters.
LEARNING OF OPENING AND CLOSING POSITIONS
Should a braking function be activated (DIP6:ON), the rst operations are carried out at normal speed,
without braking, in order to allow for the learning of the gate stroke.
Once the stroke is recorded, the control unit will control automatically the braking phases during opening
and closure. This learning phase is performed also in case of power failure.
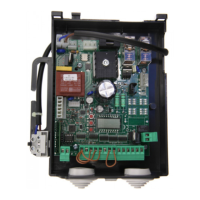
LED DIAGNOSTICS
The conditions of the control unit is indicated by the number of ashes of LED DL1:
1 ash with 3 sec. interval The control unit is powered and is operating regularly
2 ashes with 3 sec. interval Input, open STOP
3 ashes with 3 sec interval Input, open PHOT1
4 ashes with 3 sec interval Input, open PHOT2
5 ashes with 3 sec interval Input, open DAS
6 ashes with 3 sec interval Alarm, DM Test. Check the correct operation of photocells.
7 ashes with 3 sec interval Alarm, optical sensor activation
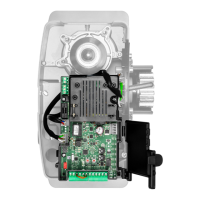
CONFIGURATION WITH BUILT-IN RECEIVER
The control unit is tted with a built-in radio module for receiving remote controls both with xed codes
and variable codes (see dip-switch 4 functions), with a frequency of 433.92MHz.
For a transmitter to be used, the module rst has to self-learn its code. The memorise procedure is
illustrated below, the module can memorise up to 64 different codes.
Memorising a new transmitter by activating the P.P. function
- Press the PGM button once for 1sec and the Power LED will start blinking at 1 sec intervals.
- Press the transmitter button within 10 sec to memorise with the P.P. (Step-by-step) function.
To exit the programming procedure wait 10 sec or press the PGM button for 1 sec.
To memorise a new transmitter code with activation of 2nd radio channel output (DIP1:ON)
- Press push-button PGM twice, each time for at least 2 seconds, LED DL1 switches on with xed light.
- Within the following 10 seconds, press the transmitter push-button to be memorised with 2
nd
radio
channel function.
Wait for 10 sec or press PGM push-button for 1 second to exit the programming mode.
Remote Learning of a transmitter
If one transmitter has already been memorised others can be memorised without having to access the
control unit as follows:
- Press the hidden key on the transmitter already stored in memory, the ashing light starts ashing.
- On the already memorised remote control, press the key corresponding to the function which must be
copied.
- Within 10 sec, press the key of the new transmitter to which the function should be assigned.
E.g.: on key 1 of TX “A” the P.P. function is stored; this function should be assigned to key 2 of the new
TX “B”. Hence, press in sequence: hidden key of TX A >> key 1 of TX A >> key 2 of TX B
Cancelling all transmitters from the memory
- Keep the PGM key pressed for 15 sec, the DL1 LED and the courtesy light start ashing rapidly and
switch off at completion of cancellation.
- Release the PGM key and the memory is now erased.
N.B.: For safety reasons, transmitters cannot be memorised during the open/close cycles of the motor.
When entering the memorise transmitter procedure, if the Power LED gives a prolonged blink and then
goes out, this signals that the receiver memory is full and no other transmitters can be memorised or that
the transmitter is not compatible.
 Loading...