EasyManua.ls Logo

Bernina Artista 165 User Manual

Bernina Artista 165
120 pages
To Next Page IconTo Next Page
Page #1 background imageLoading...
Page #1 background image
1
When using an electrical appliance, basic safety
precautions should always be followed, including the
following.
Read all instructions before using this sewing machine.
When the machine is not in use, it should be disconnected
from the electricity supply by removing the plug from the
power outlet.
To reduce the risk of electric shock:
1. An appliance should never be left unattended when
plugged in.
2. Always unplug this appliance from the electric outlet
immediately after using and before cleaning.
To reduce the risk of burns, fire, electric shock or injury to
persons:
1. Do not allow to be used as a toy. Close attention is
necessary when this appliance is used by or near
children.
2. Use appliance only for its intended use as described in
this manual. Use only attachments recommended by
the manufacturer as contained in this manual.
3. Never operate this appliance if:
· it has a damaged cord or plug,
· it is not working properly,
· it has been dropped or damaged
· it has fallen into water
Return the appliance to the nearest authorized dealer
or service center for examination, repair, electrical or
mechanical adjustment.
4. Never operate the appliance with any air openings
blocked. Keep ventilation openings of the sewing
machine and foot controller free from accumulation
of lint, dust and loose cloth.
5. Keep fingers away from all moving parts. Special care
is required around the sewing needle.
6. Always use an original or recommended BERNINA
stitch plate. The wrong plate can cause the needle to
break.
7. Do not use bent needles.
8. Do not pull or push fabric while stitching. It may
deflect the needle causing it to break.
9. Turn power switch to “0” when making any
adjustments in the needle area, such as threading
or changing the needle, threading the bobbin or
changing the presser foot.
10. Always unplug the sewing machine from the
electrical outlet when removing covers, lubricating
or when making any other user servicing adjustments
mentioned in this instruction manual.
11. Never drop or insert any object into any opening.
12. Do not use outdoors.
13. Do not operate where aerosol (spray) products are
being used or where oxygen is being administered.
14. To disconnect, turn all controls to the off (“0”)
position then remove the plug from the outlet.
15. Do not unplug by pulling on the cord but grasp the
plug before pulling.
16. No responsibility will be taken for any possible
damage as the result of misuse of the machine.
17. This machine is provided with double insulation.
Use only identical replacement parts. See instructions
for Servicing of Double-Insulated machines.
In a double-insulated product, two systems of insulation
are provided instead of grounding. No means of
grounding is provided on a double-insulated product nor
should a means for grounding be added to the product.
Servicing a double-insulated product requires extreme
care and knowledge of the system and should only be
done by qualified service personnel. Replacement parts
for a double-insulated product must be identical to those
parts in the product. A double insulated product is
marked with the words “DOUBLE INSULATION” or
“DOUBLE INSULATED”.
The symbol may also be marked on the product.
This sewing machine is intended for household use only.
Safety Instructions
IMPORTANT SAFETY INSTRUCTIONS
DANGER
WARNING
SERVICING DOUBLE-
INSULATED PRODUCTS
SAVE THESE
INSTRUCTIONS!
BA_165_engl 16.4.2004 9:34 Uhr Seite 1
030787.52.04_0401_a165_EN

Other manuals for Bernina Artista 165

Question and Answer IconNeed help?

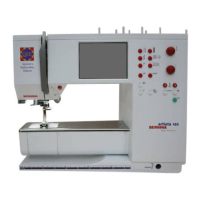
Do you have a question about the Bernina Artista 165 and is the answer not in the manual?

Bernina Artista 165 Specifications

General IconGeneral
DisplayLCD
Foot ControlYes
Needle Up/DownYes
Speed ControlYes
Free ArmYes
Needle ThreaderYes
Presser FeetMultiple included

Summary

IMPORTANT SAFETY INSTRUCTIONS

DANGER

Instructions to reduce the risk of electric shock.

WARNING

Instructions to reduce the risk of burns, fire, electric shock or injury.

Setting up the machine

Power Connections

Connecting power cable, foot control, and power switch operation.

Winding the bobbin

Winding the bobbin

Step-by-step instructions for winding the bobbin.

Bobbin case

Instructions for removing and inserting the bobbin case.

Inserting the bobbin

Steps for correctly inserting the bobbin into the bobbin case.

Changing the needle

Changing the needle

Instructions for removing and inserting the sewing machine needle.

Changing the presser foot

Instructions for changing the presser foot.

Threading the upper thread

Threading the upper thread

Detailed steps for threading the upper thread correctly.

Needle threader

Instructions for using the automatic needle threader.

Bringing up the lower thread

Steps to bring the lower thread up through the stitch plate.

Presser foot pressure

Presser foot pressure

How to adjust presser foot pressure for different fabrics.

Thread tension

Thread tension

Basic settings and adjustments for thread tension.

Presser feet

Practical stitches

Buttonholes

Standard and Stretch Buttonholes

Details on standard, narrow, and stretch buttonholes.

Round and Keyhole Buttonholes

Details on round and keyhole buttonholes with bartacks.

Specialty Buttonholes

Details on straight stitch, sew-on, and eyelet buttonholes.

General instructions

On screen stitch selection/stitch display/functions

How to select stitches, alter settings, and use on-screen functions.

Functions

External Function Buttons

Explanation of buttons like clr, mem, ?, TC, smart, setup, eco, quick reverse.

On-Screen Functions

How on-screen functions are activated and cancelled.

Function Toolbar Options

Detailed functions on the toolbar: balance, stitch selection, mirror images, etc.

Functions (Cont.)

Memory Editing Functions

Functions for editing memory contents: motor speed, securing, mirror image, balance.

Personal program

How to create and manage personal programs.

Reset

How to reset machine settings to basic defaults.

Functions in Memory

Information on memory capacity and usage.

Buttonhole program functions

Buttonhole length – direct length entry

How to enter buttonhole length directly.

Buttonhole length – on screen measurement

How to measure buttonhole length on screen.

Manual buttonhole

How to sew manual buttonholes.

Stitch counter buttonhole

How to use the stitch counter buttonhole function.

Messages/Buttonholes

Messages

List of machine messages and their responses.

Buttonholes (Cont.)

Automatic buttonholes (standard and stretch)

Instructions for sewing automatic buttonholes.

Automatic buttonholes (round and keyhole)

Instructions for sewing automatic round and keyhole buttonholes.

Automatic buttonhole (standard and stretch) Length calculated from button

How to determine button size for automatic buttonholes.

Buttonhole corrections (all types)

How to make adjustments to buttonhole width, density, and balance.

Buttonhole in Long Term Memory

How to save and recall buttonholes in long term memory.

Sewing a 4-step buttonhole

Step-by-step guide for sewing a 4-step buttonhole.

Automatic buttonhole (all types)

How to program the buttonhole length and sew automatic buttonholes.

Stitch counter buttonholes (all types)

Instructions for stitch counter buttonholes.

Manual 4–6 step buttonholes

Instructions for sewing manual buttonholes.

Memory (Cont.)

Programming stitches

How to program stitches into memory.

Editing memory contents

How to modify stitches, functions, and mirror images in memory.

Quilt stitches

Balance

Balance and practical stitches/decorative stitches

How to adjust stitch balance for different fabrics and stitch types.

Balance

How the electronic balance function works.

Balance for practical stitches

How to balance practical stitches.

Balance for decorative stitches

How to balance decorative stitches.

Smart Function

Saving the screen with the Smart Function

How to save current machine settings using the Smart Function.

Smart Function – back to screen

How to return to the saved screen with Smart Function.

Setup Program

Setup

How to enter and navigate the Setup program menu.

Functions in Setup

Overview of functions available within the Setup program.

Setup Program (Cont.)

Personal Program Setup

Designing a custom screen with preferred stitches and variations.

Personal Program Functions

Managing personal programs and the Favorite function button.

Deleting stitches from the Personal Program

How to delete stitches from the personal program.

Return all functions to basic settings

How to reset all functions to basic settings.

Calibration

Step-by-step guide to calibrating the machine's touch screen.

Programming the Favorite Function Button

Assigning functions to the Favorite Function button.

Changing basic settings for stitch width, stitch length and needle positions

How to alter stitch width, length, and needle position.

Changing the motor speed

How to adjust the maximum sewing speed using arrows.

Return to basic settings

Resetting machine settings to factory defaults.

Screen Calibration

Instructions for calibrating the touch screen for accurate selections.

Embroidery hoop adjustment

How to adjust the embroidery hoop for correct needle positioning.

eco (ecology) function

Eco function

How to activate the eco function to save energy.

Return to sewing

How to deactivate the eco function and return to normal sewing.

Needle, thread, fabric feed

Needle, thread, fabric feed (Cont.)

Cleaning and Maintenance

Cleaning

Instructions for cleaning the stitch plate area and hook.

Cleaning the hook

Detailed steps for cleaning the sewing machine hook.

Lubricating

Instructions for lubricating the sewing machine hook.

Troubleshooting

Thread Issues

Troubleshooting upper and lower thread breaks and faulty stitching.

Stitch and Machine Operation Issues

Resolving skipped stitches, needle breaks, and machine running issues.

Straight stitch

Securing stitch

Edge stitching

Zig-zag stitch

Altered Memory

Triple Straight Stitch seam

Stretch/Super stretch seam

Vari-overlock seam

Double overlock seam/Jersey overlock seam

Stretch overlock seam/Reinforced overlock seam

Hems with practical stitches

Sewing knits

Ribbing with overlock seam

Zippers

Blind hem

Sewing on wide elastic

Bar tack program

Buttonholes (Cont.)

Automatic buttonholes (all types)

How automatic buttonholes register length and duplicate.

Automatic round and keyhole buttonholes

Instructions for automatic round and keyhole buttonholes.

Sew the first bead

Steps to sew the first bead of an automatic buttonhole.

Sew the buttonhole

Steps to sew automatic round and keyhole buttonholes.

Program the buttonhole

How to program the buttonhole length.

Auto buttonhole

How auto buttonhole functions.

Stitch counter buttonholes for all buttonhole types (can not be saved in memory)

Manual 4/6-step buttonholes (all types)

Button sewing-on program

Eyelets

Elastic Edges

Reinforced edges on woven fabrics

Patches on knits and jersey

Darning

Manual darning

Freehand quilting

Practical and decorative stitches in memory

Related product manuals