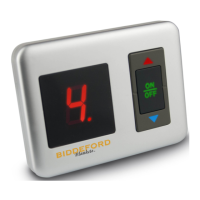
Turning “On”
The display on a digital style controller
will show “4”, or three bars for the digital
throw controller, the very first time the
controller is turned on after being plugged
into the warming product and wall outlet.
After the very first time, the controller
will remember your last preference and
start with that heat level when turned ON.
Alternatively, the analog style controller
will backlight the heat level setting on
its dial. If the backlight or display does
not illuminate, or the display reads “E” or
flashes, see the FAQ section.
Note: If you have a Queen or King sized
product, you will need to connect both
controllers to heat both sides of the prod-
uct; each controller will only heat one side.
Adjusting the Temperature
To adjust a digital controller’s heat level
setting, while the controller is ON, press
one of the arrow buttons. Press the UP
arrow to increase the heat setting, and
the DOWN arrow to decrease it. Each time
you press an arrow button, the setting will
adjust by one heat level. Alternatively, the
analog style controller heat level settings
are manipulated by rotating a dial to the
desired level. There are multiple heat level
settings, with “H” for HIGH; the higher the
number or bar, the warmer the product.
Note: If you have a product that uses two
controllers, one for each side, each control-
ler can be adjusted to a different setting,
causing each side to heat differently.
Turning “OFF”
Turn the controller OFF manually by press-
ing the ON/OFF button or switch. When
the controller is OFF but plugged in, the
digital controller will not display a number
or bar, and the analog controller will not il-
luminate the heat level setting on the dial.
Turn OFF and/or unplug the controller
when not in use.
Note: When OFF, a red or green dot may
be present on specific digital controller
models; indicating standby mode.
Note: If you have a product that uses two
controllers, please ensure both controllers
are turned OFF and/or unplugged when
the warming product is not in use.
Note: The Auto-Off feature is not intended
to replace the manual turning OFF of the
warming product. Please turn OFF and/or
unplug the controller when not in use.
Pre-Heat ( Specific Models Only )
Turn the controller ON and press the PRE-
HEAT button. This will start pre-heating the
bedding and “p” will be displayed on the
controller. The heat setting will then revert
to the last heat setting after 1.5 hours.
If you want to change to another setting
during the pre-heat period, press the Up or
Down button.
Instructions
10 Customer Support: 800.789.6441