EasyManua.ls Logo

Billyoh 6000 Series - User Manual

Billyoh 6000 Series
21 pages
Print Icon
To Next Page IconTo Next Page
Loading...
Covers All 8ft & 10ft Gable Sizes
V1.0-210116
2) Reacquaint
yourself with the
parts, QTy’s and
Sizes on the
PACKING LIST.
PACKING
LIST
1) Take 5
minutes
and have
a coffee.
3) Read the
instructions
thoroughly and
then re-read if
necessary.
BEFORE
YOU
START
6000
10ft Gable:
8ft Gable:
RANGEs Covered:
Covers Multiple Sizes:
10x10, 12x10
16x10, 20x10
10x8,12x8
16x8
CODE:
INS-0046
Traditional Apex Door Offset Windowless Workshop
Building Instructions
Please print and read the instructions carefully
and please retain for future reference
Please note that all images are for illustration purposes only.
For Queries and Help please contact Product Support: 01636 858 377
Boarded Door
Covered
Question and Answer IconNeed help?

Do you have a question about the Billyoh 6000 Series and is the answer not in the manual?

Summary

Product Maintenance Checklist

Level Base

Importance of a firm, level base for building stability and moisture prevention.

Seal The Windows

Using silicone sealant inside and outside windows to prevent water ingress.

Annually Treat The Building

Applying water-resistant treatment annually to protect the building.

Building Contact Restrictions

Keeping trees/hedges trimmed back to prevent damage and water ingress.

Felt Maintenance

Inspecting and replacing damaged roofing felt to prevent water leaks.

Lubrication

Applying suitable oil to moving parts like hinges for continued proper use.

Cladding Styles

Overlap Cladding

Traditional style using rough sawn timber, economic for lower impact use.

Shiplap Cladding

Interlocking timber style for strength, smoother finish, continuous lines.

Panel Orientation

Panel Edge Overhang

Ensuring lower edge of panels overhangs the floor for proper fixing.

Building a Base

Concrete Base Construction

Laying a concrete base with hardcore for a solid, level foundation.

Flag Stone Base Construction

Using flag stones on a hardcore and sand base for a level foundation.

Troubleshooting Guide

Pre-Assembly Troubleshooting

Advice on treatment timing, base type, missing parts, and tools needed.

During Assembly Troubleshooting

Guidance on window fixing, joist direction, building rigidity, and difficulty.

Post-Assembly Troubleshooting

Explanations for door gaps, window water tightness, and leaks.

Tips on Glazing Installation

Glazing Tips Summary

Practical advice for preventing wood splitting and protecting glazing during assembly.

Important Safety Notices

Construction Safety Precautions

Essential safety precautions for construction, including number of people, weather, and tools.

Wooden Panel Blemishes

Guidance on handling minor wooden panel imperfections like protruding nails or knots.

Aftermarket Modification Warning

Warning about modifying the product, its impact on warranty, and safety.

Maintenance Advice

Guidance on contacting support for issues and performing regular checks.

Product Warranty Information

Details on warranty coverage, limitations, and care requirements.

Spare Parts Acquisition

Information on how to obtain spare parts through customer services.

General Recommendations

Glazing Handling and Fitting

Advice on handling, fitting, and improving water resistance of glazing.

Door Fitting Considerations

Notes on door fitting, gaps, and potential alignment issues.

Panel Handling

Tips on handling panels that may be un-square due to transit.

Building Location and Construction

Guidance on site selection, foundation preparation, and building stability.

Wood Treatment Importance

Importance of treating the building after assembly and annually.

Understanding Wood Characteristics

Understanding natural wood movement, expansion, contraction, and warping.

Floor Stages

Floor Assembly Steps

Laying floor sections with joists facing upwards and flipping the assembled floor.

Wall Panel Stages

First Wall Panel Installation

Placing and fixing the first plain wall panel to the floor edge, checking page 4 for sizes.

Central Gable Fixing

Gable Panel Attachment

Fixing gable central panels to the top of plain panels.

Truss Fixing Stage

Roof Truss Installation

Aligning and fixing roof truss sections using gable apex panels.

Truss Assembly

Assembling Truss Pieces

Assembling the individual truss pieces together.

Fitting Gable Sections

Gable Section Placement

Placing and fixing plain gable sections next to back plain wall panels.

Fixing Wall Panels

Additional Wall Panel Fixing

Laying and fixing additional plain wall panels and gable sections.

Front Wall Panel Fixing

Front Panel Installation

Fixing plain and window panels to the front of the building according to size.

Door Frame & Threshold Installation

Door Frame and Threshold Fitting

Installing the door frames and the door threshold securely.

Door Frame Fitting

Securing Door Frames

Fitting and securing the door frames to the building structure.

Truss Positioning

Correct Truss Placement

Correctly positioning roof trusses based on roof panel dimensions.

Securing Wall Panels to Floor

Wall-to-Floor Fixing

Fixing the wall panels to the floor sections for stability.

Roof Panel Placement

Roof Panel Alignment

Ensuring correct alignment of roof panels with framing, not cladding.

Roof Panel Installation

Continuing Roof Panel Fitting

Positioning and fixing roof panels square with framing and across roof trusses.

Completing Roof Panel Installation

Final Roof Panel Securing

Continuing to push and fix roof panels to the centre to add rigidity.

Door Fixing Stage

Door Hinge Attachment

Attaching hinges to the back view of the doors.

Door Lock Handle Installation

Lock Handle Alignment

Installing the door lock handle centrally to the main door frame.

Door Rebate Fitting

Fitting Door Rebates

Fixing the door rebate to the side of the door frames.

Door Cloaking Strip Attachment

Attaching Cloaking Strips

Attaching the door cloaking strip to the door for a finished look.

Cloaking Strip Installation

Exterior Cloaking Strip Fixing

Cutting and fixing cloaking strips to the building's exterior.

Facia Block Fixing

Installing Facia Blocks

Fixing facia blocks along the roof edges.

Roof Felt Installation

Tacking Roof Felt

Tacking roof felt in place with overhangs at the ends and eaves.

Repeat Roof Felt Stages

Completing Felt Installation

Repeating roof felt installation stages for the other side of the roof.

Shingles Roof Covering

Shingles Starter Layer

Preparing felt as a starter layer for shingles installation.

Facia Fixing Stage

Final Facia Board Installation

Securing the facia boards along the roof edges.

Pilot Drilling for Fixings

Drilling Pilot Holes

Importance of pilot drilling holes before inserting fixings.

Protect Your Building

Post-Assembly Treatment

Treating the building after assembly and annually for protection.

Shingles Roof Covering Instructions

Using Shingles Instructions

Referencing separate instructions for shingles roof covering.

Final Building Protection

Annual Building Treatment

Treating the building annually to protect it.

Overview

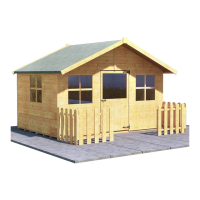
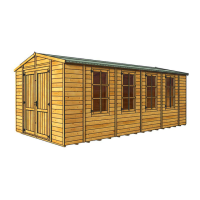
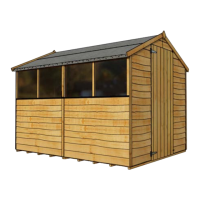
This manual describes the assembly and maintenance of a Traditional Apex Door Offset Windowless Workshop, available in various sizes under the BILLYOH brand, with product code INS-0046. The workshop is designed for domestic and outdoor use, providing a functional and secure storage solution for garden and workshop needs.

Function Description:

The workshop serves as a robust, windowless outdoor storage building. Its apex roof design provides ample headroom and efficient water run-off, while the offset double door allows for easy access and storage of larger items. The windowless design enhances security and privacy for stored contents.

Important Technical Specifications:

The workshop is available in multiple sizes, categorized by gable length and depth:

  • 10FT GABLE: 10x10, 12x10, 16x10, 20x10
  • 8FT GABLE: 10x8, 12x8, 16x8

The floor sections are available in either 19mm or 28mm Tongue and Groove (TG) construction. Specific floor codes are provided for different sizes and thicknesses:

  • 24657-Assembled-19mm-TG-Floor-D(1490mm)xW(3ft/879mm)
  • 24760-Assembled-28mm-TG-Floor-D(1490mm)xW(3ft/879mm)
  • 24658-Assembled-19mm-TG-Floor-D(1490mm)xW(4ft/1172mm)
  • 24761-Assembled-28mm-TG-Floor-D(1490mm)xW(4ft/1172mm)

The cladding styles include Overlap and Shiplap. Overlap cladding uses rough sawn timber, providing a traditional, unfinished look and economical solution. Shiplap cladding interlocks for greater strength and a smoother finish with continuous lines.

Fasteners used in assembly include:

  • Screws: S70 x 8, S50 x 5, S50 x 4, S50 x 10, S30 x 12, S25 x 2, S25 x 4, S25 x 12
  • Nails: N30 x 12, N40, T10
  • Other components: PP x 16 (Plain Panels), DR x 2 (Door Rebate), CSP x 1 (Cloaking Strip)

The roof is covered with felt, supplied in rolls, with a recommended 70mm overhang at each end. Shingles are also an option for roof covering.

Usage Features:

  • Assembly: The building requires at least two adults for construction. It is crucial to lay a solid, flat, and level base (concrete or flagstone) before assembly to ensure proper fit and structural integrity. The instructions emphasize reading all steps thoroughly, taking breaks if needed, and reacquainting with parts from the packing list. Pilot drilling all screw holes and countersinking screwheads are advised.
  • Door Placement: The personnel door can be positioned on either side of the building, offering flexibility in layout.
  • Windowless Design: Provides enhanced security and privacy, making it ideal for storing valuable tools or equipment.
  • Offset Double Door: Facilitates easy access for larger items, such as lawnmowers, bicycles, or workshop machinery.
  • Rigidity: The building achieves full rigidity only upon complete assembly, so initial flimsiness is normal.
  • Location: The workshop should be situated at least two feet away from any structures or obstructions (fences, buildings, trees) to allow for maintenance access and prevent moisture issues. Overhanging hedges or trees should be cut back regularly.
  • Weather Conditions: Avoid constructing the building in strong winds or poor weather conditions.

Maintenance Features:

  • Level Base: Maintaining a firm, level base is critical for preventing moisture penetration and ensuring the building fits together correctly.
  • Annual Treatment: The building must be treated annually with a good quality water-resistant timber treatment to protect against deterioration and prolong its life. It is recommended to apply the first treatment before assembly to cover all parts.
  • Felt/Roofing: Regularly check and replace any damaged roofing felt. If using shingles, follow the specific instructions provided with the shingle packs.
  • Lubrication: Moving parts, such as hinges, should be lubricated with a suitable oil for continued proper use.
  • Structural Checks: Periodical checks throughout the life of the building are necessary to ensure its original condition is maintained.
  • Moisture Management: Wood is a natural material that expands and contracts with moisture levels. Applying quality timber treatment minimizes these effects. Keeping the building ventilated helps avoid mould.
  • Repairs: For warped or twisted boards, replacement parts can be purchased through customer services.
  • Modifications: While customers may modify the product, doing so is at their own risk and may invalidate the warranty. Modifications should be carried out safely and without affecting structural integrity.
  • Warranty: The product comes with a warranty, subject to reasonable use, care, and transportation. Damage from post-purchase transportation, careless handling, or misuse is not covered. To comply with the warranty, annual timber treatment is required.
  • Spare Parts: Spare parts are available through customer services.

Billyoh 6000 Series Specifications

General IconGeneral
BrandBillyoh
Model6000 Series
CategoryGarden Houses
LanguageEnglish

Related product manuals