Do you have a question about the Billyoh APEX and is the answer not in the manual?
Essential safety guidelines for constructing and using the greenhouse, including advice on adult supervision and safe practices.
Answers to common questions before starting assembly, including treatment timing and base preparation.
Guidance on dealing with flimsy construction, tricky assembly, or panel fit issues during the building process.
Instructions on preparing a level base, including concrete and flag stone options for stability.
Diagrams showing panel configurations for polycarbonate roof greenhouses in various sizes.
Diagrams illustrating panel arrangements for styrene roof greenhouses, including door specifications.
Step-by-step instructions for assembling the Eze Base, including squaring, fixing brackets, and securing corner spikes.
Steps for assembling and fixing the roof truss and centre purlin for structural support.
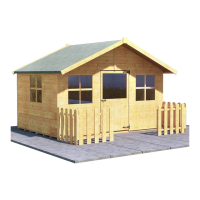
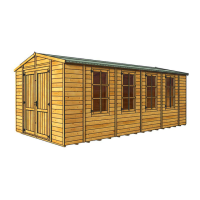
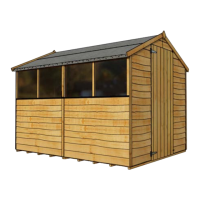
This document provides general instructions for assembling and maintaining an Apex Greenhouse from BillyOh. It covers various sizes including 3x6, 6x6, 9x6, and 12x6, and highlights features such as smaller, manageable panels, new sturdier construction, easier handling and assembly, and enhanced safety for the customer. The instructions emphasize thorough reading and retention for future reference, noting that all images are for illustration purposes only.
The BillyOh Apex Greenhouse is designed to provide a protected environment for gardening, allowing users to cultivate plants in a controlled setting. It serves as a dedicated space for growing, offering shelter from adverse weather conditions and helping to extend the growing season. The greenhouse structure is built to be sturdy and manageable, making it suitable for various garden lifestyles. It is available in different sizes to accommodate varying needs and garden spaces.
The assembly process is broken down into manageable steps, starting with pre-assembly checks and base construction. Before beginning, users are advised to take five minutes to review the packing list, reacquaint themselves with the parts, quantities, and sizes, and read the instructions thoroughly.
Base Construction: The "Eze Base" system is designed for easy construction. Users must first measure the length of their building and transfer these dimensions to the outer bearers. All parts of the Eze Base should be laid out as illustrated to ensure all components are present. For 12' greenhouses, two connected joists run down the sides and are fixed with fixing plates and 40mm screws. Bearers and joists are nailed together using 100mm nails, with each joist end nailed in two equally spaced positions for strength. The framing is squared off by measuring across the diagonals to ensure they match. Optional 'L' brackets can be screwed onto the frame from the inside of the outer framing using 40mm screws to level the Eze Base if the ground is uneven. Finally, four corner spikes are screwed into each inner corner of the base framing using 70mm screws, ensuring they are flush with the top of the frame. The Eze Base is then driven into the ground to the desired height, ensuring it is level. Packing any gaps beneath the Eze Base with ground material is recommended to protect it from weathering and create a neater finish.
Panel Arrangement and Assembly: The document details panel arrangements for both polycarbonate and styrene greenhouses with polycarbonate roofs across different sizes (3x6, 6x6, 9x6, 12x6). This includes specific window panel sizes (3ft/879mm and 1ft6/439.5mm). The assembly of panels begins with laying out the door gable top (DG) and doors (D), followed by fitting the window panels (WP) to complete the door gable. Similarly, for plain gables, the plain gable top (PG) and window panels (WP) are laid out. Pilot drilling screw holes through the frame on the inside of the panel is recommended to reduce wood splitting. Panels are fixed together using 50mm screws (S50) through the frame on the inside. It is crucial not to attach panels to the floor at this stage to allow for easier squaring of the building.
Door and Truss Installation: The door frame support (DT) is fixed between the door gable window panels (WP) using 50mm screws (S50), ensuring it is centered on the floor. For greenhouses larger than 3x6, the truss (TRU) is assembled by blunting the tips of 30mm nails (N30) and fixing the two halves together, using the plain gable apex as a guide for angles. The plain gable (PG) is then fixed centrally to the top of the window panels (WP) with 50mm screws (S50). The door gable (DG) is assembled by pilot drilling screw holes in the window panels (WP) and fixing the door gable window panels (WP) between the side panels with 50mm screws (S50). The building is squared up at this stage, and the side panels and gables are fixed to the Eze Base with 50mm screws (S50). The truss (TRU) is fixed centrally over where two side panels join, to the top of the side panels with 50mm screws (S50).
Roof and Glazing: Purlins (PU) are placed on top of the truss (TRU) and slotted into the notches on the gables (PG and DG). For roof glazing (polycarbonate), the printed film, which is the UV coated surface, should face outwards. Glazing (GL) is slotted into the grooves of the roof panel frames and held in place with two glazing clips (GC) per pane using 12mm screws (S12). Doors are fixed using 30mm screws (S30) to attach hinges (HG) to the doors (D) and through the baton on the back of the door, then to the door gable (DG). Opening windows, which come pre-assembled, are fixed to the opening window frame using 50mm screws (S50), with pre-drilling recommended. Outer turnbuttons (TB) are placed on the slave door on the door gable (DG) and screwed in with 25mm black screws (S25), ensuring they do not impede door opening.
Glazing and Finishing: For styrene or polycarb glazing, panels (GL) are held in place, and window cloaking strips (CSW) are fixed over the ends of the glazing using 30mm screws (S30). When multiple glazing panes are used, cloaking strips cover the gaps between them. Roof frames (RFR) are fixed to the top of the four sides with 50mm screws (S50). The door glazing (GL) is placed into the window recess from the outside of the door and fixed using window beading (WBD) and 30mm panel pins (P30), taking care not to use excessive force as the glazing is brittle. Inner turnbuttons (TB) are fixed to the inside of the top of the slave door with a 25mm screw (S25). Fixing plates (FP) are used with 30mm screws (S30) to secure the door gable uprights where the gable tops join the lower panels. Cloak strip panels (CSP) are fixed with 30mm nails (N30) where building corners meet and where window panels join, potentially requiring cutting to size.
Additional Features: Gutter strips are fixed by slotting the windowsill (WS) into the groove of the roof panel and fixing it with 30mm nails (N30) to allow water runoff. The windowsill may need trimming for a flush fit. For opening windows, a casement stay (CS01) is fixed to the inside of the opening window with 12mm screws (S12) and its receiving bracket to the roof frame. Casement stay pins are then fixed with 25mm screws (S25) to securely hold the window in both open and closed positions. An optional automatic vent opening arm (AVA) can be fixed to the opening window and roof panel with 25mm screws (S25). Internal cloaking strips are fixed at the top where side panels and roof panels meet, using 30mm nails (N30).
Regular maintenance is crucial for the longevity and performance of the BillyOh Apex Greenhouse.
Level Base: A firm, level base is essential for maintaining the building's structural integrity and preventing moisture penetration.
Window Sealing: Silicone sealant should be applied to the inside and outside of the windows as soon as possible after assembly to ensure a strong seal against water ingress.
Annual Treatment: The building should be treated annually with a good quality water-resistant treatment, both inside and out, after construction.
Clearance: Overhanging hedges or trees must be cut back regularly to prevent branches from piercing the roofing felt or glazing, which could lead to water ingress.
Felt Inspection: The roofing felt should be checked regularly, and any damaged felt must be replaced promptly.
Lubrication: All moving parts, such as hinges, should be lubricated with a suitable oil for continued proper operation.
Post-Assembly Checks: It is natural for wood to shrink and expand, which may create small gaps around doors. Silicon sealant can be used around windows to improve water resistance. If leaks develop, silicon sealant should be applied, and damaged boards should be replaced if necessary.
Troubleshooting Guide: The manual includes a troubleshooting section for pre-assembly, during assembly, and post-assembly issues. For example, if glazing or fixing kit is missing, users are advised to check between panels and call customer services if still not found. If the building seems flimsy, it is noted that full rigidity is achieved only after full assembly. If the building is twisted, it indicates an uneven base. Gaps around doors post-assembly are considered natural due to wood movement. For water tightness around windows, silicon sealant is recommended as these products are designed for light domestic uses and not guaranteed to be fully watertight.
General Recommendations: The manufacturer recommends treating the product with a high-quality wood treatment before assembly to ensure all exposed parts are covered. It is important to lay a solid, flat, and level base. The building is designed for assembly by two people, and professional help should be sought if in doubt. The timber used is a natural material, and variations in grain, color, and knots are normal. Expansion and contraction are inevitable with timber, and minor movement is expected. All images are for illustration purposes only, and specific components may vary. For any issues, customers are advised to call the manufacturer.
| Material | Wood |
|---|---|
| Cladding Style | Overlap |
| Assembly Required | Yes |
| Roof Material | Wood |
| Roof Covering | Felt |
| Floor Material | Wood |
| Door Style | Single |
| Warranty | 1 year |