Thank you for purchasing this bionik
™
gaming product. Our goal is to
deliver high-quality, innovative accessories that amplify your
gaming experience. Please review this guide and store it for future
reference. Otherwise, please recycle. User guides can also be
downloaded from our website at www.bionikgaming.com.
INSTALLATION
Power on your Switch
™
and Switch
™
Lite console.
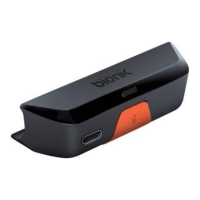
Plug in the BT Audio Sync
™
into the USB-C
™
port on the bottom of the
Switch
™
and Switch
™
Lite console (FIG. 1).
The LED on the BT Audio Sync
™
will flash to indicate that the BT Audio
Sync
™
is connected.
NOTE: May not be compatible with certain cases.
PAIRING YOUR DEVICE
Press and hold the sync button on the BT Audio Sync
™
for 3 seconds
(FIG. 2). The LED will flash rapidly to indicate that the BT Audio Sync
™
is
in discovery mode.
Place your Bluetooth
®
headphone, earbuds or other audio device
(not included) into pairing mode. Please see your device’s user guide for
instructions on how to enter pairing mode.
The BT Audio Sync
™
will automatically pair with your device.
Once the BT Audio Sync
™
is paired to your device, the LED on the BT
Audio Sync
™
will be solid orange.
Nous vous remercions d’avoir acheté ce produit de jeu bionik
™
.
Notre objectif est de livrer des accessoires novateurs de haute
qualité qui intensifie votre expérience de jeu. Veuillez examiner le
présent guide et conservez-le à titre d’information. Autrement,
veuillez le recycler. Vous pouvez également télécharger les guides
des utilisateurs à partir de notre site Web www.bionikgaming.com.
INSTALLATION
Allumez votre console Switch
™
et Switch
™
Lite.
Branchez le BT Audio Sync
™
sur le port USB-C
™
en bas de la console
Switch
™
et Switch
™
Lite (FIG. 1).
Le voyant LED du BT Audio Sync
™
clignote pour indiquer que le BT
Audio Sync
™
est connecté.
REMARQUE : Peut ne pas être compatible avec certains étuis.
APPARIEMENT DE VOTRE APPAREIL
Appuyez sur le bouton de synchronisation du BT Audio Sync
™
et
maintenez-le enfoncé pendant 3 secondes (FIG. 2). Le voyant LED
clignote rapidement pour indiquer que le BT Audio Sync
™
est en
mode recherche.
Placez votre casque Bluetooth
®
, vos écouteurs ou tout autre appareil
audio (non inclus) en mode appariement. Veuillez vous reporter au
manuel de l’utilisateur de votre appareil pour consulter les instructions de
mise en mode appariement.
Le BT Audio Sync
™
est automatiquement apparié à votre appareil.
NOTE: The BT Audio Sync
™
will automatically find and pair with your
device after the initial pairing.
PAIRING 2 DEVICES SIMULTANEOUSLY
Turn o your first device that is already paired to the BT Audio Sync
™
.
Follow all of the steps above in the “PAIRING YOUR DEVICE” section to
pair your second device.
Once the second device is paired, turn on your first device. It will
automatically begin to pair with the BT Audio Sync
™
.
Once both devices are paired, the LED on the BT Audio Sync
™
will be
solid white.
NOTE: Both devices must be same sampling rate or use aptX. When
using a true wireless headset, only one can be used at anytime.
CHARGING YOUR SWITCH
™
AND SWITCH
™
LITE
The BT Audio Sync
™
includes a passthrough USB-C
™
port (FIG. 3).
Connect your powered USB-C
™
cable (not included) into the USB-C
™
port on the bottom of the BT Audio Sync
™
.
Charging of your Switch
™
and Switch
™
Lite console should
begin immediately.
NOTE: Audio devices that are paired to the BT Audio Sync
™
will
momentarily lose connection when a powered USB-C
™
cable is either
plugged into or removed from the passthrough on the BT Audio Sync
™
.
The connection will be re-established automatically.
SWITCH
™
DOCK ADAPTER
Plug the female USB-C
™
end of the Switch
™
dock adapter onto the
USB-C
™
male plug on the BT Audio Sync
™
(FIG. 4).
Plug the USB-A end of the Switch
™
dock adapter into an open port on
the Switch
™
dock.
Follow the pairing instructions above in the “PAIRING YOUR DEVICE”
section to enjoy listening to the game sounds via your audio device while
playing with your Switch
™
and Switch
™
Lite on television.
CARE AND MAINTENANCE
Keep away from fire and high temperatures, never dispose of in a fire,
and always recycle all electronics.
Clean with dry cloth.
Avoid damage, knots and cuts in the cable and store the cable neatly.
Discontinue use if you suspect there is a malfunction. Please contact
customer support for assistance or additional information.
FAQ
Why can’t I get any audio devices to pair to the BT Audio Sync
™
?
Make sure that you have downloaded system version 4.0.0 or higher
on your Switch
™
and Switch
™
Lite console. This system update
provided support for wireless audio devices.
Make sure that you press and hold the BT Audio Sync
™
long enough to
enter pairing mode.
I have paired my AirPods
®
to the BT Audio Sync
™
. Why can’t I pair a
second device?
When pairing AirPods
®
or other true wireless earbuds to the BT Audio
Une fois le BT Audio Sync
™
apparié à votre appareil, le voyant LED du
BT Audio Sync
™
s’éclaire en orange.
REMARQUE : le BT Audio Sync
™
recherche et est automatiquement
apparié à votre appareil après l’appariement initial.
APPARIEMENT SIMULTANÉ DE 2 APPAREILS
Éteignez le premier appareil déjà apparié au BT Audio Sync
™
.
Eectuez toutes les étapes énoncées ci-dessus dans la rubrique
« APPARIEMENT DE VOTRE APPAREIL » pour apparier votre deuxième
appareil.
Une fois le deuxième appareil apparié, allumez le premier appareil. Il est
alors automatiquement apparié au BT Audio Sync
™
.
Une fois les deux appareils appariés, le voyant LED du BT Audio Sync
™
s’éclaire en blanc.
REMARQUE : les deux appareils doivent avoir la même fréquence
d’échantillonnage ou utiliser aptX. Lorsque vous utilisez de véritables
casques sans fil, un seul peut être utilisé à la fois.
CHARGEMENT DE VOTRE SWITCH
™
ET SWITCH
™
LITE
Le BT Audio Sync
™
comporte un port de transfert USB-C
™
(FIG. 3).
Branchez votre câble d’alimentation USB-C
™
(non inclus) sur le port
USB-C
™
en bas du BT Audio Sync
™
.
Le chargement de votre console Switch
™
et Switch
™
Lite devrait
commencer immédiatement.
REMARQUE : les appareils audio appariés au BT Audio Sync
™
sont
momentanément déconnectés lorsqu’un câble d’alimentation USB-C
™
est branché ou retiré du port de transfert du BT Audio Sync
™
. La
connexion sera rétablie automatiquement.
ADAPTATEUR POUR STATION D’ACCUEIL SWITCH™
Branchez l’embout femelle USB-C
™
de l’adaptateur pour station d’accueil
Switch
™
sur la prise mâle USB-C
™
du BT Audio Sync
™
(FIG. 4).
Branchez l’embout USB-A de l’adaptateur pour station d’accueil Switch
™
sur un port ouvert de la station d’accueil Switch
™
.
Suivez les instructions d’appariement énoncées ci-dessus dans la
rubrique « APPARIEMENT DE VOTRE APPAREIL » pour écouter les sons
du jeu sur votre appareil audio tout en jouant avec votre Switch
™
et
Switch
™
Lite sur la télévision.
ENTRETIEN
Tenez le produit éloigné du feu et des températures extrêmes, ne le jetez
jamais au feu et recyclez toujours tous les appareils électroniques.
Nettoyez l’appareil à l’aide d’un chion sec.
Évitez d’endommager, de nouer ou de couper le câble et rangez-le
soigneusement.
Cessez d’utiliser le produit si vous soupçonnez une défaillance. Veuillez
contacter le service à la clientèle afin d’obtenir de l’aide ou des
renseignements supplémentaires.
FAQ
Pourquoi est-ce que je ne parviens à apparier aucun appareil audio au
BT Audio Sync
™
?
- Vérifiez que vous avez bien téléchargé la version 4.0.0 ou ultérieure du
Sync
™
, it has an extra pairing step to connect to each other. As a result of
this extra pairing step, you are unable to pair a second device.
Is there a way to clear the pairings made between the audio devices and
BT Audio Sync
™
?
Press and hold the sync button on the BT Audio Sync
™
for 7 seconds to
reset all previous pairings. A light orange LED will flash 6 times to
indicate that previous pairings have been cleared.
FCC INFORMATION
Warning: Changes or modifications to this unit not expressly approved
by the party responsible for compliance could void the user’s authority to
operate the equipment.
NOTE: This equipment has been tested and found to comply with the
limits for a Class B digital device, pursuant to Part 15 of the FCC Rules.
These limits are designed to provide reasonable protection against
harmful interference in a residential installation. This equipment
generates, uses and can radiate radio frequency energy and, if not
installed and used in accordance with the instructions, may cause
harmful interference to radio communications.
However, there is no guarantee that interference will not occur in a
particular installation. If this equipment does cause harmful interference
to radio or television reception, which can be determined by turning the
equipment o and on, the user is encouraged to try to correct the
interference by one or more of the following measures:
Reorient or relocate the receiving antenna.
Increase the separation between the equipment and receiver.
Connect the equipment into an outlet on a circuit dierent from that to
which the receiver is connected.
Consult the dealer or an experienced radio/TV technician for help.
This device complies with Part 15 of the FCC Rules. Operation is subject
to the following two conditions:
This device may not cause harmful interference
This device must accept any interference received, including
interference that may cause undesired operation.
WARRANTY: All products come with a limited warranty and have been
subjected to a thorough series of tests to ensure the highest level of
dependability. If you run into any issues, visit
www.bionikgaming.com/pages/support for more information.
Q:
A:
système sur votre console Switch
™
et Switch
™
Lite. Cette mise à jour du
système a permis de prendre en charge les appareils audio sans fil.
- Veillez à bien maintenir le BT Audio Sync
™
enfoncé susamment
longtemps pour le mettre en mode appariement.
J’ai apparié mes AirPods
®
au BT Audio Sync
™
. Pourquoi ne puis-je pas
apparier un deuxième appareil ?
Lorsque vous appariez des AirPods
®
ou d’autres véritables écouteurs
sans fil au BT Audio Sync
™
, une étape d’appariement supplémentaire
s’impose pour les connecter l’un à l’autre. Cette étape d’appariement
supplémentaire vous empêche d’apparier un deuxième appareil.
Existe-t-il un moyen de supprimer les appariements réalisés entre les
appareils audio et le BT Audio Sync
™
?
Appuyez sur le bouton de synchronisation du BT Audio Sync
™
et
maintenez-le enfoncé pendant 7 secondes pour réinitialiser tous les
appariements précédents. Un voyant LED orange clignote à 6 reprises
pour indiquer que les appariements précédents ont été supprimées.
INFORMATIONS DE LA FCC
Avertissement : les changements ou modifications apportés à cet appareil
qui ne seraient pas expressément approuvés par la partie responsable de
la conformité peuvent faire perdre à l’utilisateur son droit à l’utiliser.
REMARQUE : l’équipement a été mis à l’essai et déclaré conforme aux
limites d’un appareil numérique de catégorie B, conformément à la partie
15 du règlement de la FCC. Ces limites sont conçues pour orir une
protection raisonnable contre les interférences nuisibles dans une
installation résidentielle. Cet équipement produit, utilise et peut émettre
de l’énergie de fréquence radio, et s’il n’est pas installé et utilisé
conformément aux instructions, peut perturber les
communications radio.
Cependant, rien ne garantit qu’il n’y ait pas d’interférence dans une
installation particulière. Si l’équipement produit une interférence nuisible
à la réception des programmes de radio ou de télévision, ce qui peut être
déterminé en mettant en marche et en arrêtant l’équipement, il est
conseillé à l’utilisateur de tenter de corriger l’interférence en prenant au
moins une des mesures suivantes :
Réorienter ou déplacer l’antenne réceptrice.
Augmenter la distance séparant l’équipement et le récepteur.
Brancher l’équipement dans une prise située sur un circuit diérent de
celui sur lequel est branché le récepteur.
Demander l’aide du vendeur ou d’un technicien spécialisé en
radio/télévision.
Cet appareil est conforme à la partie 15 des règlements de la FCC. Son
utilisation est soumise aux deux conditions suivantes :
Cet appareil ne doit pas causer d’interférences nuisibles.
Cet appareil doit accepter toutes les interférences reçues, y compris les
interférences pouvant provoquer un fonctionnement indésirable.
GARANTIE : Tous les produits sont assortis d’une garantie limitée et ont
été assujettis à une série de tests approfondis en vue de garantir le plus
haut niveau de fiabilité. Si vous avez des problèmes, visitez le site Web
8
 Loading...