EasyManua.ls Logo

BIRD SCOOT - User Manual

BIRD SCOOT
20 pages
Print Icon
To Next Page IconTo Next Page
Loading...
OWNER’S MANUAL & WARRANTY

Questions and Answers

Summary

Included Items

Introduction to Your E-Bike

Safety Guidelines

Before Riding the E-Bike

Performing pre-ride checks for hardware, tires, brakes, handlebars, and front wheel security.

While Riding the E-Bike

Obeying traffic laws, riding defensively, and being aware of surroundings like cars, doors, children, and road conditions.

Off-Road Riding Safety

Practicing specific skills, obeying local laws, wearing safety gear, riding with a companion, and carrying identification.

Wet-Weather Riding Precautions

Reducing speed, acknowledging impaired visibility, braking, and traction in wet conditions, and increased accident risk.

Night Riding Safety

Riding at night is dangerous; wear reflective clothing and ensure compliance with local laws.

Extreme and Aggressive Riding

E-bike design has limitations; extreme riding is not recommended and increases risks.

Electric Bicycle Safety Tips

Safety tips for electric bikes, including stability, avoiding wet conditions, and handling battery damage.

U.S. Government Safety Topics

Essential safety advice covering helmets, bike readiness, brakes, visibility, alertness, traffic rules, and secure wheels.

E-Bike Operation

E-Bike Component Diagram

Labeled illustration of the e-bike's components, including handlebars, brakes, battery, lights, and tires.

Initial Ride Safety Checks

Pre-ride checks for battery installation, display function, brake operation, tire inflation, lights, and cable connections.

Headlight and Brake Light Operation

Information on when the headlight and brake light activate, linked to Bluetooth connection and brake engagement.

Using the Horn

How to use the horn button on the left handlebar to signal location and alert other riders.

Using the Throttle

Instructions on how to control the e-bike's speed by twisting the right grip clockwise to accelerate.

Using the Brakes

How to use the front and rear disk brakes to slow down and stop, with a note on low-traction conditions.

Using the Turn Signals

How to use the switch on the left handlebar to signal turns or stops for other riders.

Adjusting the Mirrors

Guidance on adjusting rear-view mirrors on both sides of the handlebars for better visibility while riding.

Using the Kickstand

Instructions on how to deploy the kickstand to support the e-bike when not in use.

Specifications

Reading the LCD Display

Explains how the LCD display shows current speed and battery charge in 25% increments.

Connecting to the Bird App

Steps to download the app, scan the QR code, and pair the mobile device with the e-bike via Bluetooth.

Accessing the Storage Case

Instructions on how to open the storage case by holding a smart device near it and pushing a red button.

Maintenance Procedures

Removing the Battery

Step-by-step guide on how to safely remove the e-bike battery using the provided key.

Charging the Battery

Instructions on locating the charging port, connecting the charger, and the charging process.

Troubleshooting

Warranty Information

Limited Warranty Period

Covers manufacturer's defects for one year for frame/battery/charger and 90 days for wear components.

Replacements and Repairs

Defines the warranty period for replacement parts and the process for seeking repairs.

Limited Warranty Service Process

Steps to contact CMS for support, diagnose issues, and pursue warranty service if a defect exists.

Limited Warranty Eligibility

Requirements for warranty eligibility, including proof of purchase, serial number, and product condition.

Liability Disclaimer and Limitation

CMS's disclaimer of liability for misuse, neglect, unauthorized repairs, cosmetic damage, and third-party products.

Claims and Dispute Resolution

Details on submitting claims, arbitration procedures, and opting out of dispute resolution.

Overview

This document is the owner's manual and warranty for the Bird Scoot e-bike, providing essential information for safe operation, maintenance, and troubleshooting. The manual emphasizes safety precautions, proper riding techniques, and detailed instructions for various functions of the e-bike.

Function Description

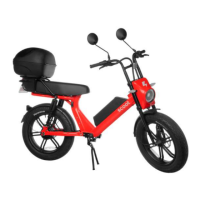
The Bird Scoot is an electric bicycle designed for personal transportation, offering a blend of traditional cycling with electric assistance. It is equipped with a motor that aids in propulsion, making rides easier and more efficient. The e-bike features a throttle for controlling speed and disc brakes for effective stopping. It also includes a horn for signaling, turn signals for indicating direction, and a headlight and brake light for visibility. A key feature is the integrated storage case, which can be accessed when connected to the Bird app. The e-bike is designed with a modular approach, allowing for potential future upgrades and easier maintenance.

Usage Features

Before riding the e-bike, a thorough mechanical check is crucial. This includes ensuring hardware is properly fastened, tires are inflated to the correct pressure, brakes are operational, handlebars are adjusted and secured, and the front wheel is securely locked. The battery pack must be charged and properly installed, and the display should turn on and function correctly. All cable connections should be tight, and the front and rear lights must work.

To operate the e-bike, the rider uses a throttle located on the right handlebar. Twisting the inner portion of the right grip clockwise accelerates the e-bike. The e-bike is equipped with front and rear disc brakes. For optimal safety, especially in low-traction conditions, the rear brake should be applied before the front brake. The front brake is controlled by a lever on the left-hand side of the handlebar, while the rear brake is controlled by a lever on the right-hand side.

Turn signals are activated by rocking a switch on the left handlebar, which has left and right arrow icons, to alert other riders of the rider's intent. The headlight automatically turns on when a Bluetooth device is connected, and the brake light illuminates when the brakes are engaged. The horn button, also on the left handlebar, is used to signal other riders or pedestrians.

The e-bike features two rear-view mirrors on each side of the handlebars, which should be adjusted to provide a clear view behind the rider. For parking, the e-bike has a kickstand. To use it, pull down the kickstand and rock the bike back until it rests on the stand and the back tire, lifting the front tire off the ground.

The LCD display provides important information, including the current speed and the battery pack charge level, shown in increments of 25%. The Bird app enhances the e-bike's functionality. Users can download the app from Google Play or the App Store and connect it to the e-bike via Bluetooth by scanning a QR code located on the top of the e-bike's fork. Once connected, the app allows access to the storage case by holding the smart device near the case and pushing a red button.

Safety is paramount, and riders must be over 18 years of age and wear a properly fitting, approved bicycle safety helmet and protective gear at all times. Appropriate footwear that grips the pedals and prevents shoelaces from getting caught in moving parts is recommended. Eye protection is advised to shield against dirt, bugs, and other airborne objects. Loose clothing should be avoided as it can get caught in moving parts or snagged by objects. Riders should always obey local laws and traffic rules, respect other motorists and pedestrians, and ride defensively. Riding in poor visibility, bad weather, or when extremely tired is discouraged. Off-road riding requires specific skills and attention, and riders should always wear appropriate safety gear and ride with a companion in remote areas.

Maintenance Features

Preventive maintenance is crucial for the e-bike's longevity and proper performance. The manual provides instructions for removing and charging the battery. To remove the battery, first ensure the e-bike is turned off. Locate the keyhole on the left side of the top tube near the display, insert the included key, rotate it clockwise, and hold. Then, pull the upper portion of the battery towards the keyhole. Once the battery is released, stop turning the key and lift the battery up and away from the e-bike.

For charging, locate the charging port dust cover on the top left side of the battery and rotate it to expose the DC three-prong charge port. Connect the AC power cable into the charger and plug it into a power outlet. The charger will automatically begin charging the battery. It is highly recommended to charge the battery pack after every ride, even if only lightly used, in 4-hour increments. After charging, remount the battery and ride the e-bike for a few minutes to see the battery level on the LCD display. The manual warns against charging a battery pack that has been unused for several months, as this may result in permanent capacity loss. It is also important to fully charge the battery pack before its first use and before any long trips.

The manual emphasizes using only the charger supplied with the bicycle and not covering the charger while it is operating. The charger should not be used in damp or wet locations, dropped, or subjected to high vibration. The battery pack should not be short-circuited, charged if its temperature is over 140°F (60°C), disassembled, submerged in liquid, or used in wet areas. It should also not be placed near fire or heat, or exposed to freezing temperatures for extended periods. A frozen battery pack should be allowed to reach room temperature before charging.

Troubleshooting guidance is provided for common issues such as reduced speed, reduced battery range, battery not charging, and strange noises from the e-bike. For reduced speed, possible causes include low battery power, and the solution is to charge the battery. For reduced battery range, causes can be low battery power, low tire pressure, heavy load on the bike, driving on rough terrain, or using the throttle only. Solutions include charging the battery, inspecting tires, adjusting bike load, adjusting the route, and including pedal assist. If the battery does not charge, possible causes are an improperly connected charger, battery temperature issues, a damaged charger, or an issue with the battery itself. Solutions involve inspecting connections, visiting the website for best practices, replacing the charger, or contacting the support team. For strange noises, causes could be loose hardware, an issue with the drivetrain, or an issue with the motor, requiring a tune-up, inspection, maintenance, or contacting the support team.

BIRD SCOOT Specifications

General IconGeneral
Motor Power350W
IP RatingIP54
Max Speed25 km/h
Max Range25 km
Max Load100 kg
Tire Size8.5 inches
Brake TypeDisc Brake
Charging Time4 hours
Battery Capacity7.5Ah

Related product manuals