EasyManua.ls Logo

Birlea Paddington Cabin Bed User Manual

Birlea Paddington Cabin Bed
11 pages
To Next Page IconTo Next Page
Page #1 background imageLoading...
Page #1 background image
Vendor: S000298
Page 1 of 11
ASSEMBLY INSTRUCTIONS
PADDINGTON CABIN BED
IMPORTANT: READ THESE INSTRUCTIONS CAREFULLY BEFORE ASSEMBLING OR USING YOUR PADDINGTON
CABIN BED FRAME.
PLEASE KEEP THESE INSTRUCTIONS FOR FUTURE REFERENCE.
HEALTH & SAFETY:
DO NOT jump on this bed frame.
DO NOT use this bed frame if any parts are missing, damaged or worn.
DO NOT use this bed frame unless all fixings are secured.
Please keep small parts out of reach of children.
Always use on a level, even surface.
This bed is tested to European safety standard BS EN 747
WARNING: If this bed is placed on a non-carpeted floor you must place some protection under all legs to stop
the bed frame from moving. If this is not adhered to there is no guarantee if the bed frame collapses.
WARNING: High beds are not suitable for use by children under 6 years of age due to risk of injury from falls .
WARNING: High beds present a serious risk of injury from strangulation if used incorrectly. Never attach or
hang anything on any part of the frame that is not designed to be used with the bed, for example, but not
limited to ropes, strings, cords, hooks, belts and bags.
WARNING: Do not use the high bed if any structural part is missing or broken.
WARNING: Children can become trapped between the bed and adjoining structures including walls, roof
pitches, ceilings and other pieces of furniture. To avoid risk of serious injury, the distance between the top
safety barrier and any adjoining structure shall not exceed 75 mm or shall be more than 230 mm.
CARE & MAINTENANCE:
Assemble in the room of use.
Assemble on a soft, clean surface.
Periodically check all screws & fixings to ensure they are secure.
DO NOT push the bed frame as this will damage the legs.
Always lift the bed with two people to reposition.
Keep any sharp objects away from the frame.
Use a soft, dry cloth to clean – do not use any detergents or chemicals.
Avoid contact with water and direct sunlight.
www.birlea.com
Question and Answer IconNeed help?

Do you have a question about the Birlea Paddington Cabin Bed and is the answer not in the manual?

Birlea Paddington Cabin Bed Specifications

General IconGeneral
TypeCabin Bed
MaterialPine
Bed SizeSingle
ColorWhite
Assembly RequiredYes
Mattress Size190cm x 90cm
FeaturesLadder
Dimensions196cm
AssemblySelf-assembly required

Summary

Paddington Cabin Bed Assembly and Safety

Health and Safety Precautions

Essential health and safety guidelines for proper bed frame usage and child safety.

Important Safety Warnings

Critical warnings regarding use by children, strangulation risks, and structural integrity.

Care and Maintenance Guidelines

Instructions for assembling, cleaning, and maintaining the bed frame for longevity.

Assembly Step 1: Initial Hardware Insertion

Step 1: Insert Hardware Part D

Instructions for inserting hardware part D using a small mallet.

Step 2: Insert Hardware Parts J and A

Instructions for inserting hardware parts J and A with mallet and screwdriver.

Assembly Step 3: Panel Joining

Step 3: Join End Panels Together

Instructions for joining end panels using hardware parts A, B, and K.

Step 4: Fix Back Posts and End Supports

Attaching back posts and end supports to end panels using hardware.

Assembly Step 5: Securing Base and Doors

Step 5: Secure Front Base and Shelf Panels

Securing hardware part F to front base and right upper shelf panels.

Step 6: Attach Doors with Hardware

Attaching left and right doors using hardware parts G, H, and I.

Assembly Step 7: Division and Back Panels

Step 7: Attach Division Panels and Plinths

Attaching division panels to shelf panels and plinths using hardware.

Step 8: Attach Lower Back Panel

Attaching the lower back panel using hardware parts C and K.

Assembly Step 9: Shelf and Plinth Installation

Step 9: Attach Left Lower Shelf and Plinth

Attaching the left lower shelf panel and side front plinth.

Step 10: Attach Left Upper Shelf Panel

Instructions for attaching the left upper shelf panel.

Assembly Step 11: Right Shelves and Division

Step 11: Attach Right Lower Shelf and Plinth

Attaching the right lower shelf panel and side front plinth.

Step 12: Insert Right Shelf Division Panel

Inserting the right shelf division panel into the structure.

Assembly Step 13: Upper Shelf and Front Base

Step 13: Attach Right Upper Shelf Panel

Attaching the right upper shelf panel using hardware parts C and K.

Step 14: Attach Front Base Panel

Attaching the front base panel to the main structure.

Assembly Step 15: Front and End Panel Attachment

Step 15: Attach Left and Right Front Panels

Attaching the left front panel and right front panel.

Step 16: Attach Assembled Left End Panel

Attaching the assembled left end panel to the structure.

Assembly Step 17: Right End Panel and Back Posts

Step 17: Attach Assembled Right End Panel

Attaching the assembled right end panel to the structure.

Step 18: Secure Back Posts

Securing the right and left back posts using hardware parts A, B, C, and K.

Assembly Step 19: Support Plinths and Hardware

Step 19: Secure Support Plinths and Attach Hardware N

Securing support plinths and attaching hardware part N using M.

Assembly Step 20 & 21: Final Assembly

Step 20: Attach Back Base Panel

Attaching the back base panel using hardware parts C and K.

Step 21: Insert Hardware Parts L

Inserting the final hardware parts L into the assembled structure.

Additional Product Information

Product Resources and Support

Information on website, customer support, and sharing assembled furniture photos.
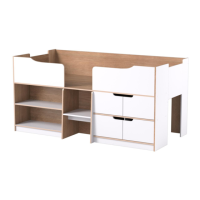
Related product manuals