Remove parts from packaging.
NOTE: The transport packaging can be used to assist in
mounting the rear blade.
1. Remove the top and sides of the package.
2. Remove the box parts, hydraulic cylinder (s) and/or
mechanical tension of the base.
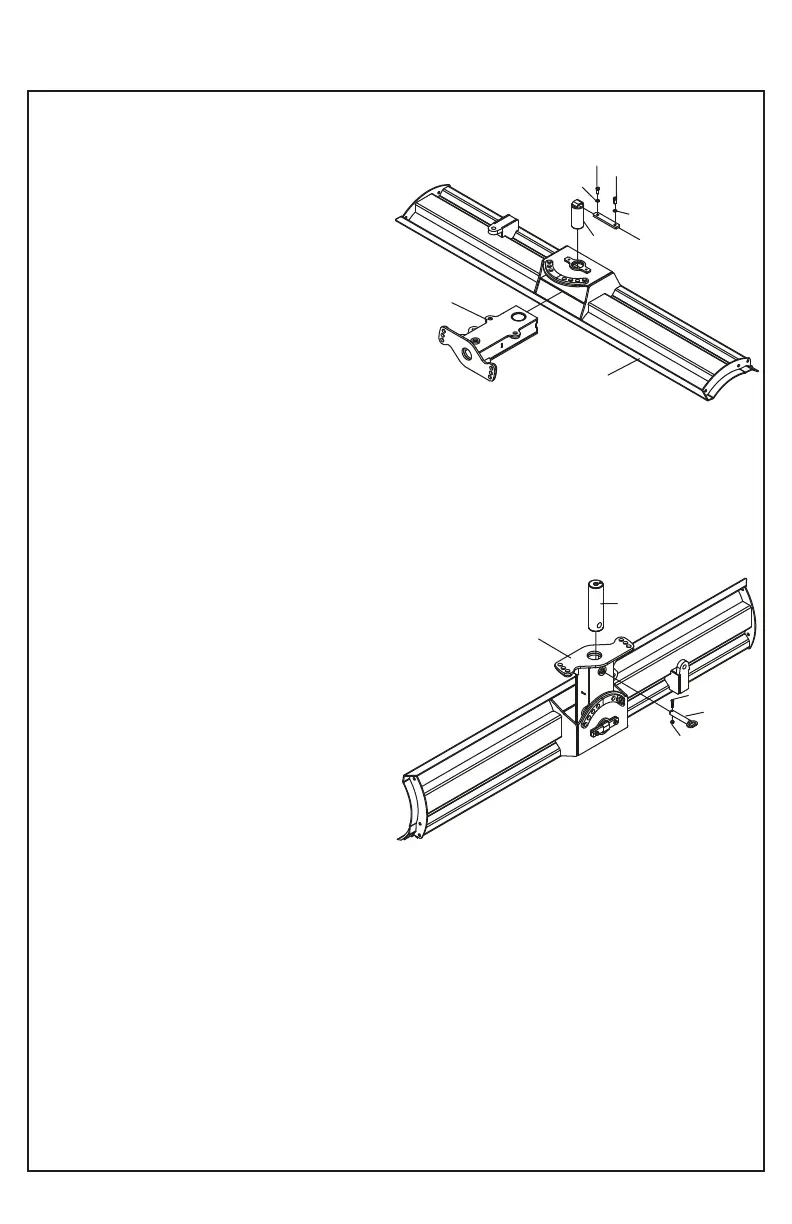
JOIN THE MOLDBOARD TO THE TURNTABLE AND
KINGPIN
NOTE: Make sure the moldboard is pointing
downwards to facilitate assembly of the turntable.
NOTE: The turntable assembly (3) to the moldboard
(1) should be done by two people.
NOTE: Prior to installation, check separately the pivot
pin into the moldboard (1) and the turntable (3).
A. Insert the turntable (3) into the slot moldboard (1).
The assembly should be adjusted. If you have
problems installing the turntable (3) the moldboard (1)
remove the paint from the surface to interfere between
the turntable (3) and the moldboard (1), then the two
assemblers (one on each side of the turntable) should
move the turntable (3) up and down as you enter the
house (3) into the slot moldboard (1). The turntable (3)
must move freely after installation.
Uniting the turntable (3) the turntable (1) by inserting
the pivot pin moldboard (8). Moving the retainer pivot
pin (15) to the end of the moldboard (8). I assured with
two hex screws (23) and lock washers (30). The
turntable (3) should move freely after installation.
NOTE: Remove the paint moldboard pivot pin (8) and
inside the holes moldboard (1) where the moldboard
pivot pin (8) passes. Apply grease to the entire contact
surface to facilitate mounting.
B. Ensure the kingpin (14) to the turntable (3) using the
catch of the kingpin (11). Secure with hexagonal screw
(22) and nut (26).
NOTE: Remove paint checkpoint kingpin (11) and the
inside of the holes in the turntable (3) where the
kingpin (14) and the retainer kingpin (11) therethrough.
Apply grease to all contact surfaces to facilitate
assembly.
1. Moldboard
3. Turntable
8. Moldboard pivot pin
11. Kingpin holder
14. Kingpin
15. Moldboard pivot pin holder
22. Screw hex. 3/8 X 1 3/4 - 16 UNC G5
23. Screw hex. 1/2 X 1 1/4 - 13 UNC G5
26. Nut 3/8 - 16 UNC INC NYLON
30. Lock washer 1/2"
30
ASSEMBLY
8
30
23
30
23
15
3
1
NB80-020
14
26
11
22
3
NB80-021