Do you have a question about the Bison PR52 and is the answer not in the manual?
Call local utility locating service (dial 811) before digging to avoid injury or service interruption.
Select footing location. Dig a 12" diameter, 48" deep hole, bell-shaped at the bottom for stability.
Use a level and pole to vibrate concrete. A 12"x36" bell-bottom hole needs approx. 4 cubic ft. of 3000 PSI concrete.
Mix concrete as per bag directions, aiming for a wet mixture. Pour the hole full to ground level.
Attach band clamps 12" from pole bottom, insert pole into concrete, vibrate, and brace for proper height.
Trowel concrete smooth, clean pole base, and allow footing to cure for at least 48 hours.
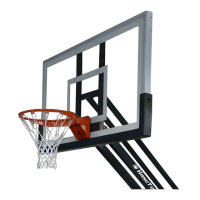
Attach Rim (R) and Backboard (Q) to Backboard Mounting Bracket (B) using provided hardware.
Slide band clamps onto gooseneck pole. Install backboard bracket, backboard, and rim assembly.
Install upside down, rotate 180°, tighten set screws, and lock with jam nuts. Ensure levelness.
Fasten backboard braces to backboard using specified hardware based on model.
Connect other ends of backboard braces to band clamps using carriage bolts and flange nuts.
Drill a 1/4" hole through bracket pilot hole into pole and install 1/4" roll pin to prevent rotation.
Attach the net and optional pole pad. The system is now ready for play.
This document outlines the installation and safe use of Bison Heavy Duty Gooseneck Basketball Systems, designed for robust and long-lasting performance in various settings. These systems are engineered to provide a stable and reliable basketball experience, suitable for both recreational and competitive play. The installation process is detailed to ensure structural integrity and adherence to official playing standards, particularly regarding rim height and backboard stability.
The Bison Heavy Duty Gooseneck Basketball System serves as a complete, fixed-location basketball hoop assembly. Its primary function is to provide a durable and stable structure for playing basketball. The system comprises a gooseneck pole, a backboard mounting bracket, a backboard, a rim, and various bracing components. The gooseneck design positions the backboard and rim at an optimal distance from the main support pole, enhancing player safety by minimizing contact with the pole during play. This configuration also allows for a clear playing area beneath the backboard. The system is designed for permanent installation, requiring a concrete footing to ensure maximum stability and resistance to impact and environmental factors. Once installed, it provides a regulation-height rim, making it suitable for a wide range of users, from casual players to more serious athletes. The robust construction is intended to withstand the rigors of frequent use and outdoor exposure, making it a reliable choice for parks, schools, and private residences.
The Bison Heavy Duty Gooseneck Basketball System is designed for straightforward use once properly installed. The system's fixed height, typically set at the official 10-foot rim height, ensures a consistent playing experience. The gooseneck pole design provides ample clearance beneath the backboard, allowing players to drive to the basket and rebound without obstruction from the main support pole. The backboard itself is securely mounted and braced to minimize vibration and movement during play, ensuring a true rebound surface. The rim, equipped with mounting hardware and a net, is designed to withstand dunking and aggressive play, though users should always exercise caution to prevent injury. The system's permanent installation in concrete means it is always ready for use, eliminating the need for setup or adjustment before each game. The optional pole pad (U) enhances player safety by cushioning potential impacts with the main support pole, a crucial feature for high-traffic playing areas. The system's durability makes it suitable for continuous outdoor use, capable of enduring various weather conditions without significant degradation in performance. Players can enjoy consistent ball rebound and a stable hoop, contributing to a more enjoyable and authentic basketball experience. The design prioritizes player safety through its structural stability and the option for protective padding.
Maintaining the Bison Heavy Duty Gooseneck Basketball System is relatively simple, focusing on ensuring the longevity and safety of the structure. The primary maintenance aspect involves regular inspection of all components for wear, damage, or loosening. Users should periodically check the tightness of all bolts and nuts, particularly those securing the backboard, rim, and braces to the gooseneck pole. Over time, vibrations from play and environmental factors can cause fasteners to loosen, which could compromise the system's stability and safety. The instructions specifically mention tightening the 1/2" Square Head Set Screws (O) and installing 1/2” Jam Nuts (P) to lock them in place, highlighting the importance of secure connections.
The use of a 1/4" X 1" Roll Pin (S) to further reduce the risk of rotation or movement of the backboard and rim assembly is a key maintenance-related installation step that contributes to long-term stability. This pin, driven into a drilled hole through the gooseneck pole and backboard mounting bracket, acts as an additional safeguard against rotational forces.
The concrete footing, once cured, requires minimal maintenance but should be inspected for cracks or signs of instability, especially after severe weather. Any significant damage to the concrete could affect the pole's foundation and should be addressed promptly by a professional.
The backboard, depending on its material, may require occasional cleaning to maintain visibility and aesthetic appeal. The rim and net are also subject to wear and tear; nets may need replacement periodically due to sun exposure or heavy use. The robust construction of the gooseneck pole and mounting hardware is designed to resist corrosion and structural fatigue, but any signs of rust or material degradation should be monitored. Applying protective coatings or touch-up paint to metal components can help extend their lifespan.
Finally, if an optional pole pad (U) is installed, it should be inspected for tears or damage that could reduce its protective effectiveness. Replacing a damaged pad is crucial for maintaining player safety. By following these simple maintenance guidelines, the Bison Heavy Duty Gooseneck Basketball System can provide many years of safe and enjoyable use.
| Category | Sports & Outdoors |
|---|---|
| Magnification | 6x |
| Objective Lens Diameter | 25 mm |
| Material | Plastic |
| Battery Type | CR2 |
| Color | Black |
| Usage | Golf, Hunting |