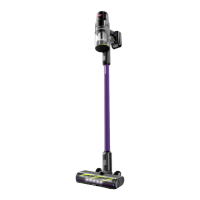
EasyManua.ls Logo

Bissell CLEANVIEW XR PET User Manual

Bissell CLEANVIEW XR PET
12 pages
To Next Page IconTo Next Page
Page #1 background imageLoading...
Page #1 background image
5
Product Overview
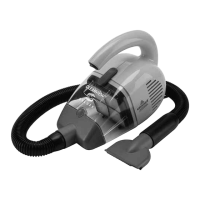
1. Hand Vacuum Assembly
2. Power Trigger
3. Battery
4. Battery Release Button
5. Dirt Tank Release Button
6. Dirt Tank Lid Button
7. Wand Release Button
8. Extension Wand
9. Foot Release Button
10. Motorized Foot
11. Brush Roll Release
Important Safety Instructions ...................................... 2
Assembly .................................................................................... 4
Installing the Wall Mount Charging Station ........ 5
Removing the Wall Mount Charging Station ..... 5
Charging the Battery.......................................................... 6
Using Your Vacuum ..............................................................7
Attaching Tools for Hand Vac Use.............................7
Emptying the Dirt Tank.....................................................8
Cleaning & Replacing the Filter ................................... 8
Maintaining the Brush Roll ..............................................9
Troubleshooting ................................................................... 10
Warranty ................................................................................... 10
1
8
2
3
10
7
6
9
11
CLEANVIEW XR
®
(PET)
POWERLIFTER
TURBO (PET)
STICK VACUUM
SERIES 3789, 3797
4
Meet your new BISSELL® product!
Go to support.BISSELL.com for a walkthrough of your new purchase,
including videos, tips, support, and more. Want to get started right
away? This guide has all the information you need to set up your new
product. Lets take a look...

Questions and Answers:

Bissell CLEANVIEW XR PET Specifications

General IconGeneral
TypeUpright
Corded/CordlessCorded
Voltage120 V
Brush SystemTangle-Free Brush Roll
Surface TypeCarpet
Special FeaturesTangle-Free Brush Roll, OnePass Technology
Included ToolsCrevice Tool
Power SourceElectric

Summary

Important Safety Instructions

Assembly

Connect Extension Wand to Foot

Connects the extension wand to the motorized foot, ensuring it clicks into place.

Connect Hand Vacuum Assembly

Connects the hand vacuum assembly to the extension wand, ensuring it clicks into place.

Attach Tool Clip and Tools

Attaches the tool clip to the extension wand and adds desired tools for use.

Charge Before First Use

Ensure the stick vacuum is fully charged before its initial use.

Installing the Wall Mount Charging Station

Secure Wall Mount

Secures the wall mount bracket to the wall using three screws.

Attach Tool Holder to Dock

Attaches the tool holder to the charging dock using two screws.

Assemble Charging Dock

Slides the charging dock into the wall mount until it clicks securely.

Plug in Charger

Slides the charger into the wall mount and plugs it into the wall outlet.

Removing the Wall Mount Charging Station

Unplug and Remove Charger

Unplugs the charger and slides it out from the wall mount.

Detach Tool Holder

Unscrews the two screws from the tool holder to detach it from the charging dock.

Remove Wall Mount

Presses the charging dock release button and lifts to remove from the wall mount, then unscrews the wall mount.

Charging the Battery

Charging with Charging Station

Details steps for removing the battery and charging it using the charging station.

Charging with Wall Mount Charger

Explains how to charge the battery while it is inserted in the wall mount charger.

Using Your Vacuum

Operating Modes and Control

Explains how to start, stop, and adjust power modes (Standard, Medium, TURBO) for different cleaning tasks.

Attaching Hand Vac Tools

Guides on how to attach tools to the hand vacuum or extension wand for cleaning furniture and stairs.

Emptying the Dirt Tank

Unlock and Remove Dirt Tank

Detaches the dirt tank from the hand vacuum by pressing a release button and twisting.

Dispose of Debris

Empties the contents of the dirt tank into a waste basket by pressing a button.

Cleaning and Replacing Filter

Remove Filter Assembly

Removes the filter assembly from the dirt tank by twisting the filter cup.

Clean and Dry Filter

Cleans the filter under warm water and allows it to dry for 24 hours before reinstallation.

Maintaining the Brush Roll

Access and Clear Brush Roll

Releases the foot, lifts the side plate, removes the brush roll, and clears debris.

Clean Brush Roll Chamber and Reinstall

Wipes the brush roll chamber and guides the brush roll back into the motorized foot.

Troubleshooting

Warranty Information

Related product manuals