Do you have a question about the Bissell POWERFORCE 2089 Series and is the answer not in the manual?
| Model | 2089 Series |
|---|---|
| Weight | 12.5 lbs |
| Filtration | Multi-Level Filtration |
| Multi-Level Filtration | Yes |
| Product Type | Upright Vacuum |
| Cord Length | 25 feet |
| Surface Recommendation | Carpet |
| Power Source | Electric |
| On-Board Tools | Crevice Tool |
Crucial safety advice to prevent fire, electric shock, and injury during operation.
Details on proper grounding procedures to ensure electrical safety.
Warning on using only BISSELL cleaning fluids to prevent damage and void warranty.
Enhancers like Oxy Boost, Renew Boost, Prevent Boost, Pet Oxy Boost.
Pre-treatment options like Oxy Stain Destroyer and Pet Stain PreTreat.
Includes Great Value, Professional Deep Cleaning, and Professional Pet Urine Eliminator formulas.
Options like DeepClean + Oxy, DeepClean + Refresh, DeepClean & Protect.
Specific cleaner for linoleum, vinyl, and ceramic tile.
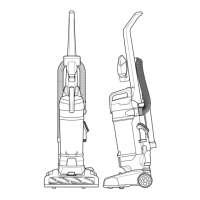
Warning to only assemble after reading instructions and operating procedures.
Connect the upper and lower sections of the cleaner securely.
Fasten the cleaner's body components using screws.
Insert and secure the handle post into the cleaner's body.
Ensure the handle is locked in place for safe operation.
Position the clean water tank onto the back of the unit.
Neatly store the power cord for convenience and safety.
Lift the clean water tank straight up from the lower body.
Remove the cap from the bottom of the clean water tank.
Fill the tank with warm tap water and BISSELL Formula to designated lines.
Tighten the cap and return the tank to the lower body until it clicks.
Important notes on water temperature, heating, and avoiding over-wetting.
Instructions on adding BISSELL Boosts to the water and 2X formula.
Check rug tags and prepare the area before deep cleaning carpets.
Connect the cleaner to a properly grounded electrical outlet.
Extend the collapsible handle and lock it in place.
Press the recline lever with your foot to angle the cleaner.
Press the power button located on the back of the machine.
Detailed steps for making wet and dry passes to clean the carpet.
Warning to turn off and unplug before performing maintenance or emptying.
Ensure the unit is powered off and disconnected from the outlet.
Pull up and out on the latches to detach the collection tank.
Lift the collection tank by its handle.
Pour out the dirty water from the opening at the back of the tank.
Rinse the tank thoroughly and secure it back onto the machine.
Refill clean water tank or dry parts before storing the machine.
Warning to turn off and unplug before cleaning or maintenance.
Disconnect the cleaner from the electrical outlet.
Remove and thoroughly rinse the collection tank.
Remove and rinse the tank vent and foam filter.
Remove, rinse, and reattach the nozzle for cleaning.
Clear lint and hair from the red gasket in the base of the unit.
Replace parts, wrap cord, wipe surfaces, and store upright.
Warning to turn off and unplug before performing maintenance.
Ensure the machine is powered off and disconnected from the outlet.
Detach the Clean Water and Collection Tanks from the machine.
Lay the machine down and unscrew the belt cover.
Unscrew and remove the belt cover using a Phillips head screwdriver.
Carefully maneuver the belt and remove the brush roll and its cap.
Insert brush into end cap, adjust, and tuck left cap into place.
Maneuver belt around pulley and brush roll cog, then secure brush roll.
Secure the belt cover back onto the machine with screws.
Warning for using the hard floor tool and specific cleaning fluid.
Ensure the cleaner is powered off and disconnected from the outlet.
Lift the clean water tank straight up from the lower body.
Pull up and out on latches to detach the collection tank.
Hook the hard floor tool onto the front of the nozzle and rotate down.
Replace both tanks and plug the cleaner into a proper outlet.
Follow cleaning pass instructions from page 8, step 5.
Warning to turn off and unplug before performing maintenance or troubleshooting.
Addresses causes and remedies for spray nozzle problems.
Diagnoses and solutions for the cleaner not suctioning liquid.
Details on the product's exclusive limited one-year warranty coverage.
Information on exceptions, exclusions, and implied warranty limitations.
Information on how to contact BISSELL for service, repairs, or questions.
Details on rewards, faster service, and alerts gained from product registration.
Link and instructions for registering the product online.
Information on accessing BISSELL's website, social channels, and customer feedback.