6 KB-520-6
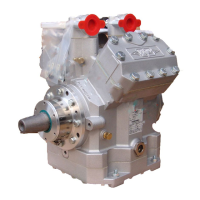
3.3 Mounting the drain pipe
from 4H.2(Y) / W4HA on
Oil accumulates in the bend of the oil
drain pipe. This avoids penetration of
air into the outer section of the shaft
seal thus preventing O-rings to
become premature brittle.
• Remove the plug and screw the
drain pipe (see fig. 2).
During the running-in period of
the new shaft seal (about 250
hours) an increased oil leak rate
may occur.
3.4 Drive
Danger!
Hair, hands or clothing can be
caught in the belt drive or cou-
pling!
Serious injuries are possible.
The area of the coupling must
be secured with a separating
cover (belt or coupling protec -
tion)!
For maintenance work on belt drive:
Danger!
Switch off motor and remove
motor fuses!
3.3 Visser le tube de drainage
à partir de 4H.2(Y) / W4HA
De l'huile s'accumule dans le coude du
tube de vidange d'huile. Cette huile évite
l'introduction d'air dans le domaine ex -
terieur de la garniture d'étan chéité ce qui
rend les joints toriques secs et cassants.
• Retirer le bouchon et visser le tube
de drainage (voir fig. 2).
Une plus grande perte d'huile risque
de survenir pendant le temps de
mise en œuvre de la nouvelle garni-
ture d’étanchéité (environ 250 heu-
res).
3.4 Entrainement
Danger !
Les cheveux, les mains ou les vête-
ments peuvent être "happés" par
l'entraînement par courroies ou par
l'accouplement !
Possibilité de graves blessures.
Absolument sécuriser la zone de
l'accouplement par une grille de
protection !
Lors d’intervention à l’entraînement par
courroies:
Danger !
Mettre hors de fonctionnement le
moteur et enlever le fusible de sécu-
rité du moteur !
3.3 Ölablauf-Rohr montieren
ab 4H.2(Y) / W4HA
Im Knie des Ölab lauf-Rohrs sammelt
sich Öl . Dies verhindert Luftzutritt in
den Außenbereich der Wellenabdich -
tung und damit eine vorzeitige Ver -
sprödung der O-Ringe.
• Stopfen entfernen und das Ölab -
lauf-Rohr montieren (siehe
Abb. 2).
Während der Einlaufzeit der
Gleitring dichtung (ca. 250
Stunden) kann eine erhöhte
Leckölmenge austreten.
3.4 Antrieb
Gefahr!
Haare, Hände oder Kleidung
können von Riemen trieb oder
Kupplung erfasst werden!
Schwere Verletzungen möglich.
Kupplungsbereich unbedingt mit
einer trennenden Abdeckung
sichern (Riemen- bzw.
Kupplungs schutz)!
Bei Arbeiten am Riementrieb:
Gefahr!
Motor abschalten und Motor-
Sicherungen entfernen!