17
ENGLISH
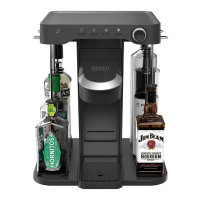
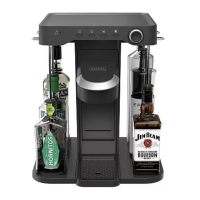
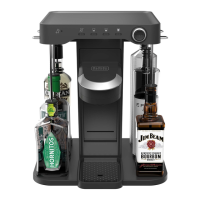
Installing Bottles (Fig.D)
WARNING: Only use water in the supplied water bottle.
Use of other liquids or substances in the water bottle may
result in damage to theappliance.
CAUTION: Avoid spills while installingbottles.
NOTE: It is recommended to use 750ml bottles or smaller to
ensure all bottles sit on the bottle platform
6
without hanging
off theplatform.
NOTE: Bottles must fit between the bottle platform and the top
of the cocktail maker whilestanding.
1. Slide a straw
7
into a bottle so the straw tip
9
sits on the
bottom of thebottle.
2. Slide the bottle stopper
13
down the straw until it sits fully
in the top of thebottle.
3. Ensure the straw lock
8
isup.
4. Align the straw plug notch
12
with the straw slot
10
.
5. Slide the straw plug
11
all the way into the straw slot,
allowing the bottle to sit freely in its designated space.
Ensure the straw plug is fully seated in the slot
6. To lock it into place, push the straw lock down until it clicks.
Ensure the lever is fullydown.
7. Repeat for allbottles.
IMPORTANT: Bottles must be placed in their designated space
to ensure the correct drink is dispensed. Names of the liquids are
located in each spot, indicating the appropriateliquid.
IMPORTANT: The following are the only liquids that should be
used with theappliance.
• Water
Installing Coaster (Fig.C)
1. Place the drip tray cover into the drip tray
3
so the rounded
and slanted corners of the cover line up with the rounded
and slanted corners of the driptray.
2. Ensure the cover sits fully inside the driptray.
3. To remove the cover, lift from the drip tray cover fingerhole
5
.
Installing Cord (Fig.B)
1. Place the cocktail maker upright on a flat, level,
stablesurface.
2. Insert the jack plug
1
of the cord into the plug port
2
.
3. Plug the other end of the cord into anoutlet.
ASSEMBLY AND ADJUSTMENTS
WARNING: To reduce the risk of serious personal
injury, turn appliance off and disconnect appliance
from power source before making any adjustments
or removing/installing attachments or accessories.
An accidental start-up can causeinjury.
Intended Use
This appliance is intended for residential use only for mixing
cocktails by adults of legal drinkingage.
DO NOT let children come into contact with theappliance.
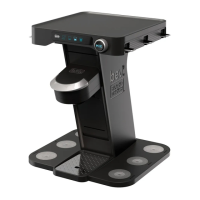
Description (Fig.A)
WARNING: Never modify the power tool or any part of it.
Damage or personal injury couldresult.
1
Jack plug
2
Plug port
3
Drip tray
4
Drip tray cover
5
Drip tray cover finger hole
6
Bottle platform
7
Straws (6)
8
Straw locks (6)
9
Straw tips (6)
10
Straw slots (6)
11
Straw plug (6)
12
Straw plug notch (6)
13
Bottle stoppers (6)
14
Power switch
15
Strength LEDs (4)
16
Bottle LEDs (6)
17
Glass shelf
18
Tower
19
Shaker LED
20
Capsule (not included)
21
Capsule holder
22
Capsule holder lid
23
Capsule cup
24
Capsule tab
25
Strength selector dial
26
Mix button
27
Party mode button
28
Cleaning mode button
29
Water bottle
30
Straw cleaner
31
Date code
DO NOT use under wet conditions or in the presence of
flammable liquids orgases.
DO NOT let children come into contact with the appliance.
Supervision is required when inexperienced operators use
thisappliance.
Date Code Position (Fig.A)
The date code
31
, which also includes the year of manufacture,
is printed into thehousing.
Example:
2021XX XX
Year and Week of Manufacture
• Check for damage to the appliance, parts or accessories which
may have occurred duringtransport.
• Take the time to thoroughly read and understand this manual
prior tooperation.