EasyManua.ls Logo

Black & Decker BPP06WTB - User Manual

Black & Decker BPP06WTB
27 pages
Print Icon
To Next Page IconTo Next Page
Loading...
INSTRUCTION MANUAL
PORTABLE AIR CONDITIONER
Thank you for choosing BLACK+DECKER!
PLEASE READ BEFORE RETURNING THIS PRODUCT FOR
ANY REASON.
If you have a question or experience a problem with your BLACK+DECKER
purchase, go to www.blackanddecker.com/instantanswers
If you can’t find the answer or do not have access to the Internet, call
844-299-0879 from 10:30 a.m. to 6:30 p.m. EST Mon. - Fri. to speak with an
agent. Please have the catalog number available when you call.
SAVE THIS MANUAL FOR FUTURE REFERENCE.
CATALOG NUMBER
BPP05WTB
BPP06WTB
BPP08WTB
BPP08HWTB
BPP10WTB
BPP10HWTB
Question and Answer IconNeed help?

Do you have a question about the Black & Decker BPP06WTB and is the answer not in the manual?

Summary

Product Registration

Safety Information

Important Safety Instructions

Provides essential safety precautions for operating the appliance and handling electrical components.

Handling Alkaline Batteries

Details safety precautions and warnings related to the use and disposal of alkaline batteries.

Grounding Instructions

Explains the importance of proper grounding for electrical safety and how to ensure it.

LCDI Power Cord and Plug

Describes the Leakage Current Detection and Interruption (LCDI) power cord features and testing procedures.

Safety Guidelines

Provides a list of 'Always Do' and 'Never Do' actions for safe operation and energy saving.

Operating Conditions

Specifies the recommended room temperature ranges for different operating modes of the air conditioner.

Set Up and Use

Parts and Features

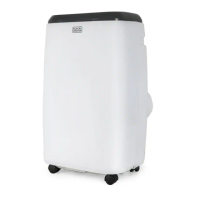
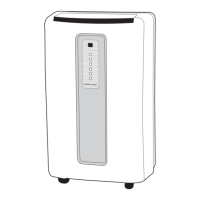
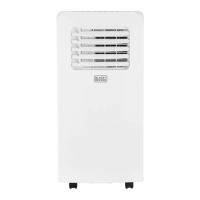
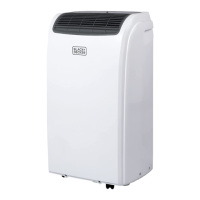
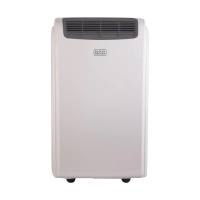
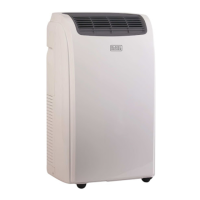
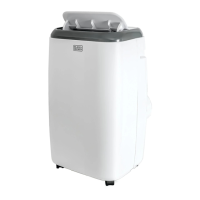
Identifies and illustrates the various components and parts of the portable air conditioner.

Specifications

Lists the unit dimensions, weights for different catalog numbers, and electrical requirements.

Installation Guide

Provides guidance on selecting a proper location and suggests tools for window kit installation.

Window Slider Kit Installation

Details the procedure for installing the window slider kit for both horizontal and vertical windows.

Exhaust Hose Installation

Explains how to connect and install the air exhaust hose and hose inlet for proper operation.

Control Panel Overview

Illustrates and describes the functions of the buttons and indicators on the unit's control panel.

Operating from the Control Panel

Guides on how to turn the appliance on, select modes, and manage settings using the control panel.

Mode Operations

Instructions for using Cool, Dehumidify, Fan, and Heat modes of the air conditioner.

Timer and Indicator Lights

How to set timers and understand the meaning of indicator lights like Swing and Sleep.

Remote Control Battery Installation

Steps for installing batteries in the remote control and basic usage guidelines.

Remote Control Layout and Functions

Diagram of the remote control and explanation of all button functions.

LED Display and Remote Functions

Explanation of LED indicators and operation of core remote buttons like Power and Mode.

Advanced Mode and Swing Operations

Detailed operations for Dehumidify, Fan, Heat modes, and using the Swing function.

Timer, Sleep, and Temperature Settings

How to use Timer, Sleep functions, and select temperature units (°C/°F).

Water Drainage (Cooling;Heat Modes)

Instructions for draining water in cooling and heat modes, including error codes.

Continuous Draining (Dehumidification)

Instructions for continuous water drainage in Dehumidification mode using the drain hose.

Cleaning and Care

Cleaning the Cabinet

How to clean the exterior cabinet of the air conditioner using a damp cloth.

Cleaning the Filter

Procedure for cleaning the evaporator filter, including vacuuming and washing.

Start and End of Season Operations

Checks and operations required before starting and after ending the seasonal use of the unit.

Troubleshooting and Warranty

Before You Call for Service

Checks to perform if the air conditioner fails to operate before contacting customer service.

Customer Service

Contact information and important notes for obtaining assistance and warranty service.

Limited Warranty

Details the terms, conditions, exclusions, and obtaining service for the product's warranty.

Overview

This document describes the BLACK+DECKER Portable Air Conditioner, an appliance designed for cooling, dehumidifying, and in some models, heating rooms. It comes with various catalog numbers: BPP05WTB, BPP06WTB, BPP08WTB, BPP08HWTB, BPP10WTB, and BPP10HWTB.

Function Description

The portable air conditioner serves multiple functions:

  • Cool Mode: Ideal for hot weather, providing cooling to the room.
  • Dehumidify Mode: Reduces humidity in the room. It is recommended to keep windows and doors closed for optimal effect. Continuous drainage is suggested in this mode.
  • Fan Mode: Circulates air without cooling or heating.
  • Heat Mode (for BPP08HWTB and BPP10HWTB models only): Provides heating for the room.

The unit is controlled via a control panel on the appliance itself or through a remote control. It features a timer function for auto start and stop, and a sleep mode that gradually adjusts the temperature for comfort.

Important Technical Specifications

  • Dimensions (W x D x H): 17.32” x 14.05” x 27.16” for all models.
  • Weight:
    • BPP05WTB: approx. 51.1 lbs.
    • BPP06WTB: approx. 54.8 lbs.
    • BPP08WTB: approx. 63.1 lbs.
    • BPP08HWTB: approx. 64.5 lbs.
    • BPP10WTB: approx. 65.1 lbs.
    • BPP10HWTB: approx. 66.6 lbs.
  • Electric Requirements: 115V ~ 60Hz.
  • Operating Temperature Range:
    • Cool Mode: 64°F (18°C) ~ 95°F (35°C)
    • Dehumidify Mode: 64°F (18°C) ~ 95°F (35°C)
    • Heat Mode (Electrical Heat Type): 45°F (7°C) ~ 81°F (27°C)
  • Cooling Capacity (BTU):
    • 5,000 BTU: up to 150 sq. ft.
    • 6,000 BTU: up to 250 sq. ft.
    • 8,000 BTU: up to 350 sq. ft.
    • 10,000 BTU: up to 450 sq. ft.
  • Power Cord: Equipped with an LCDI (Leakage Current Detection and Interruption) power cord for safety, which disconnects power if leakage current is detected. It has a grounded 3-prong plug.
  • Refrigerant: R32/R290 (for units requiring this, indicating flammable materials).

Usage Features

Installation:

  • Location: Place on a firm, smooth, level floor strong enough to support the unit, within reach of a properly rated grounded socket.
  • Clearance: Allow 12 to 36 inches of space from walls, furniture, and curtains for efficient air-conditioning.
  • Casters: The unit has casters for easy movement on smooth, flat surfaces. Avoid rolling over objects or on carpet surfaces with caution.
  • Window Slider Kit: Designed for most standard "Vertical" and "Horizontal" window applications. It is adjustable from a minimum of 27.5" (70 cm) to a maximum of 47.2" (120 cm). If the window opening is less than 27.5", the kit may need to be cut, but never cut the part with the hole. Foam seals are provided to secure the kit and seal gaps.
  • Exhaust Hose: The air exhaust hose and hose inlet/outlet are pre-assembled. For COOL, DEHUMIDIFY, and HEAT modes, the exhaust hose must be connected to the unit and vented outside through the window slider kit. For FAN mode, the hose should be disconnected. The hose can be compressed or extended moderately, but keeping its length to a minimum and avoiding sharp bends is recommended.

Control Panel and Remote Control Operation:

  • Power On/Off: Press the power button. Always press the button and wait a few minutes before unplugging to allow the appliance to perform checks.
  • Mode Selection: Use the MODE button to cycle through COOL, DEHUMIDIFY, FAN, and HEAT (if applicable).
  • Temperature Adjustment: Use the + and - buttons to set the desired temperature (61°F-88°F or 16°C-31°C in COOL/HEAT modes).
  • Fan Speed: Select HIGH, MEDIUM, or LOW fan speed using the Fan Speed button (not adjustable in Dehumidify mode).
  • Timer: Set AUTO STOP (when unit is ON) or AUTO START (when unit is OFF) in 1-hour increments up to 24 hours.
  • Swing Function: Activates the air swing of the louvers for better air distribution.
  • Sleep Mode: Gradually adjusts the temperature for a comfortable sleeping environment. In COOL mode, temperature increases 1°F after an hour and 2°F after 2 hours. In HEAT mode, temperature decreases 1°F after an hour and 2°F after 2 hours.
  • LED Button: Illuminates the LED screen on the unit.
  • °C/°F Selector: Switches between Fahrenheit and Celsius temperature display.
  • Remote Control: Requires 2 AAA batteries (not included). Point the remote at the receiver on the appliance, within 7 meters and without obstacles.

Water Drainage:

  • Auto Water Evaporation: The unit is equipped with auto water evaporation, so drainage is typically only required in high humidity or at the end of the season for COOL and HEAT modes.
  • Full Tank Indicator: The "FULL TANK" indicator light on the control panel will illuminate when the water level reaches a predetermined level, or if error codes "E2" (COOL mode) or "E4" (HEAT mode) appear.
  • Intermittent Draining: Unplug the unit, move it to a drain area, remove the bottom drain cap, let water drain, and replace the cap.
  • Continuous Draining: For Dehumidify mode, connect the supplied drain hose to the drain outlet (back center of the unit) and direct it to a floor drain or bucket.
  • Restart Delay: After the unit stops, it cannot be restarted for 3 minutes. Operation will automatically resume after this delay.

Safety Guidelines:

  • Grounding: Must be connected to a properly grounded electrical outlet with a 3-prong plug. Do not cut or remove the grounding prong. Do not use adapters or extension cords.
  • Power Cord: Do not operate if the power cord is frayed or damaged. The LCDI power cord must be tested before each use.
  • Placement: Do not block airflow, place objects on top, or use near bathtubs, showers, or wash basins.
  • Maintenance: Always unplug before servicing or moving. Do not operate without filters.
  • Chemicals: Avoid contact with combustible gases, oily/sulphurous atmospheres, or chemicals. Do not use alcohol, insecticides, or gasoline for cleaning.
  • Children: Supervise children to ensure they do not play with the appliance.
  • Flammable Refrigerants: Units using R32/R290 refrigerants require servicing by qualified personnel competent in handling flammable refrigerants.

Maintenance Features

Cleaning:

  • Cabinet: Clean with a slightly damp cloth, then dry with a dry cloth. Do not saturate with water, or use petrol, alcohol, solvents, or insecticide sprays.
  • Filter: Clean the evaporator filter weekly. Remove dust with a vacuum cleaner. If very dirty, immerse in warm water, rinse, dry thoroughly, and re-insert.

Start/End of Season Operations:

  • Start of Season: Check power cable and plug for damage. Follow installation instructions.
  • End of Season: Ensure the air conditioner is completely drained of water (refer to Water Drainage section). Clean and dry the filter thoroughly before reinstalling.

Troubleshooting: The manual provides a troubleshooting chart for common issues like the unit not starting, not cooling enough, noise/vibration, full water tank, and remote control not working, along with possible causes and remedies. For persistent problems or error codes (EO, E1, E3), contact customer service.

Warranty: A limited warranty covers defects in material, parts, and workmanship for 1 year (12 months) for labor and parts (manufacturing defects only). Exclusions apply, including damage from misuse, unauthorized repairs, power surges, or commercial use. For service, contact BLACK+DECKER Customer Satisfaction Center at 844-299-0879 with proof of purchase, model number, and serial number.

Black & Decker BPP06WTB Specifications

General IconGeneral
BrandBlack & Decker
ModelBPP06WTB
CategoryAir Conditioner
LanguageEnglish

Related product manuals