EasyManua.ls Logo

Black & Decker LST220 User Manual

Black & Decker LST220
44 pages
To Next Page IconTo Next Page
Page #1 background imageLoading...
Page #1 background image
1
20V MAX* LITHIUM TRIMMER / EDGER
INSTRUCTION MANUAL
KEY INFORMATION YOU SHOULD KNOW:
The guard must be installed before trimming or edging - if
not, the motor will overheat (page 8).
When replacing the line, use only .065 inch diameter
ROUND line (B&D Model #AF-100 is recommended) -
otherwise the tool will not function properly (page 10).
Do not bump the feed head against the ground - it will
disrupt the feed mechanism.
*Maximum initial battery pack voltage
(measured without a workload) is 20
volts. Measured under a workload,
nominal voltage is 18.
Model # LST220
SAVE THIS MANUAL FOR FUTURE REFERENCE.
VEA EL ESPAÑOL EN LA CONTRAPORTADA.
POUR LE FRANÇAIS, VOIR LA COUVERTURE ARRIÈRE.
INSTRUCTIVO DE OPERACIÓN, CENTROS DE SERVICIO Y
PÓLIZA DE GARANTÍA. ADVERTENCIA: LÉASE ESTE
INSTRUCTIVO ANTES DE USAR EL PRODUCTO.
Thank you for choosing Black & Decker! Go
to www.BlackandDecker.com/NewOwner
to register your new product.
Model Number LST220
PLEASE READ BEFORE RETURNING
THIS PRODUCT FOR ANY REASON:
If you have a question or experience a problem with your
Black & Decker purchase, go to
WWW.BLACKANDDECKER.COM/INSTANTANSWERS
for instant answers 24 hours a day.
If you canʼt find the answer or do not have access to the internet,
call 1-800-544-6986 from 8 a.m. to 5 p.m. EST Mon. - Fri
to speak with an agent.
Please have the catalog number available when you call.

Other manuals for Black & Decker LST220

Question and Answer IconNeed help?

Do you have a question about the Black & Decker LST220 and is the answer not in the manual?

Black & Decker LST220 Specifications

General IconGeneral
BrandBlack & Decker
ModelLST220
CategoryTrimmer
LanguageEnglish

Summary

Read Before Returning Product

Key Operating Information

Guard Installation

The guard must be installed before trimming or edging to prevent motor overheating.

Line Replacement

Use only .065 inch diameter ROUND line; otherwise, the tool may not function.

Line Feed Mechanism

Do not bump the feed head against the ground, as it disrupts the feed mechanism.

Safety Guidelines Definitions

Important Safety Warnings and Instructions

Wear Eye Protection

Always wear safety spectacles or goggles when operating the tool.

Use Guard

Do not operate the tool without the guard attached.

Dress Properly

Avoid loose clothing, wear rubber gloves and footwear, long pants.

Clear Rotating Line

Keep face, hands, and feet clear of rotating nylon line.

Keep Bystanders Away

Keep all bystanders at a safe distance from the work area.

Edger Safety Precautions

Take special precautions when using the tool as an edger.

Maintain Safe Distance

Ensure people and pets are at least 100 feet away during operation.

Reduce Rebound Risk

Work away from solid objects to reduce rebound injury.

Avoid Accidental Starting

Do not carry the plugged-in tool with finger on the trigger.

Do Not Force Tool

Use Right Tool

Avoid Overreaching

Check for Damage

Disconnect Tool When Not in Use

Avoid Hazardous Conditions

Store Idle Tools Indoors

Stay Alert

Maintain With Care

Check Damaged Parts

Avoid Water Immersion

Avoid Chemical Storage

Avoid Pressure Washing

California Proposition 65 Warning

Product Components

Battery Charger Safety Instructions

Prevent Liquid Ingress

Do not allow liquid to get inside the charger.

Use Designated Batteries

Charge only designated Black & Decker batteries to reduce injury risk.

Avoid Foreign Material Contact

Keep conductive foreign material away from charger cavities.

Use Specified Chargers Only

Only use chargers specified in the manual for the battery pack.

Charger Intended Use

Chargers are intended only for designated Black & Decker batteries.

Protect Charger From Elements

Do not expose the charger to rain or snow.

Disconnect Properly

Pull by the plug, not the cord, when disconnecting the charger.

Manage Power Cord

Ensure the power cord is located to avoid damage or stress.

Use Extension Cords Sparingly

Only use extension cords if absolutely necessary and ensure proper gauge.

Extension Cord Guidelines

Charger Placement and Ventilation

Charger Mounting

Handle Damaged Chargers

Charger Cleaning Safety

Do Not Connect Chargers Together

Battery Pack Safety Instructions

Avoid Battery Incineration

Do not incinerate battery packs, as they can explode and release toxic fumes.

Avoid Explosive Atmospheres

Do not charge or use batteries in explosive atmospheres.

Handle Battery Leaks

Wash skin with soap and water if battery contents contact skin.

Battery Burn Hazard

Use Only Specified Chargers

Avoid Water Immersion for Batteries

Temperature Storage Limits

Do Not Open Battery Pack

Prevent Battery Short Circuits

Battery Storage Recommendations

Optimal Storage Conditions

Store batteries in a cool, dry place away from direct sunlight and extreme temperatures.

Charging Procedure

Plug in Charger First

Plug the charger into an outlet before inserting the battery pack.

Insert Battery Pack

Insert the battery pack into the charger until it clicks.

Monitor Charging Indicator

Observe the green LED flash indicating the battery is charging.

Confirm Full Charge

A continuously lit green LED indicates the battery is fully charged.

Charger Diagnostics

Bad Battery Detection

Red LED flashes indicate a weak or damaged battery.

Hot/Cold Pack Delay

Charging pauses if battery is too hot or cold until normalized.

Leaving Battery in Charger

Important Charging Notes

Optimal Charging Temperature

Charge battery packs between 60°F-80°F (16°C-27°C).

Charger Warmth

Charger and battery pack may become warm; this is normal.

Troubleshooting Charging Issues

Check receptacle, switch, and temperature if battery does not charge properly.

Recharge Partially Used Packs

Partially used battery packs can be recharged without adverse effect.

Charger Cavity Maintenance

Keep charger cavities free of foreign conductive material; unplug before cleaning.

Battery Pack Installation and Removal

Install Battery Pack

Insert battery pack into tool until an audible click is heard.

Remove Battery Pack

Depress release button and pull battery pack out of tool.

Assembly & Adjustment

Installing the Guard

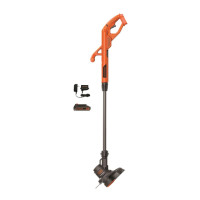
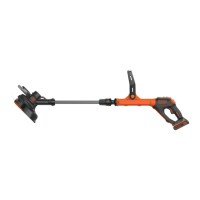
Follow steps to attach the guard securely to the motor housing.

Attaching the Auxiliary Handle

Press buttons on housing to attach the auxiliary handle.

Height Adjustment

Operating Instructions

Eye Protection Warning

Always use proper eye protection conforming to ANSI Z87.1.

Area Inspection Caution

Inspect area for wires, cords, or strings that could entangle the line.

Switching On and Off

Squeeze trigger lever to turn on, release to turn off.

Convert to Edging Mode

Edging Mode Conversion

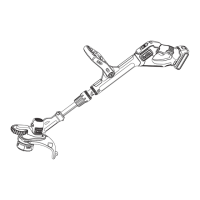
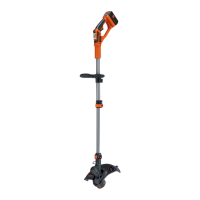
Turn collar, rotate lower housing 180°, and turn collar until tight.

Edge Guide Deployment

Pull wire edge guide out until it clicks into locked position.

Cutting Line / Line Feeding

Line Specifications

Trimmer uses .065 inch diameter ROUND nylon line.

Line Feeding Caution

Do not bump unit on ground to feed line; line wear varies with surface.

Replacement Accessories

Accessory Caution

Use only appropriate type of cutting line; Black & Decker AF-100 spool recommended.

Line Type Restriction

Use only .065 inch ROUND MONOFILAMENT line to avoid motor overload.

Other Replacement Parts

Other parts are available through Black & Decker service centers.

Accessory Hazard Warning

Using unrecommended accessories can be hazardous.

Replacing the Spool

Spool Removal Steps

Remove battery, depress tabs, and remove spool cap and spool.

Spool Seating

Push new spool onto boss and rotate slightly until seated.

Spool Cap Alignment

Align spool cap tabs with housing slots and push until it snaps.

Line Protrusion Caution

Cut line so it just reaches the trimming blade to avoid tool damage.

Rewinding Spool From Bulk Line

Bulk Line Installation

Follow steps to install bulk line, including folding and anchoring.

The RBRC™ Seal

Maintenance

Clean Air Intake Slots

Keep air intake slots clean to avoid overheating.

Line Conditioning

Store spare spools or line in a plastic bag with water.

Cleaning Plastic Parts

Clean plastic parts with mild soap and a damp rag.

Sharpen Line Cutter

Periodically touch-up the sharpness of the line cutter blade with a file.

Troubleshooting

Tool Runs Slowly

Check spool housing rotation and ensure cutting line is within length limit.

Automatic Line Feed Issues

Check tabs, remove spool, and ensure line is wound neatly.

Service Information

Contacting Service Centers

Contact nearest Black & Decker location for service, repairs, or parts.

Full Two-Year Home Use Warranty

Warranty Coverage

Two-year warranty against defects in material or workmanship.

Return for Replacement or Repair

Return product to retailer or authorized service center for service.

Warranty Exclusions

Warranty does not apply to accessories.

Free Warning Label Replacement

Call to receive free replacement warning labels.

Product Information for Mexico

Mexican Service and Sales Locations

Related product manuals