EasyManua.ls Logo

Black & Decker LST 136 - User Manual

Black & Decker LST 136
46 pages
Print Icon
To Next Page IconTo Next Page
Loading...
1
36V LITHIUM TRIMMER / EDGER
INSTRUCTION MANUAL
KEY INFORMATION YOU SHOULD KNOW:
The guard must be installed before trimming or edging - if
not, the motor will overheat (page 8).
When replacing the line, use only .065 inch diameter
ROUND line (B&D Model #AF-100 is recommended) -
otherwise the tool will not function properly (page 11).
Do not bump the feed head against the ground - it will
disrupt the feed mechanism.
Model # LST136
SAVE THIS MANUAL FOR FUTURE REFERENCE.
VEA EL ESPAÑOL EN LA CONTRAPORTADA.
POUR LE FRANÇAIS, VOIR LA COUVERTURE ARRIÈRE.
INSTRUCTIVO DE OPERACIÓN, CENTROS DE SERVICIO Y
PÓLIZA DE GARANTÍA. ADVERTENCIA: LÉASE ESTE
INSTRUCTIVO ANTES DE USAR EL PRODUCTO.
Thank you for choosing Black & Decker! Go
to www.BlackandDecker.com/NewOwner
to register your new product.
Model Number LST136
PLEASE READ BEFORE RETURNING
THIS PRODUCT FOR ANY REASON:
If you have a question or experience a problem with your
Black & Decker purchase, go to
WWW.BLACKANDDECKER.COM/INSTANTANSWERS
for instant answers 24 hours a day.
If you canʼt find the answer or do not have access to the internet,
call 1-800-544-6986 from 8 a.m. to 5 p.m. EST Mon. - Fri
to speak with an agent.
Please have the catalog number available when you call.
Question and Answer IconNeed help?

Do you have a question about the Black & Decker LST 136 and is the answer not in the manual?

Black & Decker LST 136 Specifications

General IconGeneral
Power SourceBattery
Voltage36 V
Cutting Width13 inches
Weight6.5 lbs
Adjustable HeightYes
Battery IncludedYes
Battery TypeLithium-Ion
Line Diameter0.065 inches
Feed SystemAutomatic
Charging Time1 hour

Summary

Key Product Information

Guard Installation Requirement

The guard must be installed for operation to prevent motor overheating.

Line Replacement Guideline

Specifies the required .065 inch ROUND line for proper tool function.

Line Feed Mechanism Caution

Avoid bumping the feed head against the ground to prevent disrupting the feed mechanism.

Safety Guideline Definitions

General Safety Warnings and Instructions

Comprehensive safety precautions for operating electric gardening appliances.

Personal Protective Equipment

Mandates wearing eye protection, proper clothing, and footwear.

Area and Bystander Safety

Keep bystanders and children away from the work area.

Edger Specific Safety

Precautions when using the tool as an edger, regarding thrown objects and rebound.

Safe Tool Operation and Environmental Precautions

Tool Usage Restrictions

Do not force, overreach, or use for unintended jobs.

Environmental and Storage Safety

Avoid wet conditions, explosive atmospheres, and store tools properly.

Maintenance and Damage Checks

Maintain care, check for damaged parts, and avoid water immersion.

California Proposition 65 Warning

Advises on chemicals in dust and recommended protective equipment.

Product Components

Component Identification

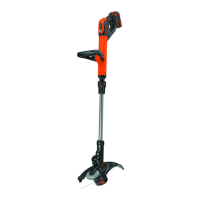
Lists and illustrates the main parts of the trimmer/edger.

Battery Charger Safety

Battery Charger Safety Precautions

Covers shock hazards, burn hazards, and general charger usage safety.

Charger Extension Cord Use

Guidelines for using extension cords with the battery charger.

Charger Operational Guidelines

Rules on placement, damage, disassembly, and voltage for the charger.

Battery Pack Safety

Battery Pack Handling and Hazards

Precautions against fire, explosive atmospheres, skin contact, and tampering.

Battery Pack Storage and Temperature

Recommendations for storing battery packs and avoiding temperature extremes.

Battery Terminal Safety

Prevents metal objects from contacting battery terminals to avoid fire hazards.

Battery Charging Procedures

Standard Charging Procedure

Step-by-step guide for charging the battery pack.

Charger Diagnostic Indicators

Explains LED indicators for bad battery and hot/cold pack delay.

Battery Status and Pack Installation

State of Charge Indicator

How to check the battery's current charge level using LEDs.

Installing and Removing Battery Pack

Procedures for safely attaching and detaching the battery pack from the tool.

Assembly and Adjustment Procedures

Attaching the Guard

Step-by-step guide for securely attaching the safety guard.

Attaching the Auxiliary Handle

Instructions for attaching and adjusting the auxiliary handle.

Tool Height and Mode Settings

Adjusting Tool Height

Using the telescopic mechanism to set a comfortable working height.

Setting Tool to Trimming Mode

Steps to configure the tool for trimming grass.

Setting Tool to Edging Mode

Steps to configure the tool for edging lawn borders.

Operating the Trimmer;Edger

Switching the Tool On and Off

Procedure for activating and deactivating the tool's motor.

Power Command Feature

Adjusting power output for max power or max runtime.

Trimming and Edging Techniques

Guidance on effective trimming and edging methods and considerations.

Cutting Line and Accessories

Cutting Line and Line Feeding

Details on line type, feeding, and maintenance during use.

Replacement Accessories

Specifies correct line type and availability of other parts.

Replacing the Spool

Step-by-step guide for replacing the trimmer line spool.

Spool Rewinding and Recycling

Rewinding Spool from Bulk Line

Guide for manually winding cutting line from bulk supply.

Battery Recycling Program (RBRC)

Information about the Rechargeable Battery Recycling Corporation seal and program.

Maintenance and Troubleshooting

Routine Maintenance

Cleaning air slots, storing line, cleaning parts, and sharpening the cutter.

Troubleshooting Tool Runs Slowly

Steps to diagnose and fix issues when the tool operates slowly.

Troubleshooting Automatic Line Feed

Steps to diagnose and fix issues with the automatic line feed system.

Service Information and Warranty

Service Center Information

How to find and contact authorized service centers for repairs and parts.

Full Two-Year Home Use Warranty

Explains the terms and conditions of the product warranty.

Free Warning Label Replacement

Information on obtaining replacement warning labels if they are missing or illegible.

Related product manuals