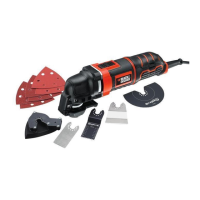
Slide the accessory (11) between the shaft and the
accessory holder making sure the acces- sory engages all
eight pins on the holder and is ush with the shaft.
Release the accessory clamping lever.
NOTE: Some accessories, such as scrapers and blades can
be mounted at an angle if required.
Fitting a sanding sheet (g. B)
Line up the sanding sheet (12) with the sand- ing base
(13) as shown.
Press the sheet rmly and evenly onto the sanding base,
making sure that the holes in the sheet coincide with the
holes in the base.
Removing a sanding sheet
Pull the sanding sheet (12) off the sanding base (13).
@
Warning! Never use the sanding base without a
sanding sheet or accessory in place.
Fitting the dust extraction adaptor (g. B)
Line up the vacuum adaptor (15) with one end of the tube
(14) as shown.
Press the adaptor rmly and evenly in to the tube.
Line up the tube (14) with the sanding base (13) as
shown.
Press the tube rmly and evenly on to the sanding base.
Secure the tube by turning the locking nut (16) clockwise.
Connect a vacuum cleaner to the vacuum adaptor.
Removing the dust extraction adaptor
Turn the locking nut (16) anti-clockwise.
Pull the tube(14) out of the sanding base (13).
Fitting alternative accessories (g. C)
Place the spacer (17) onto the collar (18).
Place the alternative accessory (19) onto the collar (18).
Firmly attach the xing bolt (20) into place to ensure a
tight t for the alternative accessory (19) with the hex key
provided.
NOTE: The spacer and xing bolt are not used to attach
BLACK+DECKER accessories. Black and Decker accessories
are attached using the Super- lokTM Tool free accessory
clamping lever.
Use
@
Warning! Let the tool work at its own pace. Do not
overload.
Variable speed control (g. A)
NOTE: Ensure the forward reverse slider (2) is not in the
locked position.
To switch the tool on, press the variable speed switch (1).
The tool speed depends on how far you press the switch.
To switch the tool off, release the variable speed switch.
Hints for optimum use
Always hold the tool securely. For precision work, hold the
tool near the front.
Clamp the workpiece whenever possible, especially when
using cutting blades.
Do not exert too much pressure on the tool.
Always use the appropriate type of attachment for the
workpiece material and type of cut.
Regularly check the condition of accessories.Replace
when necessary.
Mark the desired starting point.
Switch the tool on and slowly feed attachments into the
workpiece at the desired starting point.
Clamp a piece of plywood or soft wood to the back of the
workpiece and saw through the combination in order to
obtain a clear cut.
Do not force the cutting blade into the workpiece. Note
that cutting sheet metal will normally take more time than
sawing thicker wooden workpieces.
When cutting metal spread a thin lm of oil along the
cutting line before cutting.
When sanding new layers of paint before ap- plying
another layer, use extra ne grit.
On very uneven surfaces, or when removing layers of
paint, start with a coarse grit. On other surfaces, start with
a medium grit. In both cases, gradually change to a ne
grit for a smooth nish.
Consult your retailer for more information on available
accessories.
Maintenance
Your BLACK+DECKER tool has been designed to operate
over a long period of time with a minimum of maintenance.
Continuous satisfactory operation depends upon proper tool
care and regular cleaning.
Your charger does not require any maintenance apart from
regular cleaning.
@
Warning! Before performing any maintenance on
the tool, remove the battery from the tool. Unplug the
charger before cleaning it.
Regularly clean the ventilation slots in your tool and
charger using a soft brush or dry cloth.
Regularly clean the motor housing using a damp cloth. Do
not use any abrasive or solvent-based cleaner.
7
ENGLISH
(Original instructions)

 Loading...