Do you have a question about the Blackbird 4K HDMI 2.0 and is the answer not in the manual?
Details and labels for the front panel ports and buttons of the KVM switch.
Instructions for switching PCs using the KVM's physical front panel buttons.
Guide to operating the KVM using the included IR remote control.
Method of switching PCs by moving the mouse cursor to screen edges.
How the KVM detects and switches PCs based on USB connection status.
Using keyboard hotkey sequences to control the KVM functions.
Statement regarding the device's compliance with FCC rules and regulations.
Statement on the device's compliance with Canadian ICES-003 standards.
This document describes the Blackbird™ 4K HDMI® 2.0 2x1 USB 3.0 KVM Switch, a device designed to allow users to control up to two computers using a single keyboard, mouse, and video display. The KVM switch is compliant with the HDMI 2.0 specification, ensuring compatibility with modern display technologies. It supports a high bandwidth of up to 18Gbps, which is crucial for handling high-resolution video signals. The device is capable of supporting resolutions up to 4K@60Hz, including specific resolutions like 3840x2160 and 4096x2160, as well as all 3D video modes. This makes it suitable for demanding visual applications, such as gaming, professional video editing, or high-definition content consumption.
The KVM switch is also compliant with HDCP™ 2.2/1.4 standards, which is important for playing protected content from sources like Blu-ray players or streaming services. It supports various color spaces, including RGB 4:4:4, YCbCr 4:4:4, YCbCr 4:2:2, and YCbCr 4:2:0, offering flexibility for different display and content requirements. Additionally, the device supports High Dynamic Range (HDR) and Deep Color with 12-bits per channel, totaling 36-bit color, which enhances the visual experience by providing richer colors and greater contrast.
One of the key features of this KVM switch is its broad operating system compatibility. It works seamlessly with computers running Windows® 2000, XP, Vista®, 7, 8, and 10, as well as Mac® OS X® and Linux® operating systems. This wide compatibility ensures that users with diverse computing environments can integrate the KVM switch into their setups without issues.
The device offers multiple methods for switching between connected computers, providing convenience and flexibility. Users can switch manually using buttons on the front panel of the KVM switch. Each input has a dedicated PC# button for direct selection. When a PC is powered on and connected to one of the USB ports on the rear panel, a corresponding Connect LED illuminates, indicating a valid connection. When an input is selected, a Select LED illuminates. In Automatic Switching Mode, the Select LED of the currently displayed input flashes, providing a visual cue.
An included IR remote control offers another convenient way to switch between PCs. The remote has numbered buttons for direct selection of PC1 or PC2. It also features forward and backward cycle buttons, allowing users to navigate through the connected PCs in a sequence (PC1 > PC2 > PC1 > etc.). For an even more intuitive switching experience, the device supports Mouse Traverse. By moving the mouse cursor to the right side of the screen and holding it there for approximately 2 seconds, the KVM will automatically cycle forward to the next connected PC in the sequence (PC1 > PC2 > PC1 > etc.).
Hotkey selection via the connected keyboard provides advanced control. These hotkey sequences begin with pressing the Scroll Lock (SL) key twice, followed by one or more other keys within 5 seconds. Hotkeys allow users to cycle forward or backward through PCs (SL+SL+↑ or SL+SL+→ for forward, SL+SL+← or SL+SL+↓ for backward) or directly select a PC (SL+SL+#, where # is 1 or 2).
The KVM switch also features an Automatic Switching Mode, which can be enabled using the SL+SL+s hotkey. In this mode, the KVM automatically switches the HDMI®, MICROPHONE, and SPEAKERS inputs from one PC to another, staying on each input for a user-defined interval (default 15 seconds). The USB connection, however, remains static. During this mode, the Select LED of the currently displayed input flashes. Users can press the SPACE BAR to select the currently displayed input or any other key to return to the input that was selected before Automatic Switching Mode was enabled. The interval for Automatic Switching Mode can be set using the SL+SL+i+#+ENTER hotkey, with # representing a duration between 5 and 999 seconds.
Another useful hotkey feature is the ability to enable or disable a buzzer sound that occurs when switching between PC1 and PC2. This can be controlled with the SL+SL+b+# hotkey, where # is 1 for on and 0 for off (default is on). Finally, the SL+SL+f+L+a+s+h+ENTER hotkey allows users to resume normal operation and restore the device to its default settings.
The KVM switch incorporates USB Port Detection, which intelligently manages PC selection. If the currently selected PC is powered off or its USB connection is broken, the KVM will automatically cycle forward to the next available PC. During this search, the Select LEDs on the front panel flash sequentially. Once a valid PC connection is found and established, the corresponding Select LED illuminates. Conversely, if a PC is powered on or a USB connection is established, the KVM will automatically switch focus to that PC, ensuring a seamless transition.
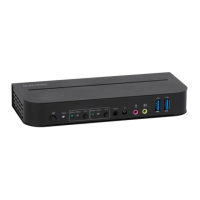
For connectivity, the device includes a comprehensive set of ports on both the front and rear panels. The front panel features a Power button and Power LED, Input Select buttons with Connect and Select LEDs for each PC, an IR EXT jack for connecting the included IR receiver, an IR "eye" for receiving signals, a 3.5mm MICROPHONE jack, a 3.5mm SPEAKERS jack, and two USB 3.0 ports for external USB devices like printers, scanners, or flash drives. The MICROPHONE and SPEAKERS jacks on the front panel are identical to those on the rear panel, allowing users to connect a single microphone or pair of headphones/speakers to either set of jacks, but not both simultaneously.
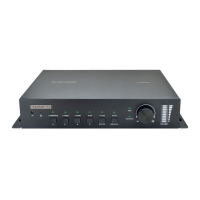
The rear panel is organized into sections: LOCAL, PC1, and PC2. The LOCAL section provides connections for the local keyboard, video display, and mouse, as well as MICROPHONE and SPEAKERS jacks. The PC1 and PC2 sections each contain HDMI® and USB input ports for connecting to the respective computers, along with MICROPHONE and SPEAKERS jacks for audio input and output from each PC. A DC 5V barrel connector is present on the rear panel for connecting the included AC power adapter.
Installation involves ensuring all equipment is powered off and disconnected. A Premium High Speed HDMI® Cable connects the local display to the HDMI Out port in the LOCAL section. A USB keyboard and mouse are plugged into their respective ports in the LOCAL section. A microphone and headphones/speakers can be connected to either the front or rear panel jacks in the LOCAL section. For each PC, a Premium High Speed HDMI Cable connects the PC's HDMI output to the HDMI In port in the corresponding PC section on the KVM. A USB 3.0 cable connects an available USB port on the PC to the USB port in the corresponding PC section on the KVM. Additionally, 3.5mm audio cables connect the PC's microphone input and audio output to the MICROPHONE and SPEAKERS jacks in the corresponding PC section on the KVM. After all connections are made, the AC power adapter is plugged in, and all PCs and connected audio devices are powered on. The KVM is then powered on using the front panel button, and the Connect and Select LEDs confirm proper operation. Users can then verify control of the selected PC via keyboard, mouse, and video display.
Maintenance of the device is straightforward. It should be cleaned using only a soft, dry cloth. For stubborn deposits, the cloth can be moistened with warm water. Chemical cleaners, solvents, or detergents should not be used. The device contains no user-serviceable parts, and users are advised not to attempt to open, service, or modify it.
Safety warnings and guidelines emphasize indoor use only, protection from water and moisture, avoiding contact with wet hands, and preventing exposure to excessive vibration, force, shock, temperature fluctuations, or direct sunlight. The device should not be placed near heat sources or in areas with excessive dust, humidity, oil, smoke, or combustible vapors. It must be used in a well-ventilated area. Prior to operation, the unit and power cord should be checked for physical damage. The power outlet must provide the correct type and level of power. The device should be unplugged when not in use, and care should be taken to prevent damage to the power cord, ensuring it does not present a tripping hazard. The unit should always be unplugged by grasping the connector head or adapter body, not the cord itself. If the remote control will be unused for a lengthy period, its batteries should be removed.
| Category | Switch |
|---|---|
| Resolution | 4K |
| HDMI Version | 2.0 |
| Output Ports | 1 |
| Compatibility | HDCP 2.2 |