+12V POWER REMOTE ETHERNET SD/HD/3GHD-SDI HDMI
IN OUT
REF INMON OUTOUT 2OUT 1LOOP OUTIN
INPUT
DISP
SET
REM
JOG
+12V POWER REMOTE ETHERNET SD/HD/3GHD-SDI HDMI
IN OUT
REF INMON OUTOUT 2OUT 1LOOP OUTIN
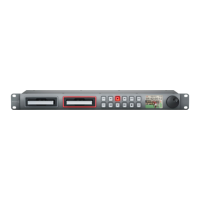
SSD Slots
1. SSD slot 1
2. SSD slot 2
Buttons and Controls
3. DISP
This button isn’t currently used but will
soon be enabled by a software update.
4. Previous Clip
Press once to go to the start of the
current clip or press twice to skip back
to the start of the previous clip.
5. Record
Recording commences the instant you
press the record button, even if you’re
playing back a clip, so you’ll never miss
a good take that’s happening. If the
button flashes red, the SSD is too slow
and is dropping frames. To switch from
one SSD to the other while recording,
press the record button for 1 second.
6. Next Clip
Press to skip to the next clip.
7. INPUT
While the stop button is illuminated,
press the INPUT button once to display
the incoming video on the LCD. If you
don’t see the video you want, press the
button again to switch between the
HDMI and SDI inputs.
8. REM
Push REM to enable RS-422 remote
control.
9. SET
This button isn’t currently used but will
soon be enabled by a software update.
10. Reverse
Press once to play in reverse at normal
speed. Press again to reverse at 2x, 4x
and 8x speeds.
11. Play
Press once to play through all clips or
press again to loop the current clip.
12. Fast Forward
Press once to play at 2x speed or press
again to play at 4x and 8x speeds.
13. Stop
Stop works in all modes.
14. JOG
Press once to use the jog wheel to scroll
through video or press again to set the
jog wheel to shuttle mode.
15. LCD
The color LCD displays video format,
timecode, audio meters, video preview,
transport controls and the active SSD.
16. Jog/Shuttle Wheel
Use with the JOG button to jog or
shuttle forwards and backwards.
Connectors
17. +12V POWER
You can use the universal power adapter
supplied with HyperDeck Studio or
power it off any DC power source, from
12V to 18V, allowing for portable battery
packs and on set use.
18. REMOTE
RS-422 remote control.
19. ETHERNET
This port isn’t currently used but will
soon be enabled by a software update.
20. SD/HD-SDI IN
You can connect your SD/HD-SDI video
sources, such as cameras, routers,
capture cards, switcher outputs or decks
to this input.
21. SD/HD-SDI LOOP OUT
This output is reclocked from the video
input and can be connected to other
devices such as a monitor or a second
HyperDeck for redundant recording.
22. SD/HD-SDI OUT 1
Connect this output to monitors,
routers, production switchers, decks
or other recording devices.
23. SD/HD-SDI OUT 2
Connect this output to monitors,
routers, production switchers, decks
or other recording devices.
24. SD/HD-SDI MON OUT
SD/HD-SDI output for monitoring.
25. REF IN
This input accepts blackburst and tri-
level sync signals from a sync generator.
26. HDMI IN
You can connect your HDMI video
sources to this input – such as a camera,
games console or the output of an
ATEM switcher.
27. HDMI OUT
Connect an HDMI display or TV to
this output to monitor your video while
recording or playing back clips. You can
also connect this output to the HDMI
input of capture cards, production
switchers and other recording devices.
28. USB
Use the USB port for software
configuration and updates.
Front View
Back View
Connections and Control
Learn more at www.blackmagic-design.com/products/hyperdeckstudio
HyperDeck Studio
INPUT
MENU
SET
REMOTE
JOG
17 18 19 20 21 22 23 24 25 26 27 28
10 11 12 13 14 15 169
4 5 6 7 8321
 Loading...