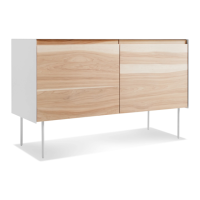
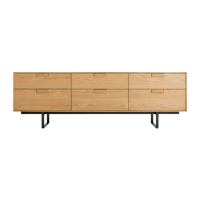
The Series 11 Console, designed in 2005 by Blu Dot Design & Manufacturing, Inc., is an elegant and refined piece of furniture characterized by its thin edges and thoughtful proportions. This console is designed to accommodate various electronic setups, whether for "HI-FI, LO-FI, WI-FI OR NO-FI" applications, making it a versatile addition to any living space. The manual provides comprehensive instructions for assembly, drawer removal and reinstallation, door adjustment, and securing the unit with an anti-tip bracket, ensuring both functionality and safety.
Technical Specifications and Parts:
The console's assembly requires a variety of parts and hardware, meticulously detailed in the manual. Key components include:
- Screws:
- Pt. 1217: 2 units
- Pt. 1218: 2 units (used for attaching the anti-tip bracket to the wall and case)
- Pt. 1053: 4 units (used for attaching the legs to the base)
- Pt. 1052: 10 units (used for attaching the base to the case)
- Washers:
- Pt. 3002: 14 units (4 for legs, 10 for base attachment)
- Allen Wrenches:
- Pt. 9001: 1 unit (for leg attachment)
- Pt. 9004: 1 unit (for base attachment)
- Mounting Hardware:
- Pt. 8041: 2 units (anti-tip bracket, one for wall, one for case)
- Pt. 8042: 1 unit (securing strap)
- Structural Components:
- Leg: 2 units
- Case*: 1 unit (geometry may vary depending on the product purchased)
- Base: 1 unit
Assembly and Usage Features:
The assembly process is broken down into eight clear steps:
- Step 01: Attach the Legs. The legs are attached to the base using four Pt. 1053 screws, four Pt. 3002 washers, and one Pt. 9001 Allen wrench. This step ensures the console has a stable foundation.
- Step 02: Attach the Base. The base is then attached to the case using ten Pt. 1052 screws, ten Pt. 3002 washers, and one Pt. 9004 Allen wrench. It is crucial to have a second person assist in lifting the case upright after the base is attached to prevent leg damage.
- Step 03: Removing the Drawer. The manual outlines two methods for drawer removal, depending on the unit's locking mechanism:
- Trigger Lock: Extend the drawer completely, then squeeze both triggers on the underside of the drawer while pulling it out.
- Tab Lock: Extend the drawer completely, pull on the plastic tabs underneath the drawer to release the lock, and then lift the drawer upwards to remove. This feature allows for easy access for maintenance or to adjust internal components.
- Step 04: Reinstalling the Drawer. Similar to removal, two methods are provided for reinstallation:
- Trigger Lock: Pull both sides of the slide forward, engage the rear slide catches, lower the drawer front into place, and push it closed.
- Tab Lock: Lower the drawer front to align with the pin, then push on the plastic tabs underneath the drawer to engage the drawer lock. This ensures smooth operation and secure closure of the drawers.
- Step 05: Door Adjustment. This step addresses hinge adjustments, which are critical for proper door alignment. Hinges work in pairs, meaning adjusting one often requires adjusting others. Three types of adjustments are possible using specific screws on the hinge:
- Screw #1: Adjusts the door from top to bottom.
- Screw #2: Adjusts the door from side to side.
- Screw #3: Adjusts the door from front to back. This feature allows for precise alignment of the console's doors, ensuring a clean and symmetrical appearance.
- Step 06: Attach Anti-Tip Bracket to the Wall. An essential safety feature, the anti-tip bracket (Pt. 8041) is installed into a wall stud 1 inch below the case top panel height using two Pt. 1218 screws. This step helps prevent the console from tipping over, especially important in households with children or pets.
- Step 07: Install Anti-Tip Bracket to Case. The second anti-tip bracket (Pt. 8041) is installed to the top panel of the case using two Pt. 1218 screws. To prevent damage, it is recommended to drill 3/32" pilot holes prior to installation. This secures the console to the wall bracket.
- Step 08: Secure the Case. The final step involves installing and tightening the securing strap (Pt. 8042) to connect the console to the wall bracket. This ensures the console is firmly anchored and safe for use.
Maintenance Features:
The manual includes "Additional Information" on cleaning the console:
- Cleaning: Use a slightly damp, soft cloth for general cleaning. For dirt and fingerprints, a quality cleaner specifically formulated for wood furniture should be used. After cleaning, wipe the surface completely dry with a soft cloth, moving in the direction of the wood grain. This helps maintain the console's aesthetic appeal and prolong its lifespan.
The Series 11 Console is designed to be a durable and adaptable piece of furniture, offering both aesthetic appeal and practical functionality for various home entertainment and storage needs. Its detailed assembly instructions and maintenance guidelines ensure a user-friendly experience and lasting quality.