Do you have a question about the BluDot Chicago 8 Box and is the answer not in the manual?
Detailed steps for correctly using the cam lock system for furniture assembly, including visual guides.
Connect side panels to the horizontal panel using provided hardware and aligning grooves.
Slide the back panel into the designated grooves of the assembled case.
Complete the assembly of the main case structure by repeating initial steps for remaining sections.
Assemble the vertical support posts using the specified hardware and repeating the process.
Insert the assembled posts into the base structure as illustrated.
Adjust the case to ensure it is level by turning the base elements as shown.
Connect additional case units to the vertical posts using the appropriate hardware.
Continue attaching case modules to the support posts, following the diagram.
Add further case sections to the structure, securing them to the posts.
Final attachment of case units to the support posts as per the assembly diagram.
Install the anti-tip bracket onto a wall stud, positioned below the top panel height.
Secure the anti-tip bracket to the top panel of the furniture case, recommending pilot holes.
Install and tighten the safety strap to secure the furniture to the wall before use.
Instructions for cleaning furniture with a damp cloth and wood cleaner, wiping dry with grain.
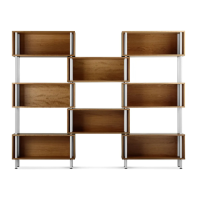
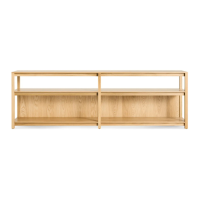
The Chicago 8 Box is a modular storage system designed in 1997 by Blu Dot. It is characterized by its use of negative space to create smart and elegant storage solutions. The system is designed for self-assembly, with detailed instructions provided for each step.
The Chicago 8 Box functions as a versatile storage unit, allowing users to create customized shelving configurations. Its modular design enables the assembly of multiple cases, which can then be attached to a framework of posts to form a larger, interconnected storage system. The "8 Box" likely refers to the capacity to create a system with eight individual storage compartments or "boxes" when fully assembled as depicted in the manual. The design emphasizes both aesthetic appeal and practical storage, making it suitable for various interior settings.
Components: The system comprises several key parts:
Assembly Hardware: Primarily uses cam lock systems (Pt. 8002, Pt. 5001, Pt. 5005, Pt. 5002) for case construction and various screws (Pt. 1001, Pt. 1217, Pt. 1218) for attaching posts and anti-tip brackets.
Safety Features: Includes an anti-tip bracket system (Pt. 8041, Pt. 1217, Pt. 1218) and securing straps (Pt. 8042) to prevent the unit from tipping over, ensuring stability and safety, especially in homes with children or pets.
The Chicago 8 Box offers a blend of modern design, practical functionality, and user-friendly assembly, with a strong emphasis on safety through its anti-tip features. Its modular nature allows for flexible adaptation to various storage needs and spaces.
| Brand | BluDot |
|---|---|
| Model | Chicago 8 Box |
| Category | Indoor Furnishing |
| Language | English |