17
Once the frame is fixed to the wall,
connect the supply cable, the water
pipe and insert the wastewater pipe in
the predisposed conduit.
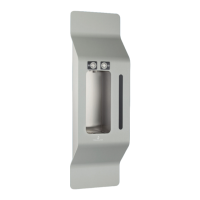
For the built-in version, prepare the
housing in the wall (dim. LxDxH:
225x110x491) and fix the unit in
place with nuts and washers using the
appropriate holes on the front or the
side (fig. 17.2).
Reconnect the contacts indicated
above and relocate the frontal cover
making it slide downwards on the rear
frame. Tighten the safe screw on the
supply zone.
3
5
4
4
height
935
226
495
FLOOR
200
200
237,1
F
3
23,5
21 455
SECTION F-F
SCALE 1 : 8
4
4
Sizes
range
housing
machine
1 - Create hole on plasterboard panel
2 - Prepare water supply (pipe ø8), drainage (pipe 17ø) and
electricity (230V 50Hz)
3 - Fix the machine on the plasterboard panel with 6 screws on
the front of machine
4 - If you can fix the machine laterally on the side upright or
plasterboard panel
5 - Fix the front panel with the safety screw in the bottle compartment
Fig. 17.2
Fig. 17.1
2