22
CTX5
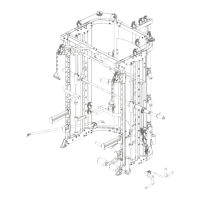
Step 3: Assembly of Guide Rods and Barbell Rod
1. Attach the lower bases (25) to the lower plates (19) with a total of four bolts (33), eight washers
(11) and four nuts (10).
2. Attach the upper bases (26) to the upper plates (13) with a total of four bolts (33), eight washers
(11) and four nuts (10).
L NOTICE
For the next steps, it is recommended to begin on one side and proceed further. The following
instructions begin on the right side.
3. Slide the following parts over the right guide rod (27) in the following order: one rubber pad
with groove (30), one safety hook left (32; the hook should be facing inwards/to the left), one
rubber pad (43), one sliding sleeve (29) and one lock sleeve (28).
4. Slide the following parts over the left guide rod (27) in the following order: one rubber pad with
groove (30), one safety hook right (31; the hook should be facing inwards/to the right), one
rubber pad (43), one sliding sleeve (29) and one lock sleeve (28).
5. While carefully holding the right guide rod with its components, insert the guide rod (27) into
the lower base (25) and upper base (26).
6. Secure the guide rod (27) to the lock sleeve (28) with one set screw (34).
7. First, slide the barbell rod (41) through the
right sided sliding sleeve (29) on the right
guide rod (27), then hang the barbell rod (41)
at any height in the upright tubes (16).
8. While carefully holding the left guide rod
and its components, rst slide the left sided
sliding sleeve (29) onto the left side of the
barbell rod (41), then insert the left guide rod
(27) into the lower base (25) and upper base
(26).
9. Secure the guide rod (27) to the lock sleeve
(28) with one set screw (34).
10. Slide one check ring (36) and one pipe (37)
onto each end of the barbell rod (41).
11. Attach one end cap (35) to each pipe (37)
with one bolt (38), one spring washer (39)
and one washer (40).
12. Slide one barbell collar (89) onto each pipe
(37).