Care And Maintenance
NOTE: When the heater is not in use, it should be stored in a dry location, away from possible damage. The
power cord should be stored properly to avoid contact with hot or sharp objects.
WARNING: Make sure the power is turned off before proceeding. Any electrical repairs or rewiring of this unit
should be carried out by a licensed electrician in accordance with national and local codes.
If repairing or replacing an electrical component or wiring, the original wire routing, color coding and securing
locations must be followed.
WARNING: Electrical outlet wiring must comply with local building codes and other applicable regulations to
reduce the risk of re, electrical shock and injury to persons.
WARNING: Do not use this replace if any part of it has been under water. Immediately call a qualied service
technician to inspect the replace and replace any part of the electrical system.
WARNING: Disconnect the power before attempting any maintenance or cleaning to reduce the risk of re,
electrical shock or personal injury.
WARNING: During any service of this appliance, the power to the unit must be turned off. First turn the main
power switch to the "OFF" position. Then remove the electrical plug from the wall outlet.
WARNING: Risk of re: do not exceed the recommended bulb wattage.
Troubleshooting
Problems
1. No power, logs do not
glow.
2. All function keys are
inactivated and ame
ashing.
3. All function keys are
inactivated and ame
lighted on but do not
glow.
4. Fan motor continues
to blow after unit is
powered off.
5. Power cord gets warm
to the touch.
1. The unit does not have
power.
2. The overheat protection
device has been
engaged.
3. The ambient temperature
sensor is broken or not
working correctly.
4. Normal operation.
5. Normal operation.
Possible Causes
1. Check that unit is plugged into a standard
120 volt outlet. Then make sure power is set
at "ON" position.
2. Unplug unit, wait 5-10 minutes, then the
sensor will reset itself. Plug the unit back
in and turn on the heater. If the problem
persists, call customer service.
3. Unplug unit, wait 5-10 minutes, then the
sensor will reset itself. Plug the unit back
in and turn on the heater. If the problem
persists, call customer service.
4. This is a standard feature; the blower runs
for an additional 20 seconds to ensure heat
will not be trapped inside the unit.
5. This is normal for a heater appliance as it
requires more current to operate. Check the
connections of the appliance cord and the
outlet. Make sure the plug fits tightly into
the outlet. During use, check the plug and
outlet frequently to determine if it is HOT;
if so, discontinue use of the appliance and
consult with a qualied electrician to check
or change the overheating outlet(s).
Solutions
8
CLEANING INFORMATION:
•Makesuretheunitisturnedoff,unpluggedandtheheatingelementsofheaterarecoolwheneveryouarecleaningthe
heater.
•Cleanthemetaltrimusingawater-dampened,soft,andcleancloth.DONOTusebrasspolishorhouseholdcleanersas
theseproductswilldamagethemetaltrim.
•Themotorsusedonthefanandtheflamegenerator assemblyarepre-lubricated forextendedbearing lifeand
requirenofurtherlubrication.However,periodiccleaning/vacuuming ofthefan/heaterandairintake/outputventsis
recommended.
•Anyotherservicingshouldbeperformedbyanauthorizedservicerepresentative.
•Allowatleast10minutesbetweenturningofftheunitandremovingthelightbulbtoavoidaccidentalburningoftheskin.
GLASS INFORMATION:
•Undernocircumstancesshouldthisproductbeoperatedwithbrokenglass.
•Donotstrikeorslamtheglass.
•Donotuseabrasivecleanerstocleantheglass.
•Thisproductusestemperedglass.Replacementoftheglasssuppliedbythemanufacturershouldbedonebyaqualied
servicepersonnel.
CHANGING THE LIGHT BULB
•Thereeffectiscreatedwiththeuseofa40-WattB-10candelabralightbulbwithanE-12(small)socketbase.Thelight
bulbwillhavetobereplacedfromtimetotimewhentheyburnout.
•Duringnormaloperation,thestoveheaterwillalwaysgiveasimulatedamefunction.Iftheintensityofamesuddenly
increases,itmeansthatthelightbulbisgoingtoburnout.Replacethelightbulbimmediately,accordingtotheinstructions.
Donotoperatethestoveheaterwhenthelightbulbburnsoutorwithoutthelightbulb.
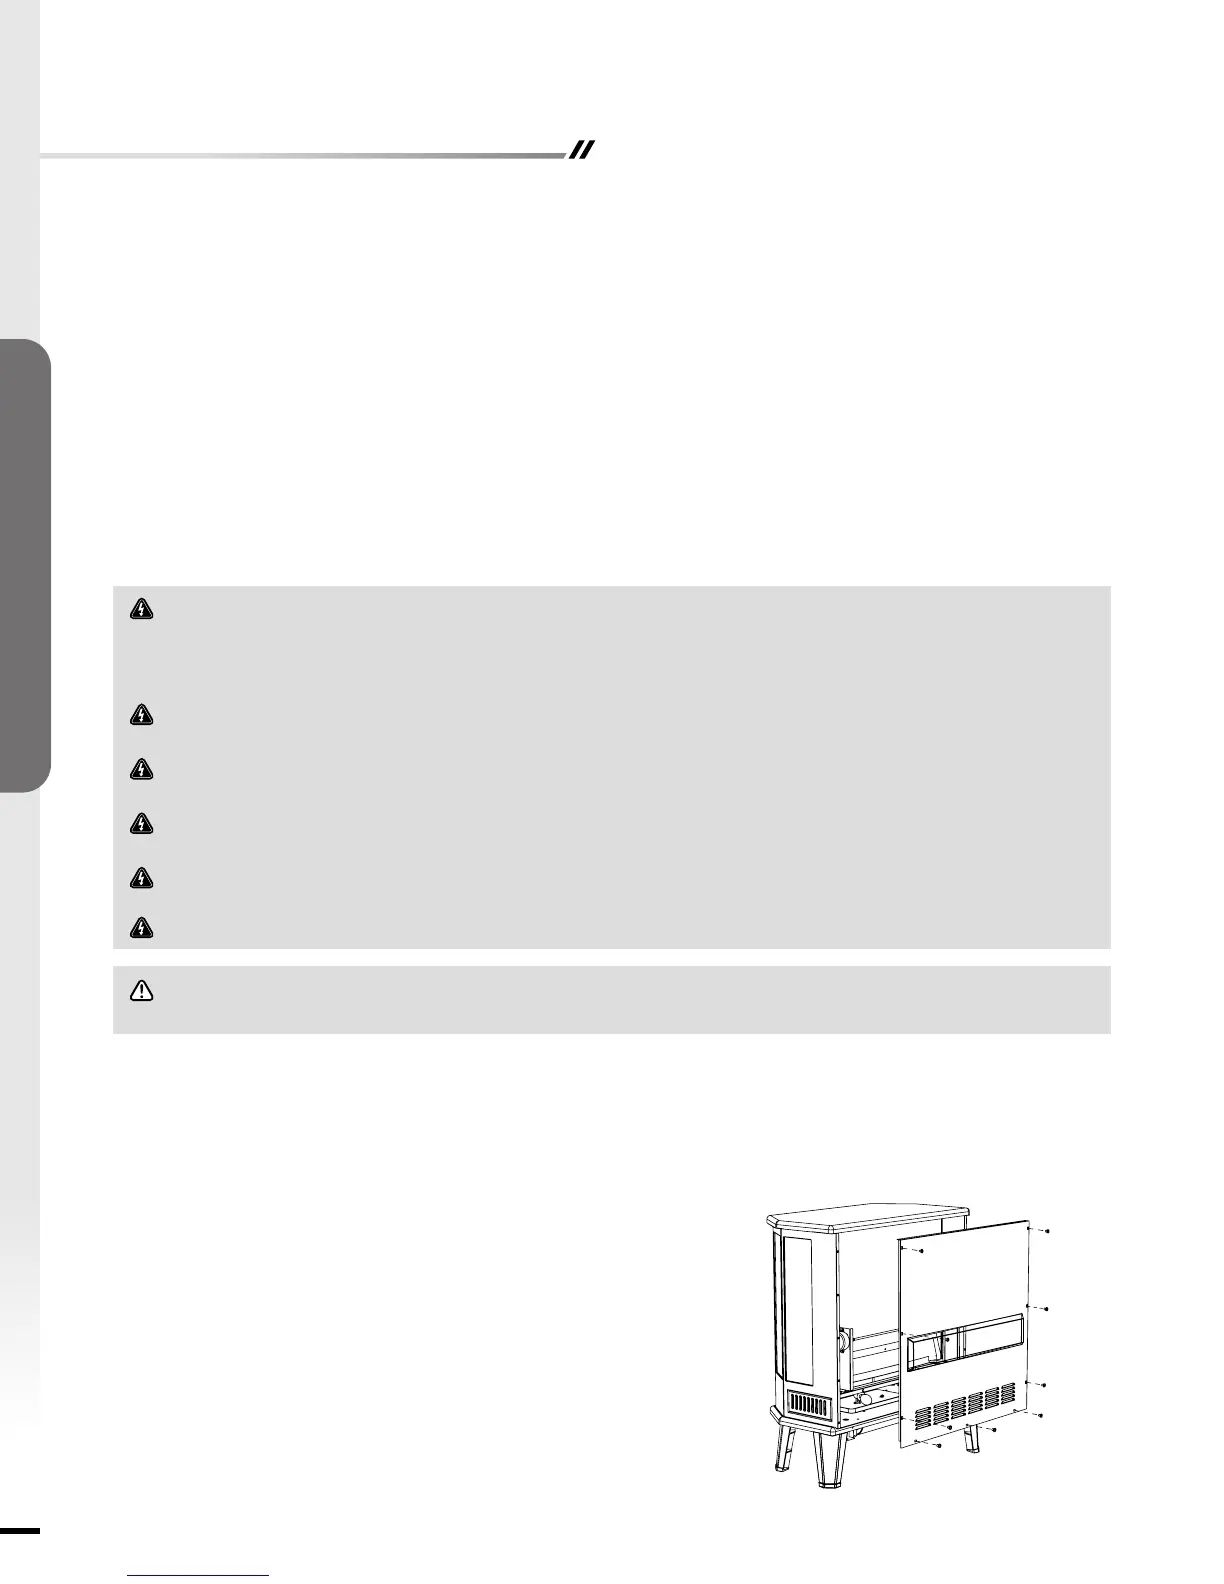
STEP 1: Turnthemainpowerswitchoff,andthenunplugthepowercord
fromthewalloutlet.
STEP 2: Loosenthescrewsholdingthestovebackpaneltothemainbody
ofstove.
STEP 3:Youwillnda40-WattB-10candelabralightbulbwithE-12socket
baseatthebottom.
STEP 4:Replacetheburned outlightbulbusinganew40-WattB-10
candelabralightbulb.
STEP 5:Reinstallthebackcover.
STEP 6:Plugintheunit.
ASSEMBLY & OPERATIONS
 Loading...