Do you have a question about the Boraam RASMUS DINING CHAIR and is the answer not in the manual?
Provides essential pre-assembly guidance and customer support contact details for the table.
Lists all components and hardware required for table assembly.
Details the initial step-by-step process for assembling the dining table.
Ensures all bolts are securely tightened before using the assembled table.
Provides essential pre-assembly guidance and customer support contact details for the chair.
Lists all components and hardware required for chair assembly.
Details the initial step-by-step process for assembling the dining chair.
Ensures all bolts are securely tightened before using the assembled chair.
Lists all components and hardware required for bench assembly.
Details the step-by-step process for assembling the dining bench.
Ensures all bolts are securely tightened before using the assembled bench.
This manual describes the assembly and use of the Boraam Rasmus Extension Dining Table, Rasmus Dining Chair, and Rasmus Dining Bench. These pieces are designed to provide a cohesive and functional dining set, offering flexibility in seating and table size.
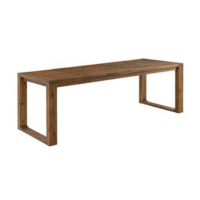
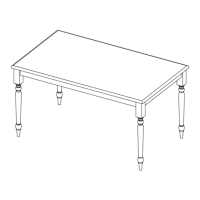
The Rasmus Extension Dining Table is a versatile piece of furniture designed to adapt to various dining needs. Its primary function is to serve as a dining surface, but its key feature is the extension mechanism, which allows the table to expand in length. This is particularly useful for accommodating a larger number of guests when needed, and then retracting to a more compact size for everyday use or smaller gatherings.
The assembly process for the table begins with attaching the table legs to the main table frame. This involves using bolts (C) and washers (A and B) and tightening them with the provided Allen wrench (D). The manual emphasizes the importance of not fully tightening the bolts until all components are in place, allowing for minor adjustments and ensuring proper alignment. Once the legs are securely attached, the table can be flipped upright.
The extension mechanism is a central feature of the Rasmus dining table. To extend the table, the two main halves of the tabletop are pulled apart, revealing a hidden leaf stored within the table's frame. This leaf is then lifted and unfolded, or simply pulled out, depending on the specific design, to fill the gap created by separating the table halves. The manual illustrates a mechanism where the leaf is stored underneath and pivots up into place. Once the leaf is in position, the two main table halves are pushed back together, securing the extension leaf and creating a larger dining surface. The manual shows a locking mechanism (2X) that secures the table in both its compact and extended configurations, preventing accidental separation or collapse.
Regular maintenance involves checking all bolts to ensure they are securely tightened. This is crucial for the stability and safety of the table, especially given its extension feature, which involves moving parts. The manual explicitly states, "BE SURE TO CHECK ALL BOLTS SECURELY TIGHTENED PRIOR USING THIS TABLE." This suggests that periodic checks are necessary to maintain the table's structural integrity over time. Cleaning instructions are not provided in the manual, but general care for wooden furniture would apply, such as wiping with a damp cloth and avoiding harsh chemicals.
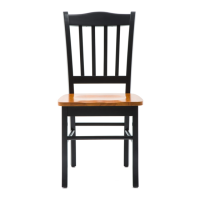
The Rasmus Dining Chair is designed to complement the dining table, providing comfortable seating. The chair's design appears to be contemporary, with a curved backrest and sturdy legs.
The assembly of the dining chair involves attaching the backrest and seat frame to the chair legs. The manual breaks down the assembly into several steps, each focusing on a specific set of connections.
As with the table, the manual emphasizes the importance of checking all bolts for secure tightening before using the chair. "BE SURE TO CHECK ALL BOLTS SECURELY TIGHTENED PRIOR USING THIS CHAIR." This indicates that regular inspections and tightening of fasteners are essential for the chair's stability and longevity.
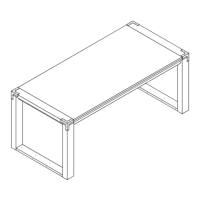
The Rasmus Dining Bench offers an alternative seating option, ideal for maximizing space or creating a more casual dining atmosphere. Its design appears to be a long, backless or low-backed bench, matching the aesthetic of the table and chairs.
The assembly of the dining bench follows a similar pattern to the chair, focusing on connecting the main components.
The manual concludes with a maintenance instruction for the bench: "BE SURE TO CHECK ALL BOLTS SECURELY TIGHTENED PRIOR USING THIS BENCH." This consistent advice across all pieces of the dining set highlights the importance of regular fastener checks for safety and structural integrity.
In summary, the Boraam Rasmus dining set is designed for practical home use, offering an extendable table for flexible dining arrangements and complementary seating options. The assembly instructions prioritize clarity through visual aids and emphasize careful, progressive tightening of fasteners, with a strong focus on ongoing maintenance to ensure the safety and durability of the furniture. The inclusion of comprehensive customer support information further enhances the user experience by providing readily available assistance.
| Product Name | Boraam Rasmus Dining Chair |
|---|---|
| Category | Indoor Furnishing |
| Chair Type | Dining Chair |
| Style | Contemporary |
| Seat Height | 18 inches |
| Weight Capacity | 250 lbs |
| Assembly Required | Yes |
| Material | Wood |