k
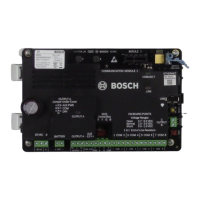
Location Item Description Specication
A MODULE 1
Plug-in comm
module
Communication module options
B ETHERNET Ethernet port built-in on-board Ethernet connection (10Base-T/100Base-T)
C USB USB port USB connector (for rmware updates and RPS connection)
D Heartbeat LED Slow=normal, rapid=service mode
E Reset Reset switch Hold ve seconds to enter or exit service mode
F B C Outputs B(2) C(3) Open collector, 50mA, active low
G TMPR Tamper Optional tamper switch connector (ICP-EZTS)
H
1 COM 2 to
7 COM 8
Alarm inputs End Of Line (EOL) resistor supervised alarm inputs
I R Y G B SDI2 bus SDI2 device bus
J COM AUX Aux power 12 VDC, 800mA
K NO C NC Output A(1) Programmable relay output
L
+ BAT –
18 VAC,
Battery, Earth
ground, 18 VAC
Primary/Secondary power and Earth Ground connections
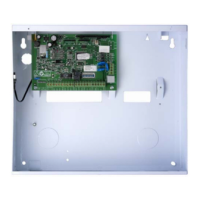
M Mounting Mounting holes Mounting holes for control panel
Control panel connection location
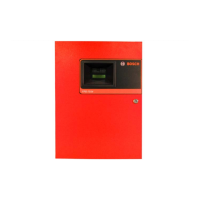
B Series Control Panel
Installer Quick Start Guide
Use this guide to quickly install a Bosch B6512/B5512/B4512/B3512 security system. Additional information is found in the Control Panels Installation Manual.
For additional training:
Bosch YouTube channel:
When you see this icon, use your smart phone with
a QR code reader app to view helpful videos.
Control panel component layout
7 COM 8
RPMT
8 MOC 72 MOC 13 COM 45 COM 6
TESER
COM AUX R Y G B
PWR A B COM
C B
TUPTUO
C
A
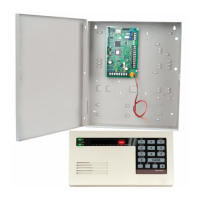
Step 1
Mounting the control panel
▶ Mount the enclosure prior to mounting the control panel.
▶ Mount control panel into enclosure with hardware provided.
Bosch tips:
B10
B11
7 COM 8
RPMT
8 MOC 72 MOC 13 COM 45 COM 6
TESER
COM AUX R Y G B
PWR A B COM
C B
TUPTUO
C
A
7 COM 8
RPMT
8 MOC 72 MOC 13 COM 45 COM 6
TESER
COM AUX R Y G B
PWR A B COM
C B
TUPTUO
C
A
+
NOTE: Not all
modules are available
in all regions.
B Series Installer's Site:
M
A
B
C
D
E
F
G
HIJKL
Step 2
Installing a communication module
▶ Insert leg of module into slot marked “x.”
▶ Cellular: Place antenna on top of enclosure and run cable inside,
then connect to module.
▶ PSTN: Connect module to a D166 (RJ31x) jack using a D161/D162
cable.
Bosch tips:
AM
Step 3
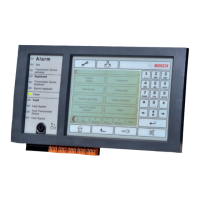
Installing a keypad
▶ When installing a compatible Bosch keypad, refer to keypad
installation guide for specic wiring diagrams. Basic keypad wiring
is shown below.
▶ When installing more than one keypad, refer to keypad
installation guide for unique address settings.
Bosch tips:
I
Step 4
Installing expansion modules
▶ If installing more than one device that is similar, refer to the
module’s installation guide for address settings (for example,
two of the same device).
▶ If installing a RADION B810 wireless receiver, use address 1 only.
Bosch tips:
I
Step 7
Powering the control panel
▶ Connect wires to control panel before applying battery or AC
power.
▶ Connect earth ground to a cold water pipe (copper) or other
solid connection to ground.
Bosch tips:
L
Step 5
Installing wired inputs
▶ If using a dual EOL, 2K EOL, or no EOL, refer to control panel
installation guide for control panel settings.
▶ If using 2-wired powered devices, use a B201 or D125B.
Bosch tips:
H
Step 6
Installing a bell or siren
▶ Output A can supply up to 1 A at 12 VDC when sourced from a
control panel (jumper in AUX PWR position).
▶ Output A can support up to 3 amps at 12 VDC when using a
separate power supply (jumper in DRY position).
▶ Output B and C are open collectors and are limited to 50 mA at
12 VDC.
Bosch tips:
KJ
Step 9
Connecting the control panel using RPS
Bosch tips:
CB
Installation
sequence:
Scan and follow these
videos in sequential order
to the steps listed below.
▶ Connect a computer with RPS installed. Direct RPS connections
can be done through a USB connection or Ethernet connection.
▶ The Account Assistant automatically launches when you create a
new account.
▶ For USB direct connection, use a B99 USB cable.
Step 8
Create panel accounts using RPS
▶ If conguring using the Installer Services Portal, go to Step 11.
▶ Install Remote Programming Software (RPS) v6.06 or later. You can
download RPS from the RPS product page.
▶ Follow the RPS Account Assistant instructions to create new control
panel accounts. The Account Assistant helps you create a new panel
account.
▶ If RPS is not available, keypad programming is an option. Refer to
keypad installation instructions.
Bosch tips:
(North America only)
1. Scan QR code.
2. Scroll down.
3. Locate and select your region
for additional videos.
7 COM 8
RPMT
8 MOC 72 MOC 13 COM 45 COM 6
TESER
COM AUX R Y G B
PWR A B COM
+ BAT -18VAC
C B
TUPTUO
NO C NC
OUTPUT A