If the power cord is damaged, it must be replaced by
a Bosch Service Centre.
Products sold in
GB
only: Your machine is fitted with
an approved 13 A (BS 1363/A) electric plug and is
protected by a 13 A fuse (ASTA Approved to
BS 1362).
If the fitted plug is not suitable for your socket out-
lets, it should be cut off and an appropriate plug fitted
in its place by an authorized customer sercive agent.
The severed plug must be disposed of to avoid a
possible shock hazard and should never be inserted
into a 13 A socket elsewhere.
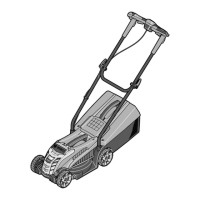
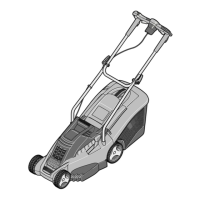
➊
Insert the handle bottom
8
into the holes provided
and
➋
Secure with the screws.
➌
Attach the handle top
3
with the bolts and wing
nuts
13
to the handle bottom
8
.
Note: The handle top
3
is height adjustable. Fix han-
dles in desired position
I
or
II
.
Note: Ensure that the cable clips supplied are used
to fix the cable to the handle.
Attach cable to cable restraint
5
ensuring that
sufficient cable slack is available. (non GB models)
Snap together both top and bottom half of the grass-
box.
Ensure the cables are not trapped when folding/un-
folding top handles.
Do not drop the handles.
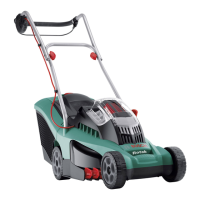
Fitting
Lift the deflector guard
7
and hold up, fit the grass-
box
6
.
Removing/Emptying
Lift the deflector guard
7
and hold up. Remove
grassbox
6
.
For non grass collection the mower can be used
without the grassbox
6
in position, with the deflector
guard
7
in the down position.
Stop, release switch lever and wait until
the motor stops before adjusting height.
The blades continue to rotate for a few
seconds after the machine is switched off,
a rotating blade can cause injury.
For the first cut of the season, a high cutting adjust-
ment should be selected.
Your machine has three settings that result to the fol-
lowing cutting heights.
I = 20 II = 40 III = 60
Remove the grassbox to aid adjustment (see Grass-
box).
Lift the mower,
TIP: The front wheel has a height of cut indicator
12
which shows the postion of the wheels. Move this
wheel first, then repeat for each wheel
10
.
➊
Pull/push the wheel to the front of the mower us-
ing the hand positioned on the wheels.
➋
Raise/lower the wheel.
➌
Allow wheel to locate in desired position.
Make sure that all wheels are set to the same height.
The blade continues to rotate for a few
seconds after the machine is switched off.
Allow the motor/blade to stop rotating be-
fore switching “on” again.
Do not rapidly switch off and on.
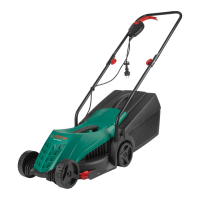
Starting:
➊
Press and hold the safety button
2
.
➋
Squeeze the switch lever
1
towards the
handle.
Release the safety button
2
.
Stopping:
Release the switch lever
1
.
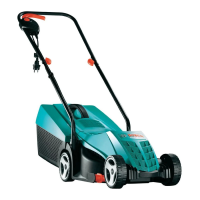
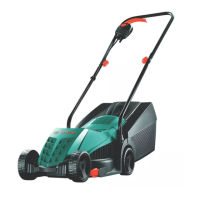
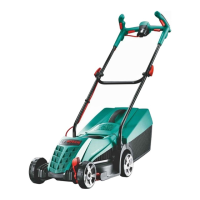
Assembly
Grassbox
A
B
D
Adjusting the Cutting Height
Starting and Stopping
C
E
 Loading...