2
block-type installation, program all
entry panels first.
If there is an IPD/300LR porter
switchboard and IOD/303LR
a
ccessories, they will be program-
med automatically on exiting pro-
gramming.
1 - PROGRAMMING
R
ECEIVERS
1.1 - Enter receiver programming
mode (yellow LED flashes).
1.2 - Lift the handset of the receiver to
be programmed.
1.3 - Press the two receiver buttons
and at the same time for at least
1 s;
the unit communicates with the system
3
00 entry panel or porter (default set-
ting entry panel n. 1).
1.4 - Make the relevant call from the
entry panel or IPD/300LR, if fitted;
the receiver sounds to confirm the pro-
g
ramming.
1.5 - Repeat the operations in points
1.2, 1.3 and 1.4 for all the receivers.
1.6 - Exit programming mode.
NOTA. You can change the default
entry panel used to program the
users by selecting any of the system
300 entry panels or the IPD/300LR
switchboard, if there is one (see
chapter 5-ALTERING DEFAULT
USER PROGRAMMING DEVICE).
I
f you decide to program receivers
from X2 blocks, follow the instruc-
tions provided with the X2 entry
panel.
2 - PROGRAMMING
SYSTEM 300 ENTR
Y PANELS,
MASTER X2
BLOCK ENTRY PANELS
Besides determining the entry panel
scanning order, programming lets you
set the type of system 300 entry panel
(with or without a surveillance camera),
duration of the solenoid door lock
command (the latter is only for system
300 pushbutton panels), and the num-
ber of X2 blocks in the system.
Proceed as follows:
2.1 -
Enter
entry panel pr
ogramming
mode
(yellow LED on).
System 300 entry panels
(ICP/LR or HAC/300LR) (fig. 3)
The line engaged indicator light (if pre
-
sent) lights up on pushbutton panels,
whilst the SETUP MODE message is
displayed on digital entr
y panels.
2.2 -
Pr
ogramming
entry panel and
door lock r
elease time.
•
Pr
ogramming entry panel with sur-
veillance camera and door lock r
elease
time 1 s.
- Pr
ess call button n.1.
W
ait for audible confirmation: two
notes.
• Programming entry panel with no
surveillance camera and door lock
release time 1s.
- Press call button n.1.
Wait for audible confirmation: two
notes.
- Press call button n.1 again.
Wait for audible confirmation: one
note.
NOTE. If you wish to alter the door
lock r
elease operating time fr
om 1 s
to 4 s, 8 s or 16 s, carry out the above
operations in point 2.2 or 2.3 using
call buttons n. 2, 3 and 4 respectively.
2.3 - Repeat the procedure in 2.2 for
the remaining entry panels (in the order
in which the entry panels are to be
scanned).
Once the procedure is finished, the
e
ngaged indicator light goes off or the
SETUP MODE message disappears to
indicate that programming is complete.
Master X2 block entry panels
(
HEV/301, HEC/301, AZV/304, etc.)
(fig. 3)
WARNING. X2 block entry panels
can only be programmed with ver-
sion 3.0 units or later versions.
2.4 - To set each Master X2 block
e
ntry panel, two procedures are
necessary, given below.
A - Identification of block entry
panel.
B - Setting of number of user calls
i
n the block.
A - Identification
of block entry panel
1 -Remove and replace jumper
SW2 (receiver programming mode)
on the first
Master entry panel
only (the one connected to the
XA/300LR power supplier
, fig. 3)
belonging to the first X2 block and
await confirmation;
confirmed by double audible signal
and the solenoid door lock release
command being activated.
B - Definition of number
of user calls in the block
This programming is performed,
again from the Master entry panel,
proceeding as follows:
1 -
Set number of buttons used on
audio/video panel (0, 1, 2, 3 or 4):
- press the last button used on the
audio/video panel (fig.4); if there isn’t
one, press the first button on the addi-
tional panel (fig.4).
2 - Set total number of user calls in the
block:
- press the last call button used.
2.5 -
Repeat the pr
ocedure in point
2.4 for the following first
Master
entry panels belonging to the other
blocks.
Programming of other Slave entry
panels belonging to the same block
(fig. 3) must be performed afterwards
(see “Programming X2 Slave entry
panels”
section).
2.6 - Exit programming mode.
Sample settings of number
of user calls
EXAMPLE 1 -
X2 block featuring
T
argha audio-only entry panel with 3
calls, with no additional pushbutton
panels (fig. 5).
3
1 2
3
4 5 6
98
7
0
C
TSP
HPV/1+
HAV/200+
HIA/300+
ICP/LR+
...HEP/306+
...HTS
HPV/1+
HAV/200+
HIA/300+
HAC/300LR+
2HTS
XA/300LR
Master
Slave
Slave
Slave
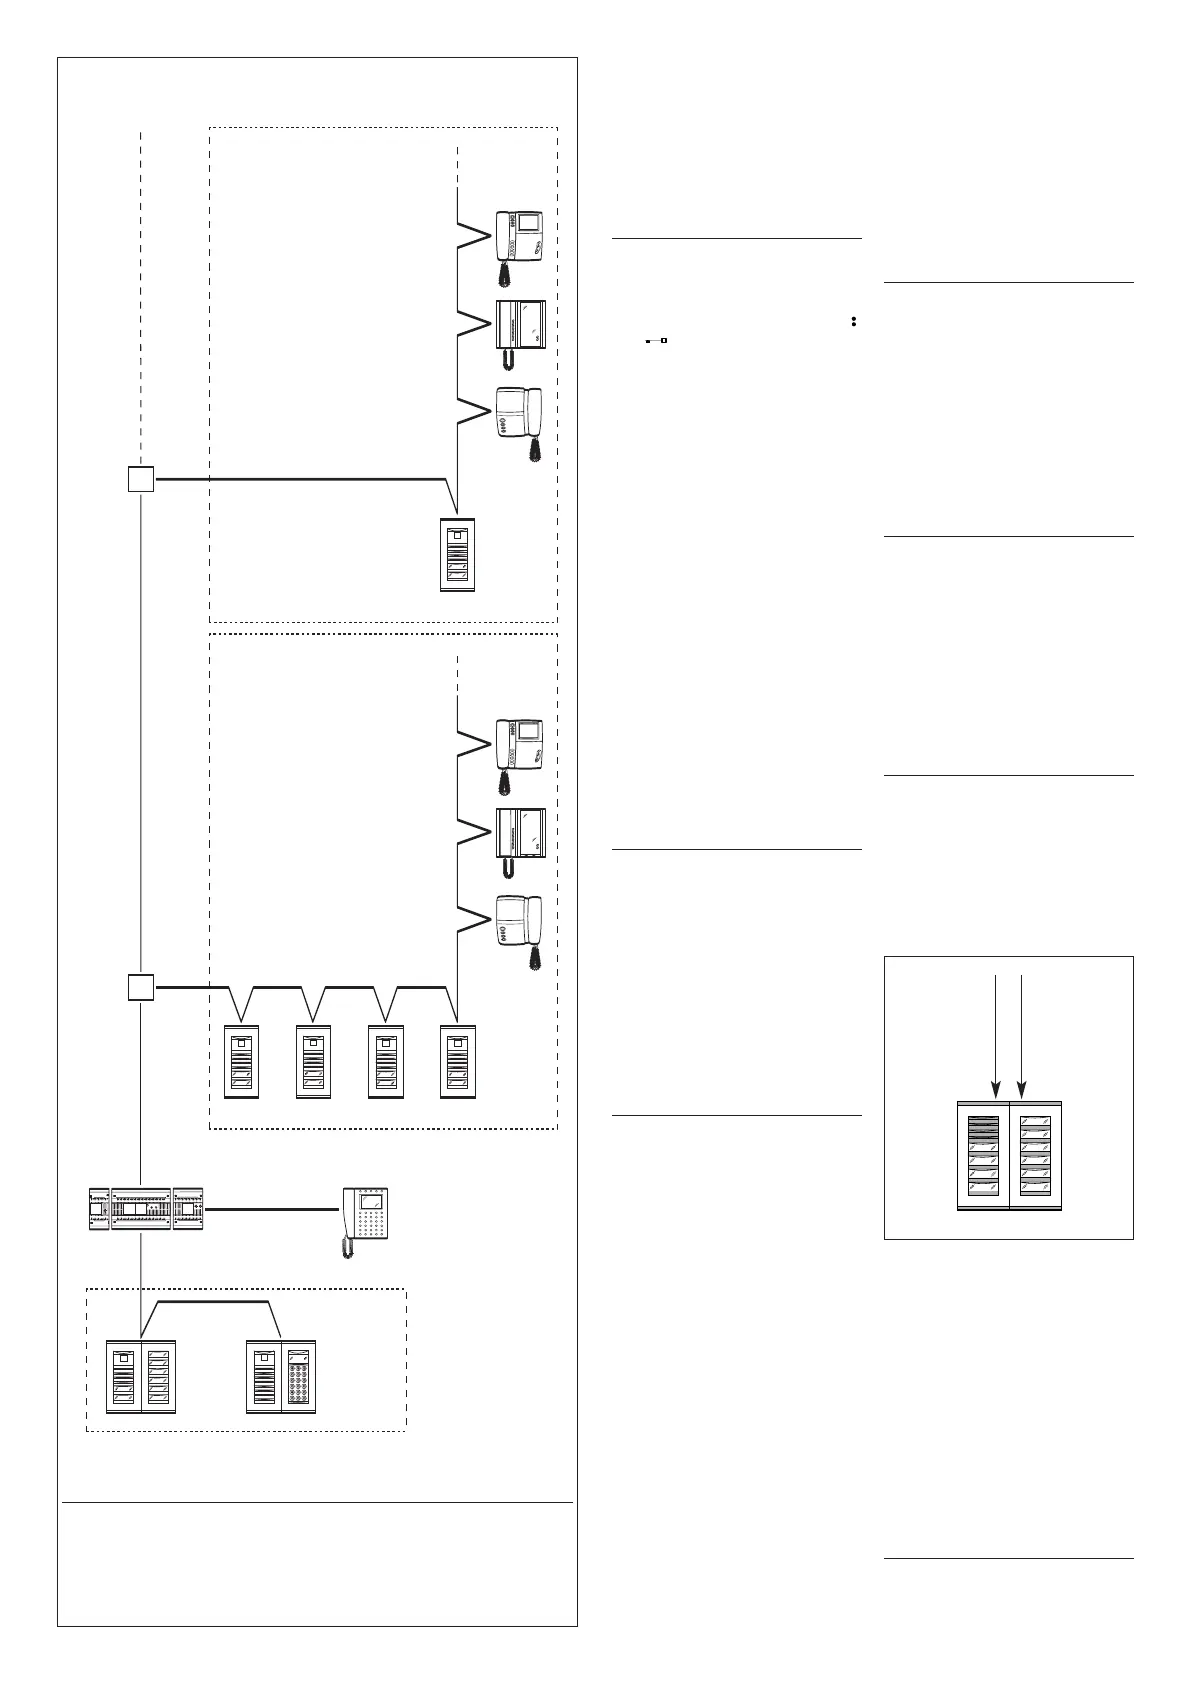
ICB/300
IPD/300LR
XAV/300
Master
Master and Slave entry panels:
HEV/301, HEC/301, HET/301, AZV/304, AZ/304.
X
2 Block - 2
X2 Block X2 - 1
Porter
switchboard
300 entry panels
R
ESIDENTIAL INSTALLATION WITH X2 BLOCKS
X2 block
e
ntry
p
anels
X2 block
entry
panels
Audio/video panel
(max 4 buttons)
HEV/301
HET/301
HEC/301
AZV/304
AZ/304
Additional
panel
HEP/306
HEP/312D
VZS/308C
or digital
HAC/300LR
4
 Loading...