EasyManua.ls Logo

BrakeBuddy Vantage User Manual

Default Icon
6 pages
To Next Page IconTo Next Page
Page #1 background imageLoading...
Page #1 background image
INSTALLATION MANUAL
311-0288-053 Rev. A 11/05
FIG. 2
FIG. 1
© 2004 Hopkins Manufacturing Corporation Printed in U.S.A
Move seat back.
antage
antage
Phone (800) 470-2287
w
ww.brakebuddy.com
antage
antage
Congratulations on the purchase of your new BrakeBuddy! The
BrakeBuddy was designed and built as an auxiliary braking
system to operate in conjunction with the existing braking
system in your towed vehicle.
Use of the BrakeBuddy in a manner inconsistent with these
instructions may result in damage to your vehicle, serious injury
or death. You must read and understand these instructions
prior to the use of this product.
If you have any questions after reading these instructions, please
call BrakeBuddy customer service at 1-800-470-2287.
1. Remove the BrakeBuddy and components from the shipping
carton. The complete system consists of:
Main BrakeBuddy Unit
Breakaway System
Clevis Assembly
Remote Alert System
2. Install the breakaway system by following the step-by-step
instructions included with the breakaway kit.
3. Attach the lock nut and clevis assembly to the air cylinder (Fig.1).
4. Adjust the driver’s seat to the far back position (Fig. 2). Place the
BrakeBuddy on the floorboard between the seat and the brake
pedal. Slide the BrakeBuddy back against the seat for maximum
working room.
5. With the notched end of the clevis facing up, attach the clevis to
the top of the towed vehicle’s brake pedal (Fig. 3). Angle the
brake pedal clevis so the upper portion of the clevis grabs the top
of the towed vehicle’s brake pedal. Pull down on the air cylinder
rod (or lower portion of the clevis) to extend the clevis under the
bottom of the towed vehicle’s brake pedal. Pull back on the red
locking tab (A) until secure (tab should not go all the way down).
6. Move the BrakeBuddy forward until the air cylinder rod is fully
retracted (Fig. 4). Make sure the brake pedal is not being
pressed.
7. Adjust the driver’s seat forward until it touches the handle on the
back on the BrakeBuddy (Fig. 5).
8. Adjust the BrakeBuddy handle (Fig. 6). Loosen the adjustment
knob on the back center portion of the BrakeBuddy and adjust the
height of the handle so it contacts the seat at the lowest position
possible without sliding under the seat. (NOTE: the lower on the
seat, the firmer the support).
T
ighten the adjustment knob to
secure handle.
FIG. 3
A
Move BrakeBuddy forward.
Move seat forward.
FIG. 4 FIG. 5
FIG. 6
Adjust handle
up or down to fit
seat at lowest
point.
Question and Answer IconNeed help?

Do you have a question about the BrakeBuddy Vantage and is the answer not in the manual?

BrakeBuddy Vantage Specifications

General IconGeneral
Vehicle CompatibilityMost towed vehicles
Weight10 lbs
Power Source12V DC
InstallationPortable, no permanent installation required
ActivationAutomatically activates with towing vehicle's brakes
Braking ForceProportional to tow vehicle braking
Safety FeaturesBreakaway system, automatic shut-off
Breakaway SystemIncluded

Summary

Installation Manual

Physical Installation Steps

Steps for physically connecting the BrakeBuddy unit to the towed vehicle's brake pedal.

Powering and Initial Setup

Connecting power, performing the auto-start cycle, and final seat adjustments.

Operation Instructions

Adjusting Air Pressure and Sensitivity Settings

How to set air pressure for vehicle weight and adjust sensitivity for brake activation.

Understanding Indicator Lights

Explanation of diagnostic indicators on the main unit and their meanings.

Removal Instructions

Steps for Removing the BrakeBuddy

Procedure for safely disconnecting and removing the BrakeBuddy from the towed vehicle.

Troubleshooting

Power & Compressor Issues

Solutions for problems related to the air compressor not starting or functioning.

Brake Application & Sensitivity

Guidance for issues with brake application strength, responsiveness, and brake lights.

System Setup & Wiring Issues

Troubleshooting problems with breakaway system connection and immediate brake activation.

Limited Three-Year Warranty

Warranty Coverage and Duration

Details on what the warranty covers and for how long.

Service and Repair Process

Instructions on how to obtain warranty service and repairs.

Exclusions and Limitations

Information regarding what is not covered by the product warranty.

State Law Variations

Notes on how state laws may affect warranty rights.
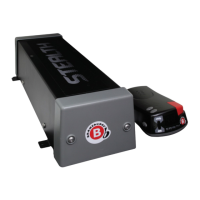
Related product manuals