The BRAYER BR4955 is a fan designed for artificial ventilation of rooms. It comes with a remote control for convenient operation.
Technical Specifications
- Power supply: 220-240 V, ~ 50Hz
- Rated input power: 60 W
- Remote control: 3 V (CR2025 battery included)
- Unit operating life: 3 years
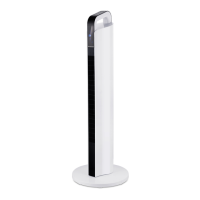
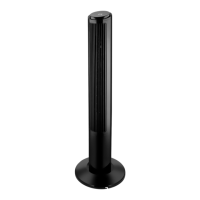
Description of Components
The fan consists of the following main parts:
- Base: The foundational support for the fan.
- Body: The main housing of the fan.
- Outgoing Airflow Grill: Where the air exits the fan.
- Indication panel/display: Shows current settings and status.
- Control panel: Buttons for manual operation.
- Carrying Handle: For easy transportation of the fan.
- Air-Inlet Grill: Where air enters the fan.
The control panel (5) features several sensory buttons:
8. On/Off button: To power the fan on or off.
9. Airflow speed selection button: To adjust the fan's speed.
10. Fan body oscillation On/Off button: To activate or deactivate the oscillation function.
11. Timer On/Off button: To set the fan's operating time.
12. Airflow type selection button: To choose different airflow modes.
13. Decorative and operation mode indicators On/Off button: To control the illumination of indicators.
The indication panel (4) includes:
14. Display: Shows numerical information, such as timer settings.
15. Decorative light indicators: General decorative lights.
16. Low air flow speed indicator: Lights up when low speed is selected.
17. Medium air flow speed indicator: Lights up when medium speed is selected.
18. Maximal air flow speed indicator: Lights up when maximal speed is selected.
19. «Breeze» air flow type indicator: Lights up when the "Breeze" mode is active.
20. «Normal» air flow type indicator: Lights up when the "Normal" mode is active.
21. «Night» mode indicator: Lights up when the "Night" mode is active.
The remote control (28) mirrors most of the control panel functions:
22. On/Off button: To power the fan on or off remotely.
23. Airflow type selection button: To choose different airflow modes remotely.
24. Airflow speed selection button: To adjust the fan's speed remotely.
25. Oscillation Mode On/Off button: To activate or deactivate oscillation remotely.
26. Timer On/Off button: To set the fan's operating time remotely.
27. Decorative and operation mode indicators On/Off button: To control the illumination of indicators remotely.
28. Remote Control: The handheld device for remote operation.
29. Battery Holder: Compartment for the remote control battery.
Safety Measures and Operation Recommendations
Before using the fan, carefully read the operation manual and keep it for future reference.
- Use the unit only for its intended purpose as stated in the manual.
- Mishandling can lead to breakage, harm to the user, or property damage not covered by warranty.
- ATTENTION! The remote control uses a lithium battery. Keep batteries away from children. If a child swallows a battery, seek immediate medical attention.
- Ensure the unit's operating voltage matches your home mains voltage.
- Place the fan vertically on a flat, dry, moisture- and heat-resistant surface. Do not place it horizontally or turn it over.
- Avoid placing the fan on soft surfaces like high-pile carpets, sofas, or beds.
- Do not place the fan near curtains or direct it towards houseplants.
- Do not use the fan in confined spaces (e.g., built-in cabinets, wall niches).
- Avoid prolonged exposure to the fan's airflow, especially for children and the elderly.
- Do not use the power cord as a carrying handle or wind it around the fan body.
- Ensure the power cord does not contact hot surfaces or sharp furniture edges.
- Protect the unit from impacts, falls, vibrations, and other mechanical stress.
- Do not block the air inlet grill with foreign objects or cover the unit during operation.
- Do not use the unit where flammable liquids or aerosols are present or stored.
- Keep the unit away from heating appliances, heat sources, or open flames.
- Do not use the unit outdoors, in bathrooms, or in high-humidity areas.
- Avoid using the unit near kitchen sinks, swimming pools, or other water-filled containers.
- If the unit falls into water, unplug it immediately before retrieving it. Contact an authorized service center for inspection or repair.
- Do not touch the unit body, power cord, or plug with wet hands.
- Avoid using the unit during lightning storms.
- Do not block the fan grids or insert foreign objects into them.
- Never leave the unit connected to the mains unattended.
- Unplug the unit after use or before cleaning.
- Switch the fan off and unplug the power cord from the mains socket.
- When unplugging, hold the plug, not the cord, to prevent damage.
- Do not immerse the unit in water or other liquids.
- If water drips on the fan body, switch it off, unplug it, and wipe it dry with a soft cloth.
- For child safety, do not leave polyethylene bags or packaging film unattended.
- The unit is not intended for use by children.
- Do not allow children to play with the unit as a toy.
- Do not allow children to touch the operating surface, the unit body, the power cord, or the power plug during operation.
- Be especially careful if children or disabled persons are near the operating unit.
- During operation and breaks, unplug the unit if left unattended.
- The device is not intended for use by persons (including children) with physical, sensory, psychological, or mental disabilities, or lacking experience or knowledge, unless supervised or instructed by a responsible person.
- Regularly check the power cord integrity.
- If the power cord is damaged, it must be replaced by the manufacturer, a maintenance service, or similarly qualified personnel to avoid danger.
- Do not repair the unit yourself. If the unit is disassembled or dropped, unplug it and apply to the service center.
- To avoid damages, transport the unit in its original packaging.
- Keep the unit in a dry, cool place out of reach of children and disabled persons.
THE UNIT IS INTENDED FOR HOUSEHOLD USE ONLY. DO NOT USE THE UNIT FOR COMMERCIAL OR LABORATORY PURPOSES.
Before the First Use
After transportation or storage at negative temperatures, unpack the unit and wait at least 3 hours before using it.
- Unpack the unit and remove all packaging materials.
- Keep the original package.
- Read the safety measures and operating recommendations.
- Check the delivery set.
- Examine the unit for damages; if damaged, do not plug it into the mains.
- Ensure the power supply voltage matches your mains specifications.
- Wipe the fan body with a slightly damp cloth and then wipe it dry.
Assembling the Fan
The fan is delivered with a disassembled base (1). Do not switch the fan on without the base (1).
- Use a crosshead or flat-tip screwdriver (not supplied) to assemble the base (1).
- Position the fan body (2) horizontally.
- Assemble the Base (1) by joining the two halves (Fig. 1) and securing them with 4 screws.
- Attach the Base (1) to the lower part of the body (2) using the 4 screws (Fig. 2).
- Place the fan vertically on the base (1).
Remote Control (28)
ATTENTION! A lithium battery is used in the remote control. To avoid danger, do not allow children to play with the battery. If your child has swallowed a battery, immediately see a doctor.
Battery installation/replacing (Pic. 3):
- Press the clamp and remove the battery holder (29) from the remote control (28) body.
- Insert a CR2025 battery (supplied with the unit) into the holder, strictly following the polarity.
- Install the battery holder (29) into the remote control (28).
Notes:
- If there is an isolation insert in the battery holder (29), remove it.
- Replace the battery in time.
- Do not recharge the lithium battery.
- Remove the battery if you are not planning to use the unit for a long time.
- Dispose of the used battery from the remote control (28).
- When using the remote control, direct it to the front part of the fan body (2).
- The distance between the remote control and the fan should not exceed 5 m, and the coverage angle should be up to 30 degrees.
- Avoid exposing the receiver to direct sunlight, otherwise false activation of control commands is possible.
Using the Fan
- Use the handle (6) to carry the fan.
- Place the fan base (1) on a flat, dry, and steady surface.
- Do not place the fan on soft surfaces, such as carpets with high pile, sofas, or beds.
- Insert the Power Cable (7) plug into the mains.
Switching the fan on/off and selecting the airflow speed:
Notes:
- The buttons on the control panel (5) are sensory; simply touch them to activate the desired mode.
- Each press of a button on the control panel (5) or remote control (28) is accompanied by a sound signal.
- To switch the fan on, press the button (8) on the control panel (5) or the button (22) on the remote control (28). You will hear a sound signal, and the fan will switch on at a medium airflow speed. The decorative indicators (15) and the medium airflow speed indicator (17) will light up on the indication panel (4).
- Pressing the button (9) on the control panel (5) or the button (24) on the remote control (28) allows you to select the airflow speed. The indicators (16, 17, 18) will appear on the indication panel (4):
- Indicator (16): Low airflow speed.
- Indicator (17): Medium airflow speed.
- Indicator (18): Maximal airflow speed.
- To switch the fan off, press the button (8) on the control panel (5) or the button (22) on the remote control (28). The fan will switch off, and then you can unplug the unit.
Switching the fan body oscillation on/off:
- To turn the oscillation mode on, press the button (10) on the Control Panel (5) or the button (25) on the Remote Control (28). To turn off the oscillation mode, press the button (10) on the Control Panel (5) or the button (25) on the Remote Control (28) again.
Fan operation time timer:
- To set the operating time of the fan, press the button (11) on the Control Panel (5) or the button (26) on the Remote Control (28). You will hear a sound signal, and the Timer operation time will appear on the Display (14) as «1H».
- Press the buttons (11 or 26) repeatedly to set the timer operation time. The timer can be set from 1 hour to 8 hours with 1-hour increments.
- To switch the timer off, repeatedly press the button (11 or 26) until the timer operation symbols on the display (14) go out.
Air flow type selection button:
- By pressing the button (12) on the control panel (5) or the button (23) on the remote control (28), you can select the type of airflow. The type of airflow is displayed on the display panel (4) by the indicators (19, 20, 21):
- Indicator (19) «Breeze»: The airflow speed is chaotically changing, from soft breeze to strong gust of wind.
- Indicator (20) «Normal airflow»: The airflow speed can be changed by pressing the buttons (9 or 24).
- Indicator (21) «Night» mode: The airflow speed increases and decreases gradually.
Decorative and operation mode indicators on/off button:
- To switch off the illumination of the decorative indicators (15) and indicators of operating modes (16, 17, 18, 19, 20, 21), press the button (13) on the control panel (5) or the button (27) on the remote control (28). The illumination of the decorative indicators (15) and the operation mode indicators (16, 17, 18, 19, 20, 21) will go out. To switch on the illumination of the operation mode indicators and the decorative indicators, press the button (13) on the control panel (5) or the button (27) on the remote control (28); the illumination of the decorative indicators (15) and the operation mode indicators (16, 17, 18, 19, 20, 21) will switch on.
- To turn off the fan, press the button (8) on the Control Panel (5) or the button (22) on the Remote Control (28) and remove the Power Cable plug from the mains.
Cleaning and Maintenance
- Before cleaning the fan, switch it off and unplug it.
- Wipe the fan body with a slightly damp cloth and then wipe it dry.
- Do not use liquid detergents, abrasive cleaners, or any solvents to clean the fan (2).
- To avoid the risk of electric shock, ensure no water or other liquid gets into the fan body.
- You can use a vacuum cleaner with an appropriate attachment to clean the Air-Inlet Grill (7) and the Outgoing Airflow Grill (3).
Storage
- After cleaning, store the fan in a dry, cool place away from children and disabled persons.
- Before using the fan next time, it is recommended to check the unit's operability and the integrity of the power cord insulation and the power cord plug.
Delivery Set
- Fan – 1 pc.
- Base – 1 pc.
- Base rack – 1 pc.
- Remote control – 1 pc.
- CR2025 battery – 1 pc.
- Instruction manual – 1 pc.
Recycling
To prevent possible damage to the environment or harm to human health from uncontrolled waste disposal, after the service life expiration of the unit or the batteries (if included), do not discard them with usual household waste. Deliver the unit and batteries to specialized centers for further recycling. The waste generated during the disposal of the unit is subject to mandatory collection and consequent disposal in the prescribed manner. For further information about recycling this product, contact your local municipal administration, a disposal service, or the shop where you purchased this product.
The manufacturer reserves the right to change the appearance, design, and specifications without affecting the general operation principles of the unit, without prior notice.
The manufacturing date is specified in the serial number. In case of any malfunctions, promptly apply to the authorized service center.